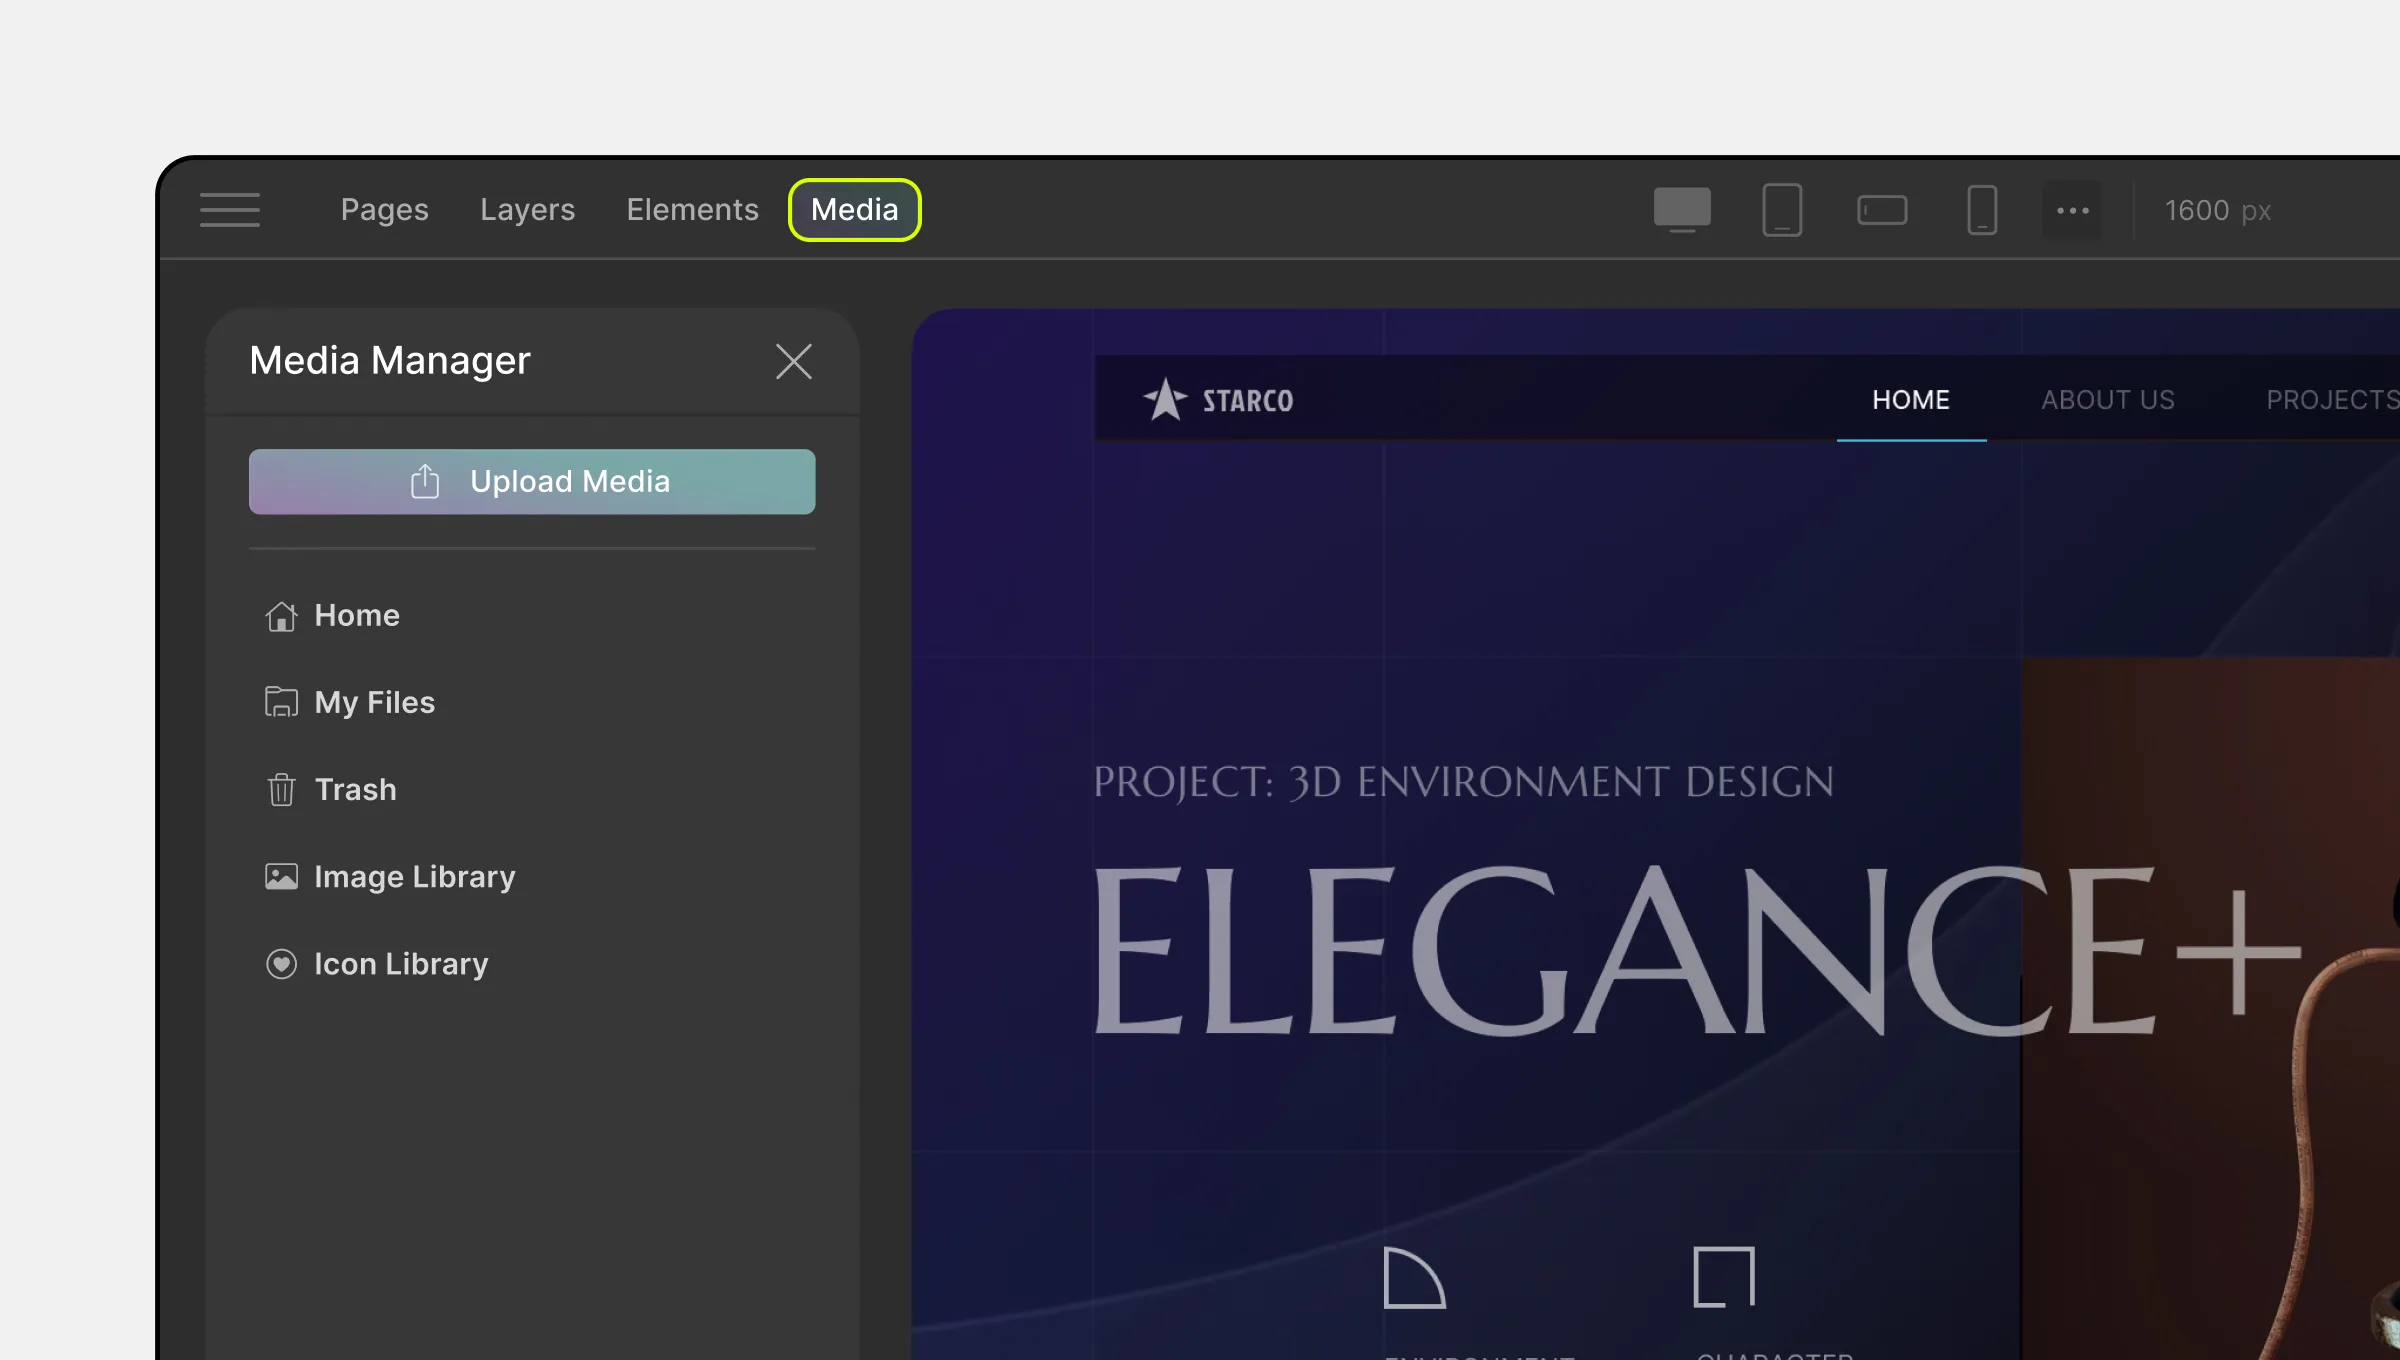
The Media Manager allows you to seamlessly upload, manage, and enhance your media files. You can also access open-source media libraries like Unsplash and Pexels from here.
Upload Media
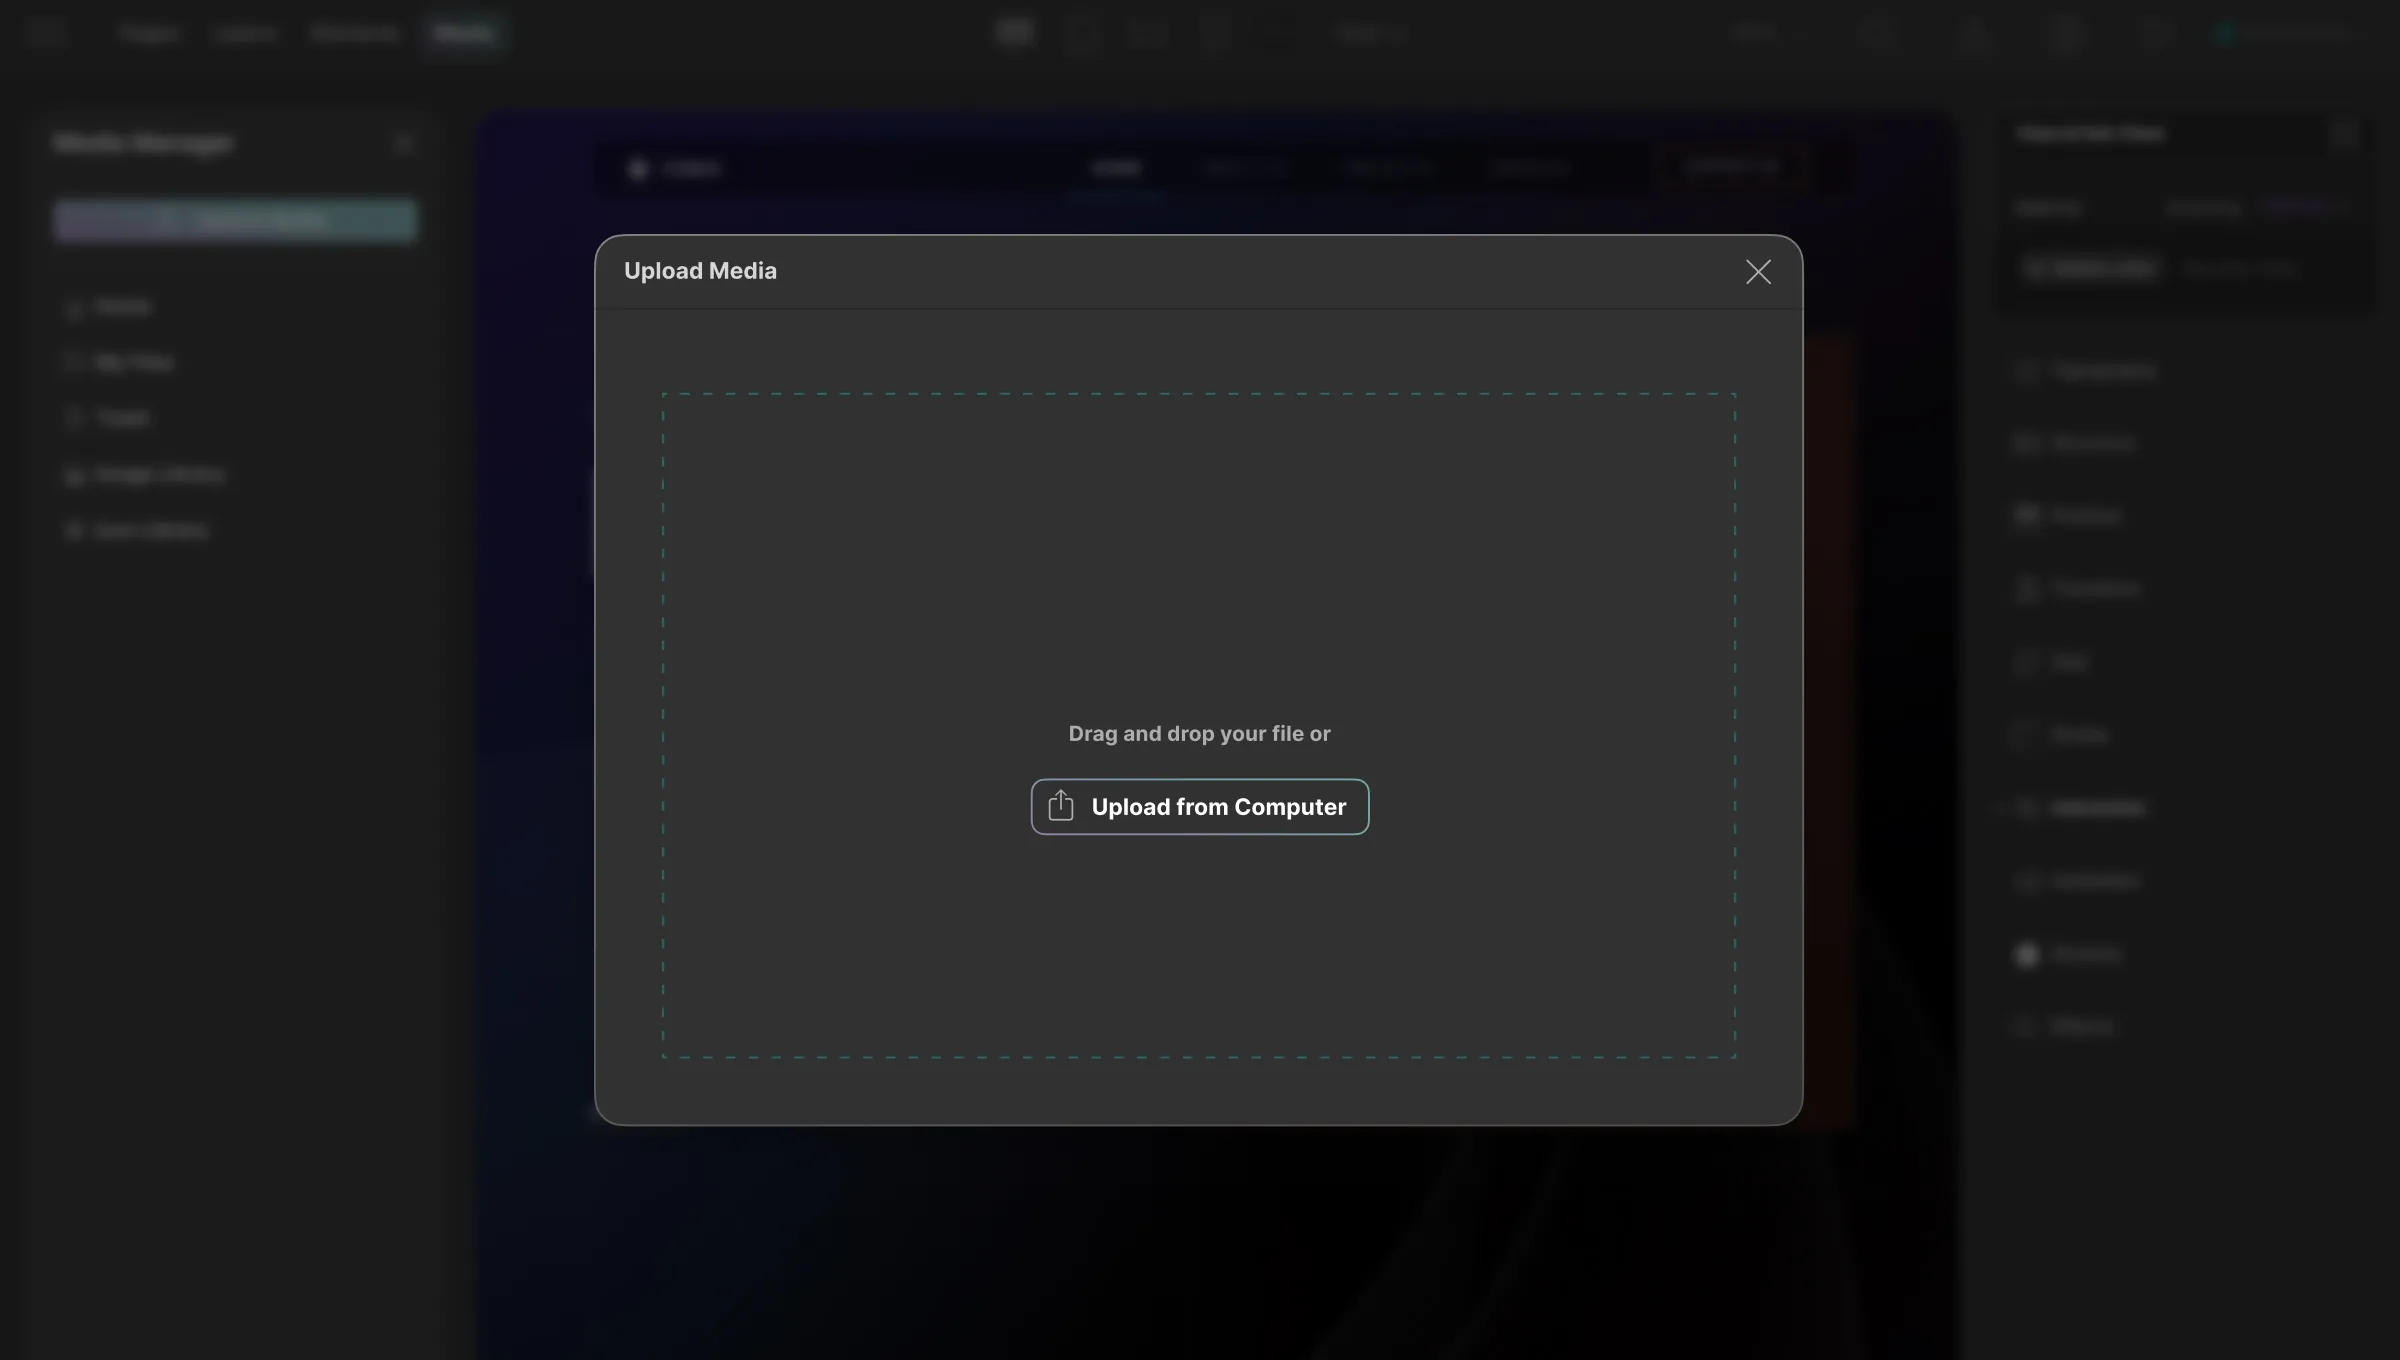
First up is the Upload Media Button. Upon clicking, the Upload Media Window will appear, offering two straightforward methods to upload your media:
- Drag and Drop: Simply drag your desired media files into the designated area.
- Upload From Computer: Click the button to open your computer’s file manager and choose the media you wish to upload.
The following media types are supported for uploading:
- Image
- Video
- Audio
- SVG
- Lottie
Home

In the Home section, you can access your entire media library. Utilize the Search field at the top to efficiently locate your desired files.
Select an image from this section to reveal customization options in a side panel to the right. Further details on these options are provided below.
Image Crop & Edit
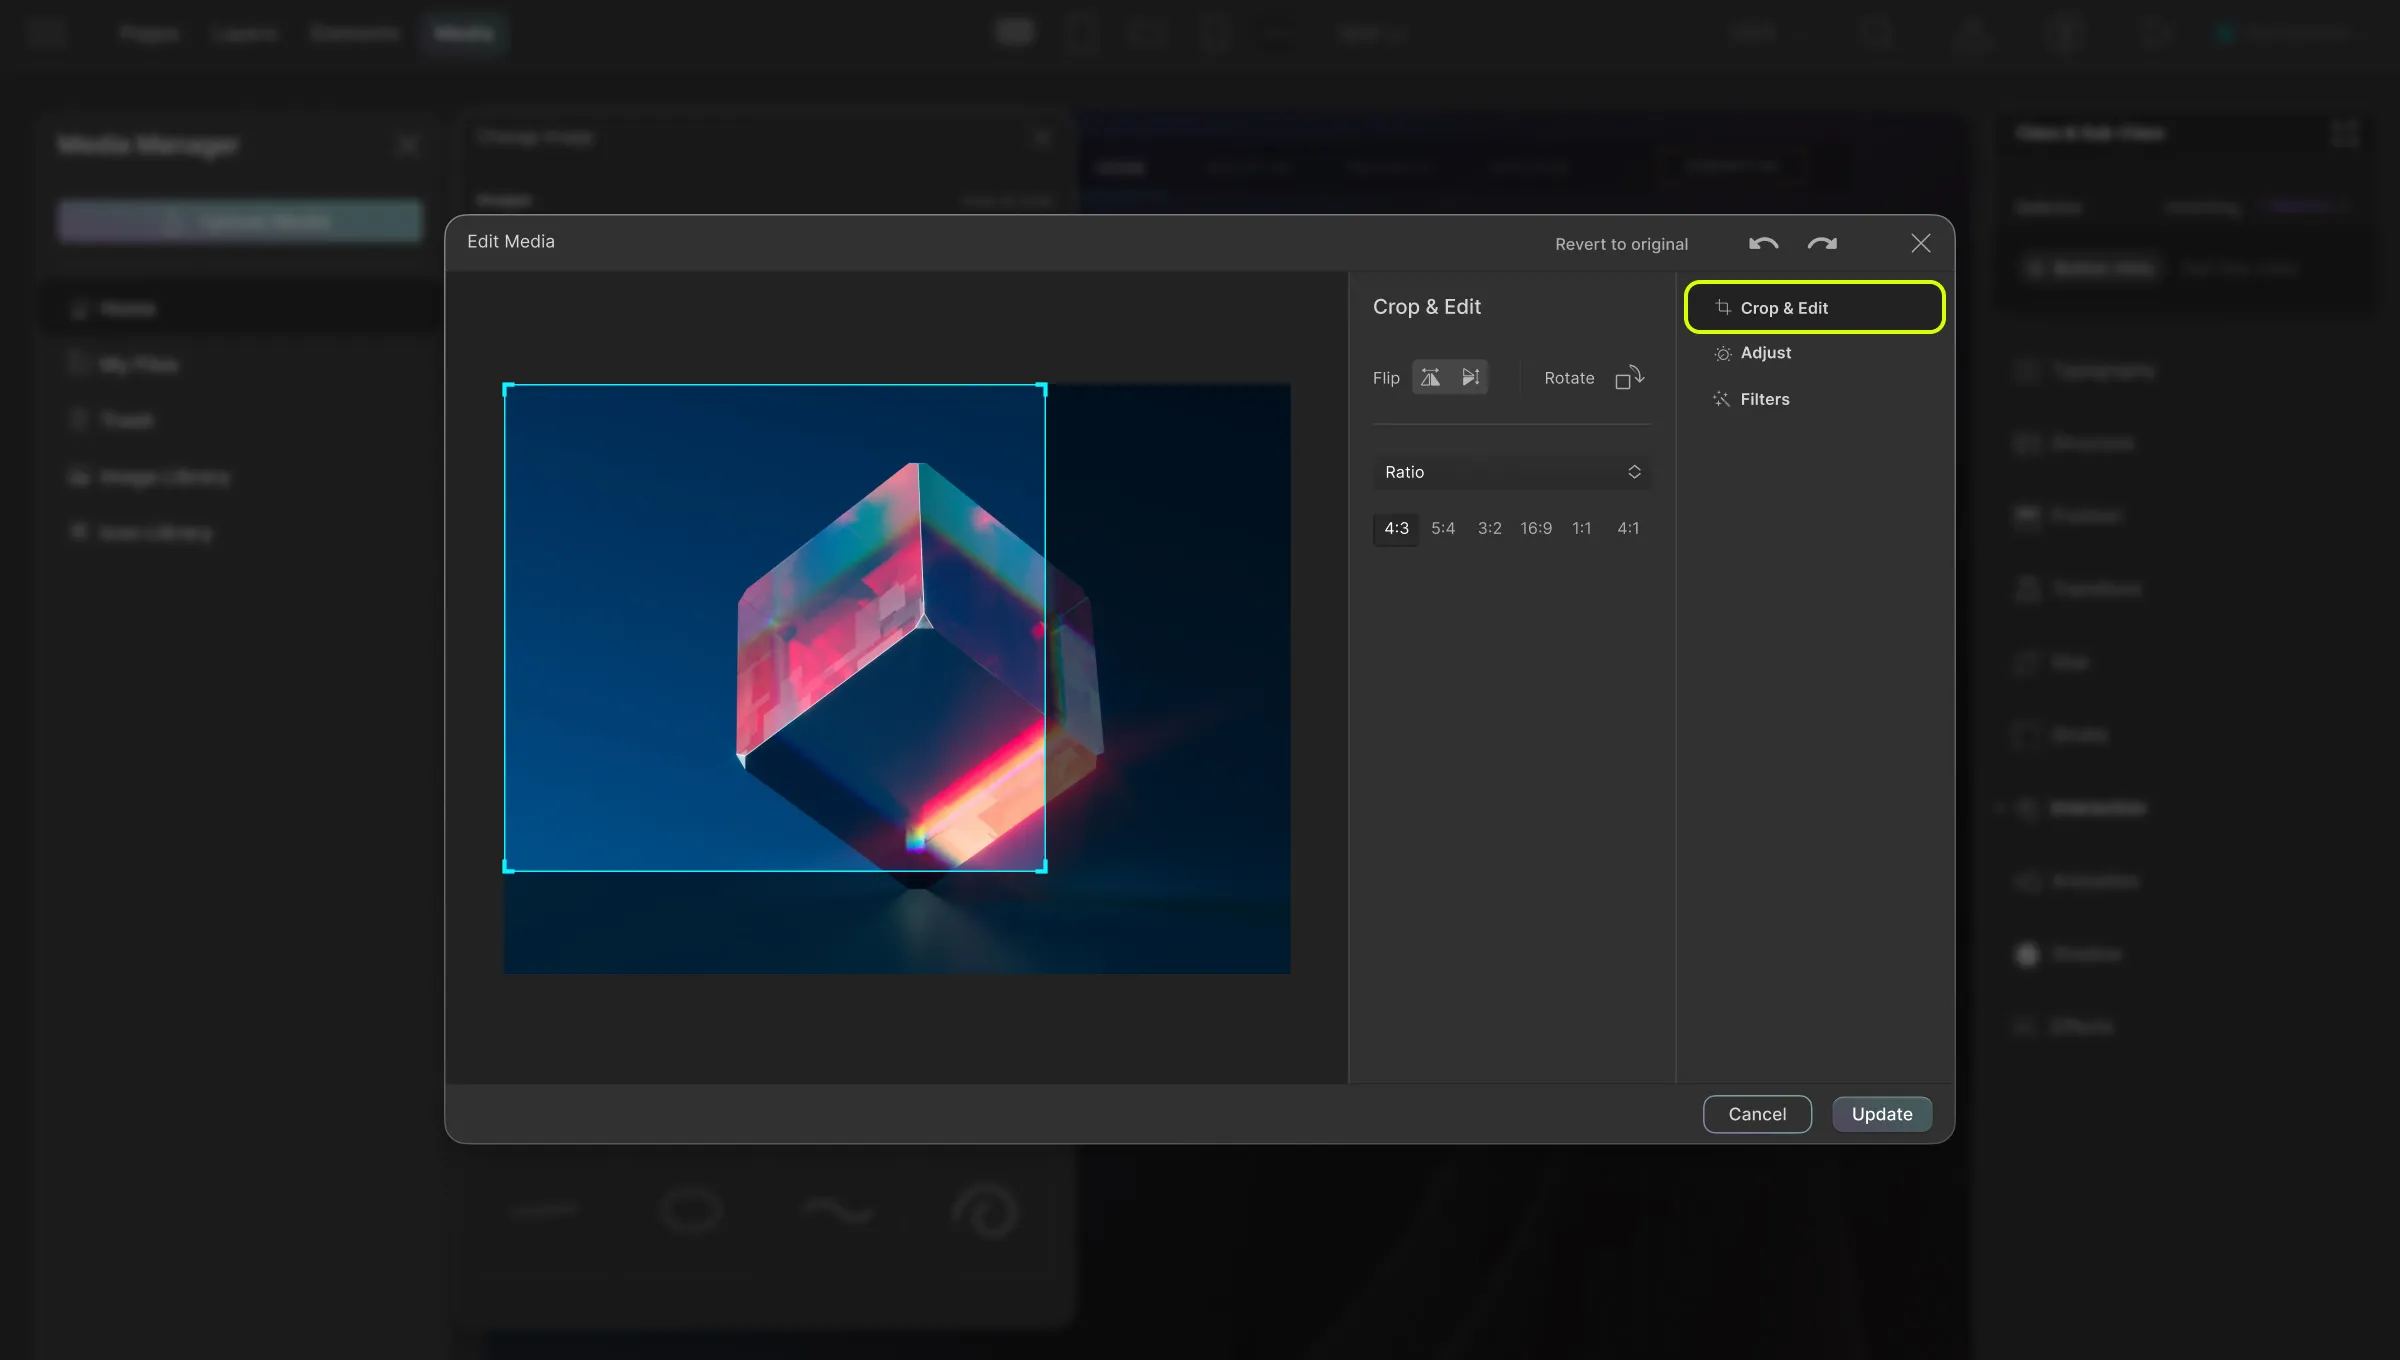
The Image Crop & Edit option opens the Edit Media window, which facilitates cropping and editing of images.
- Crop: Adjust the blue frame’s corners to define the desired cropping area.
- Flip: Horizontally or vertically flip the image.
- Rotate: Rotate the image by 90 degrees anti-clockwise with each click.
- Aspect Ratio Type: Modify the aspect ratio:
- Original: Maintain the initial aspect ratio.
- Freeform: Crop freely without restrictions.
- Square: Achieve a 1:1 aspect ratio.
- Ratio: Select ratios such as 4:3, 5:4, 3:2, 16:9, 1:1, and 4:1.
- Revert to Original: Restore the image to its original state.
- Undo/Redo: Reverse or redo actions.
- Adjust & Filter: Access the Adjust and Filter sections from the side panel on the right.
- Add: Save changes and insert the edited image into the canvas.
Adjust
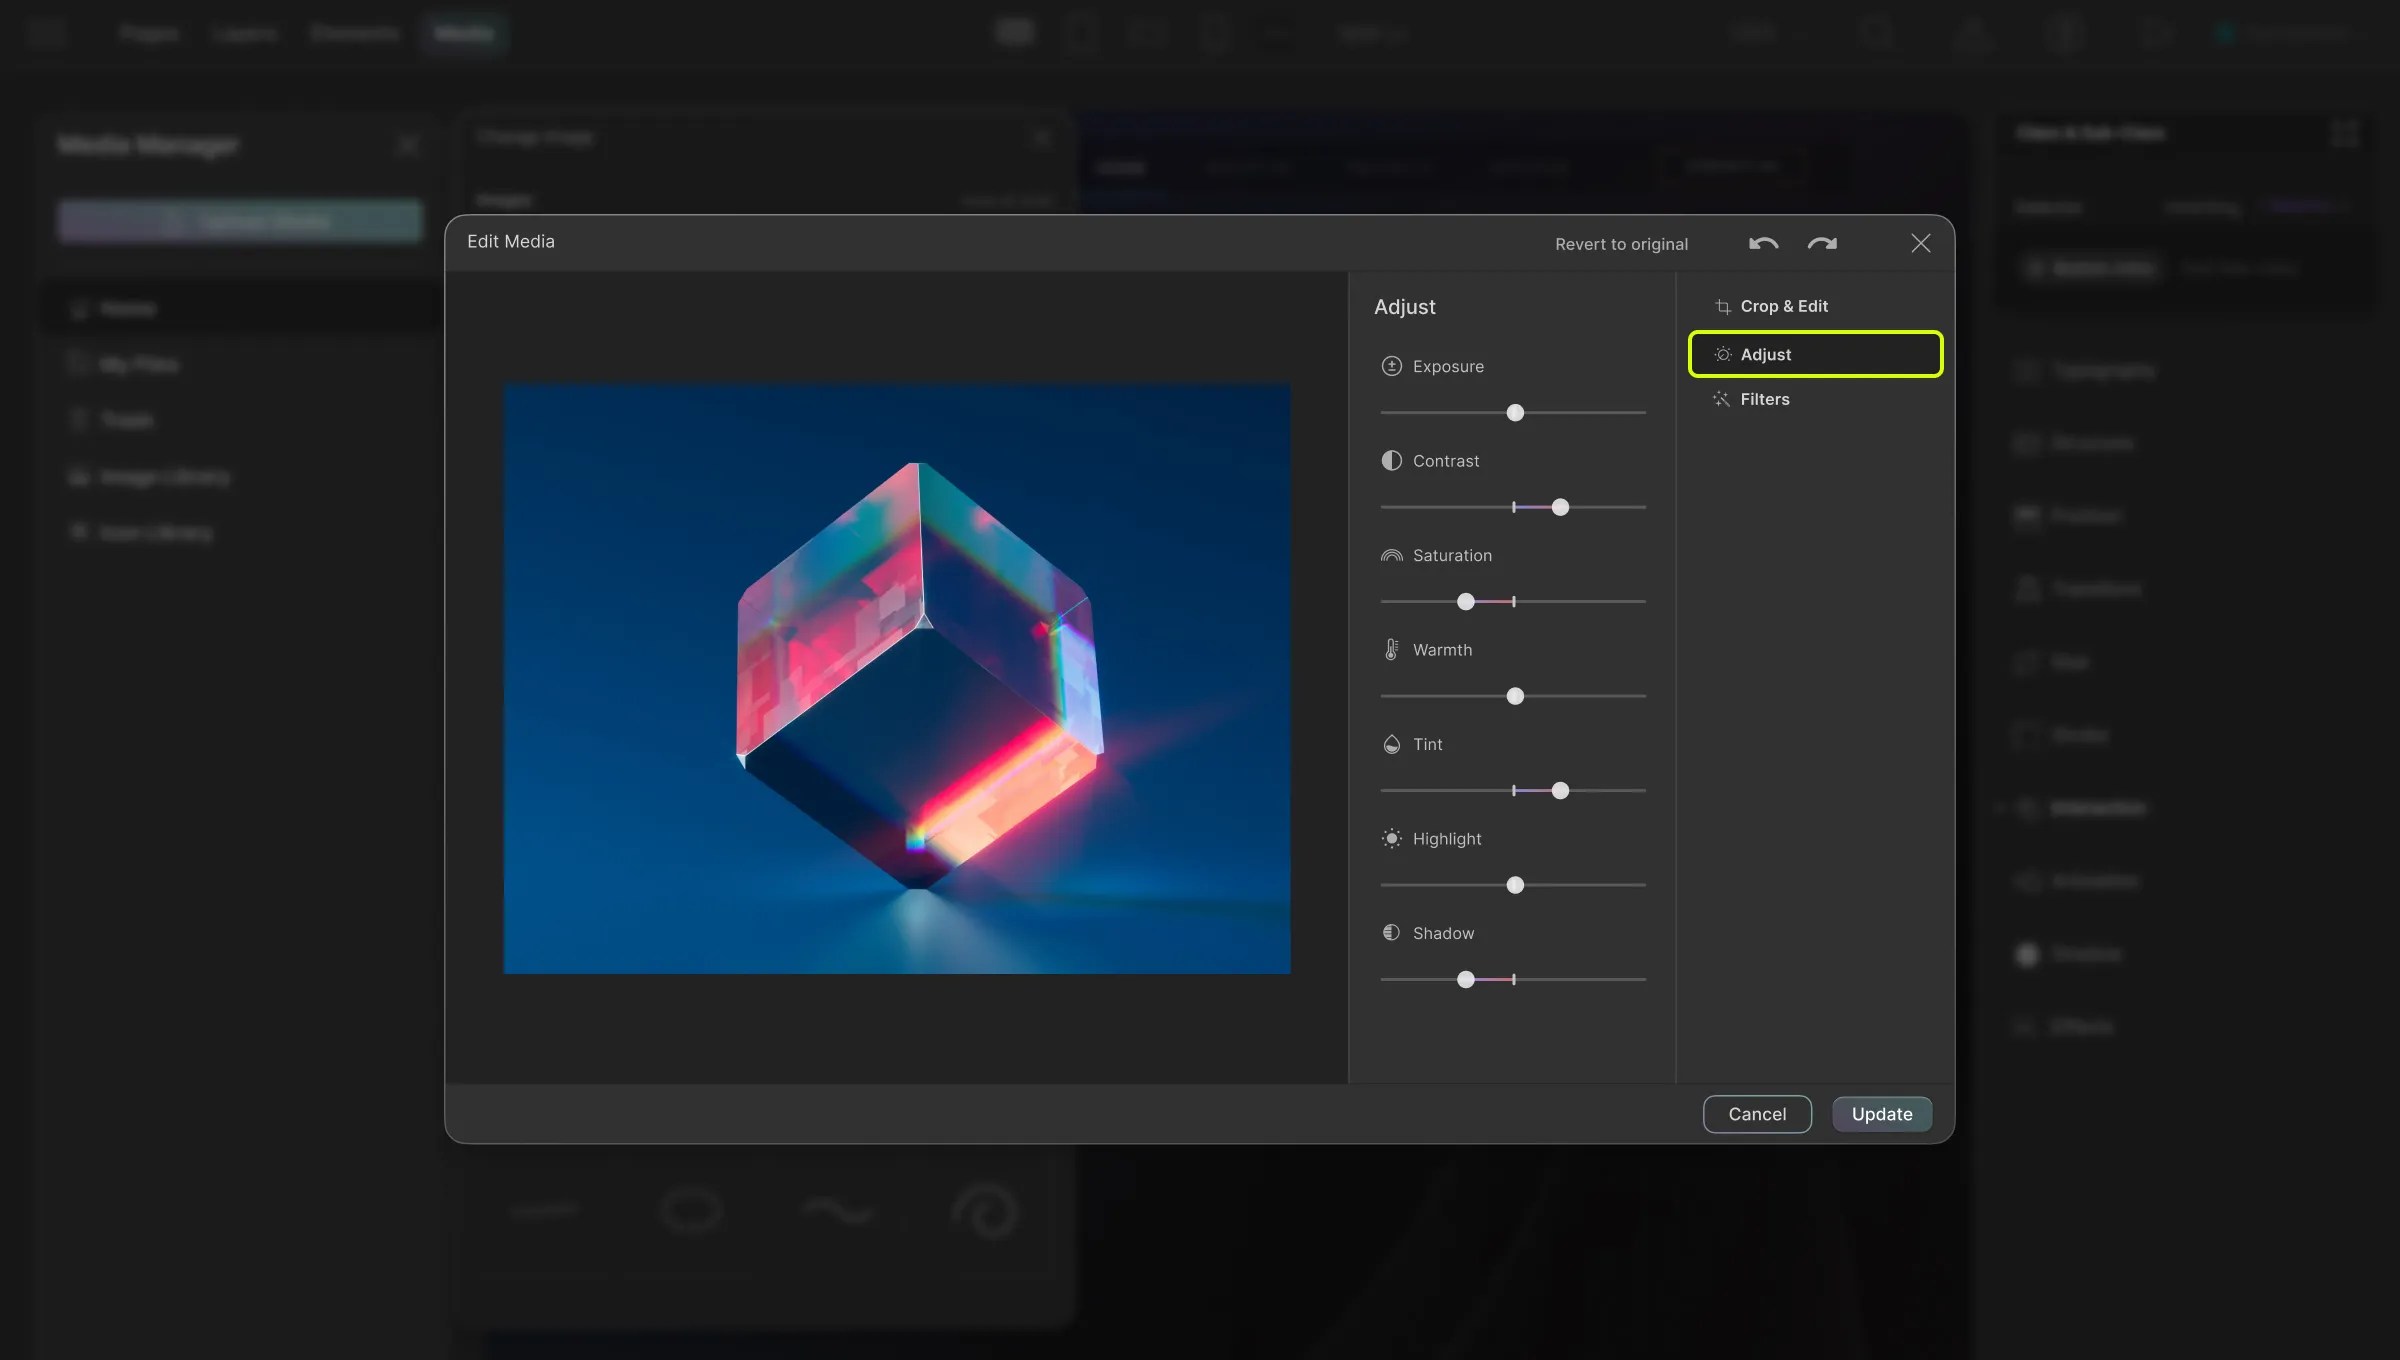
In the Adjust section, enhance your selected image using the following properties:
- Exposure: Increasing Exposure increases the amount of “light” in the image i.e. brightens the image.
- Contrast: Increasing Contrast will result in darker shadows and brighter highlights.
- Saturation: Increasing Saturation increases the intensity of the image’s colors.
- Warmth: Increasing Warmth will enhance warmer tones of the image like yellow, orange, and red.
- Tint: The Tint property recolors the entire image in a single color specified by you.
- Highlight: Increasing the Highlight brightens the lightest portions of the image.
- Shadow: Increasing Shadow darkens the darkest portions of the image and adds more depth.
Filters
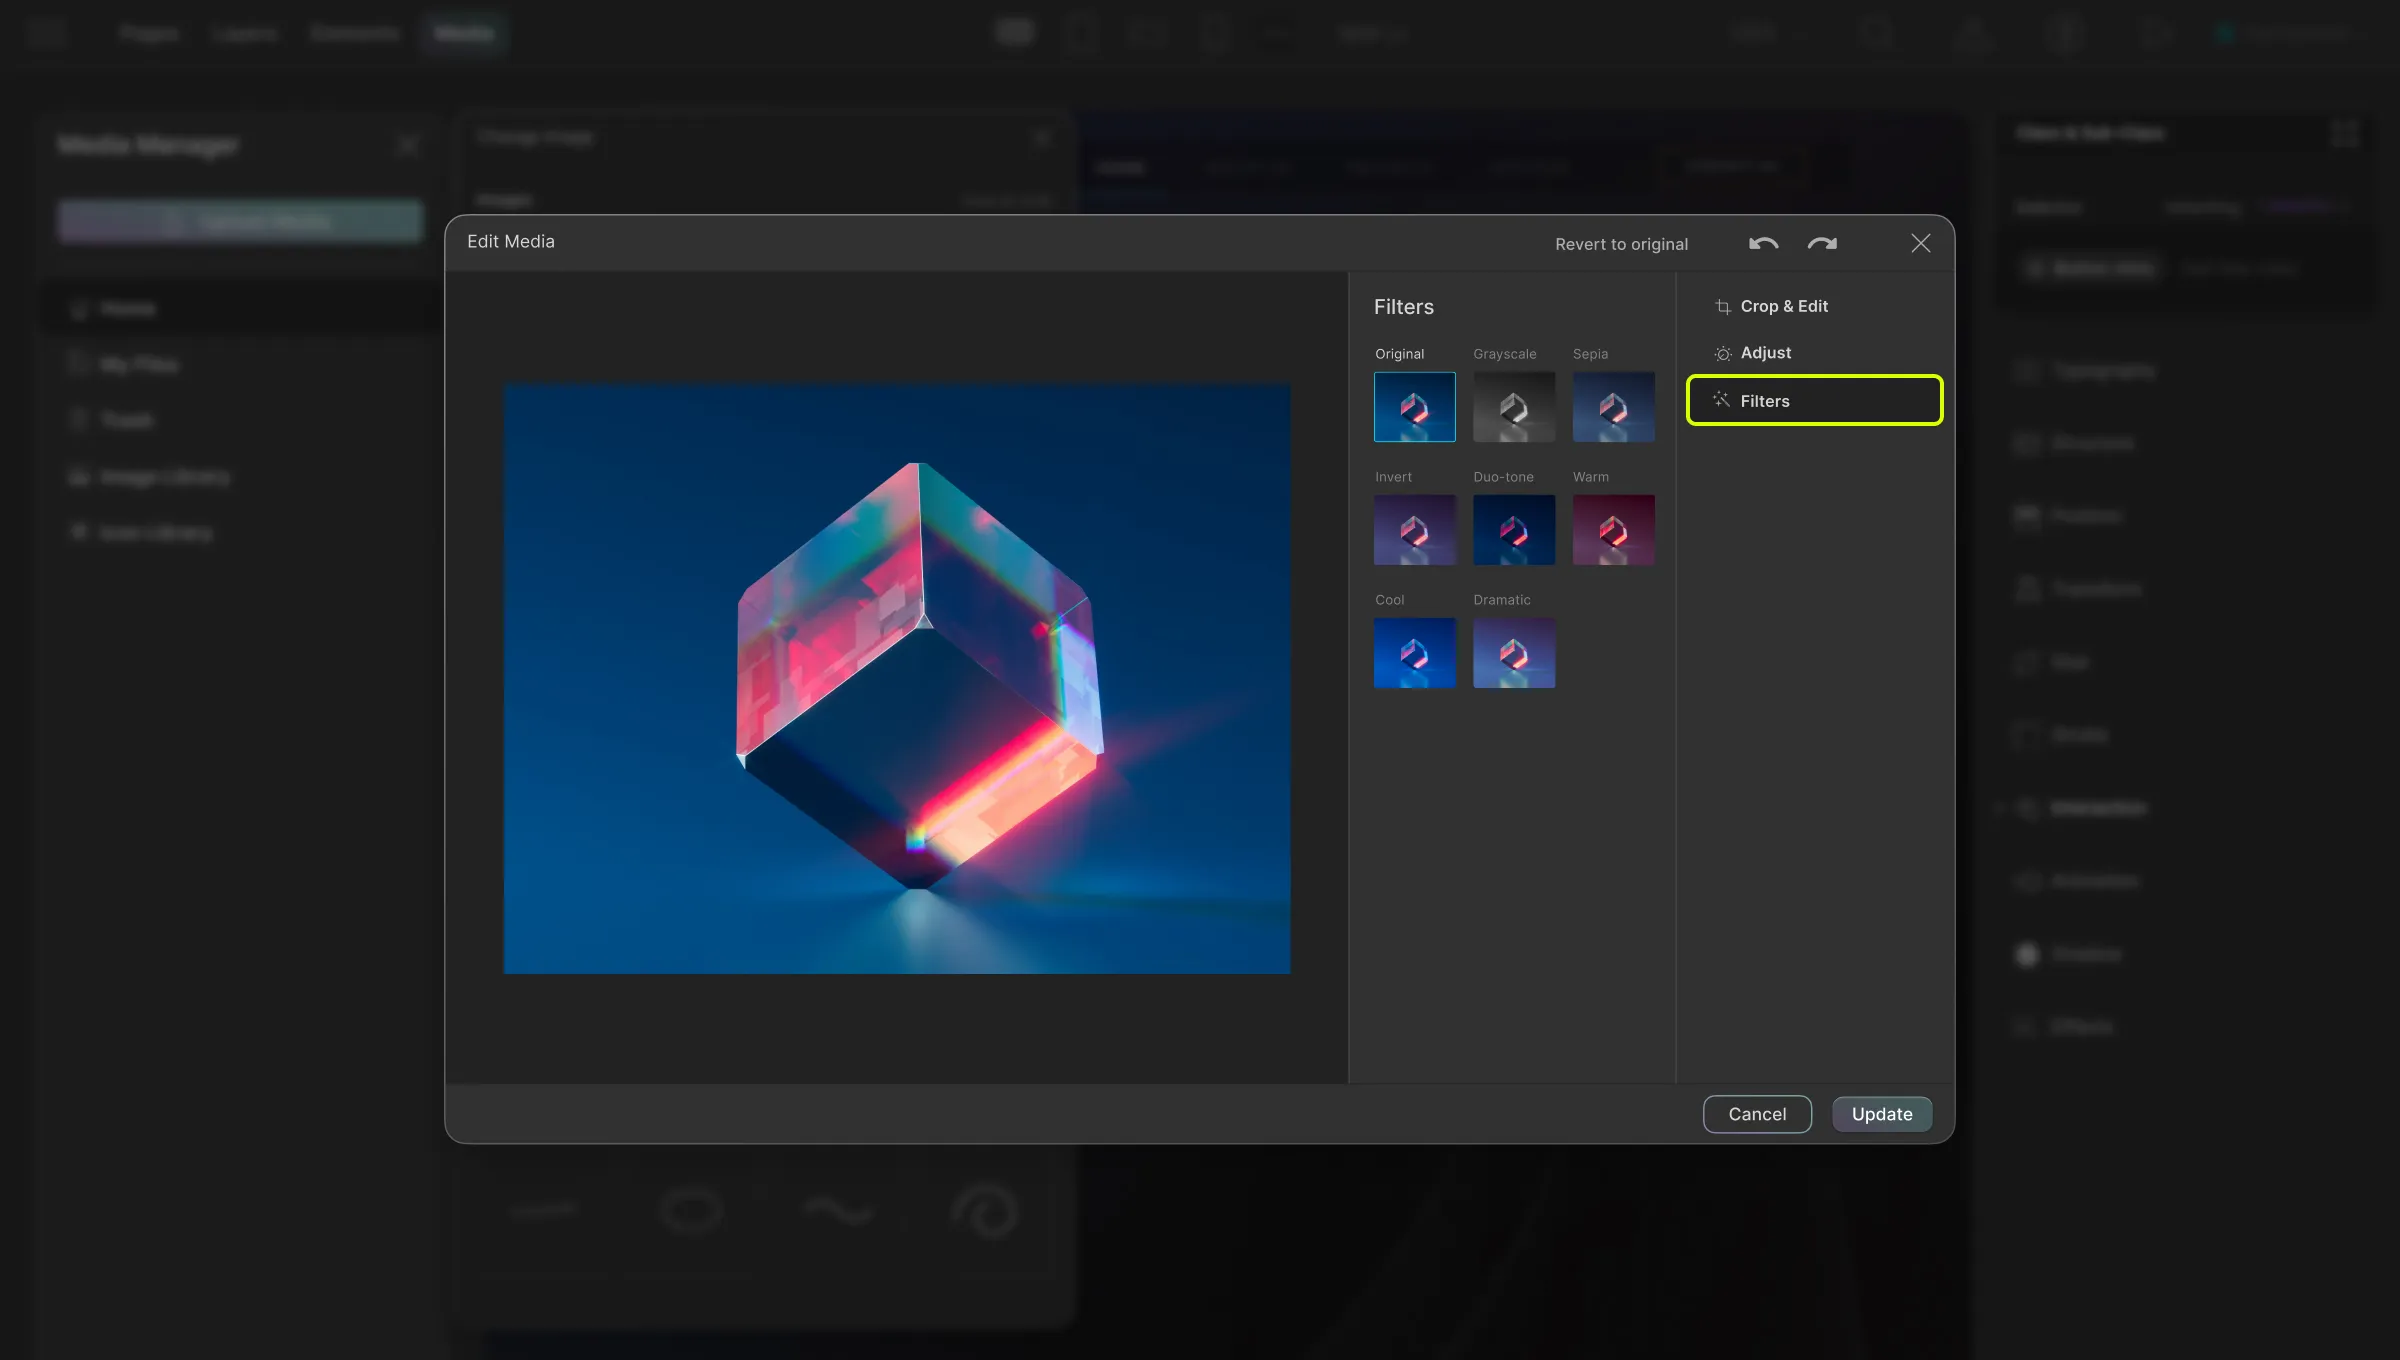
The Filters section provides pre-made filters to enhance your images. Options include:
- Original
- Grayscale
- Sepia
- Invert
- Duo-tone
- Warm
- Cool
- Dramatic
📝 Note: Any edited image will be saved as a new image in the Media Library.
Additionally, right-clicking over any Media item in Home will give you the following options:
- Get URL Link: A handy option using which you can copy the URL of the selected Media.
- Move to Trash: Delete the item by moving it to the Trash folder.
My Files
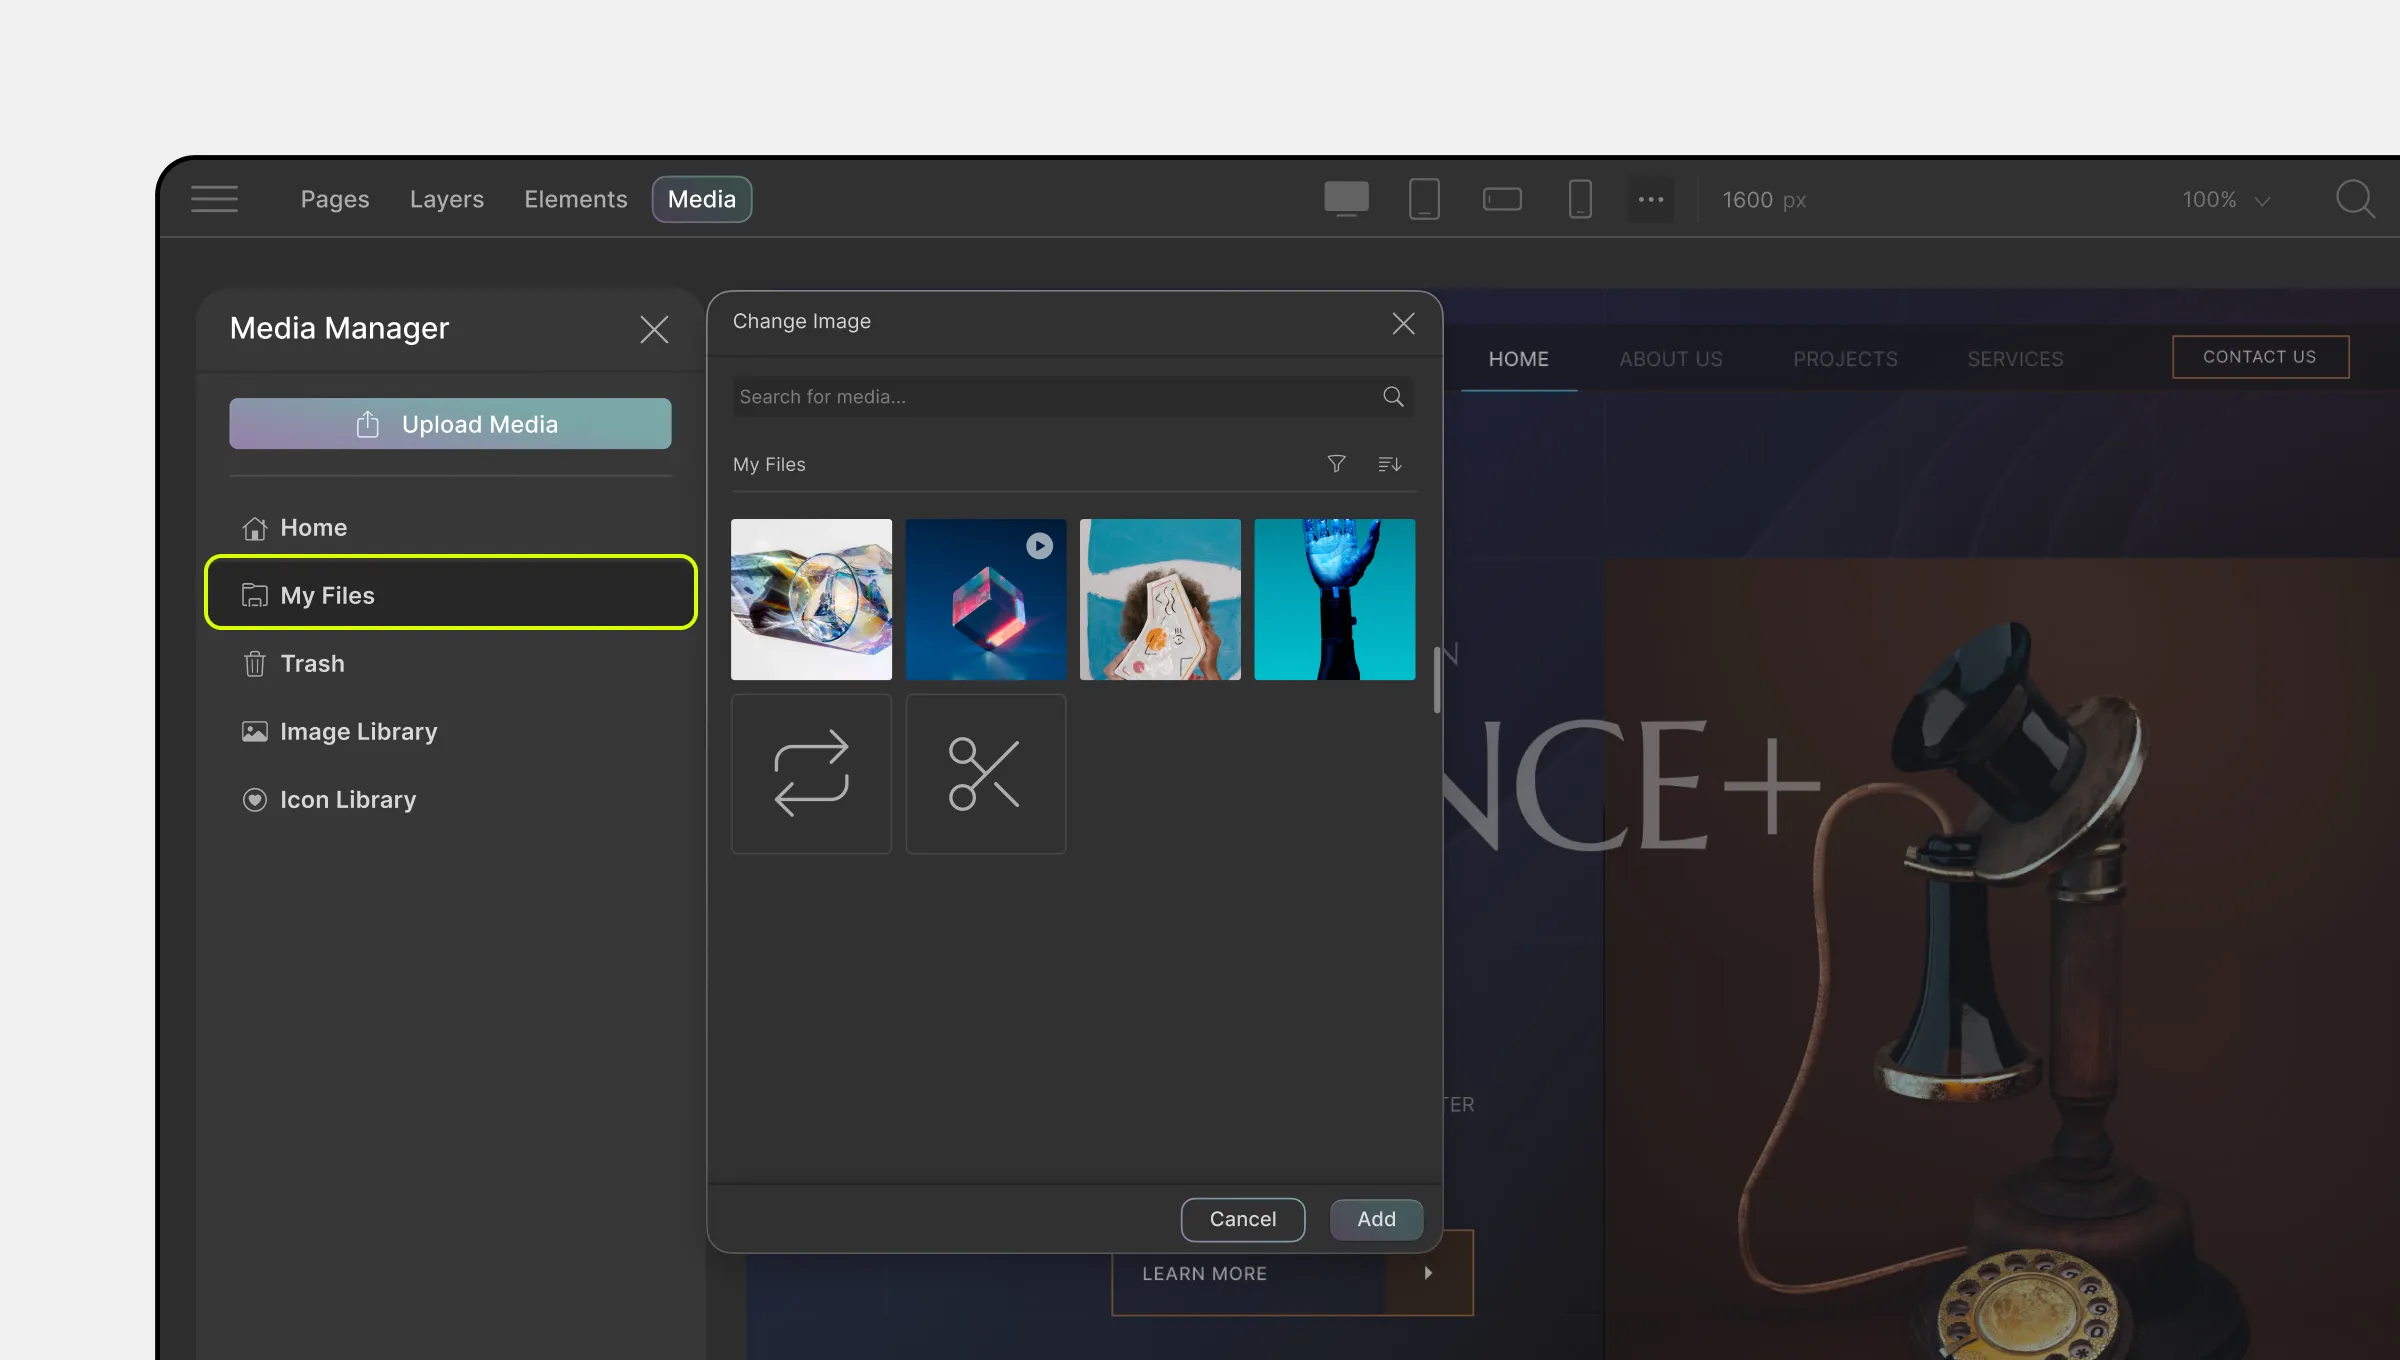
The My Files section may look similar to the Home section and also has some of the same features but that’s not all there is to it.
In this section, you will find only the media that you have uploaded. This includes all of the Images, Videos, and any other media types.
- Search: You can search through your assets using the input field that’s at the top of this section.
- Filter: Click on the Filter icon that’s beside the Search field to access filtering options. You can filter your media by its type i.e. Image, Video, Audio, SVG & Lottie. Also, note that you can filter multiple types at a time and a tick icon will appear beside the ones selected.
- Sort: You’ll find the Sort icon beside the Filter option. Click on this toggle to Sort your assets in ascending or descending order.
Clicking on any Image will once again make the options Crop & Edit, Adjust, and Filters appear on the right. And, right-clicking on a Media item will give you the options Get URL Link & Move to Trash.
Trash
This folder is where all of the “deleted” items reside until you restore them or it gets permanently deleted. To restore a media, simply right-click and select the Restore option. If not restored, these get permanently deleted from the trash in 30 days.
Image Library
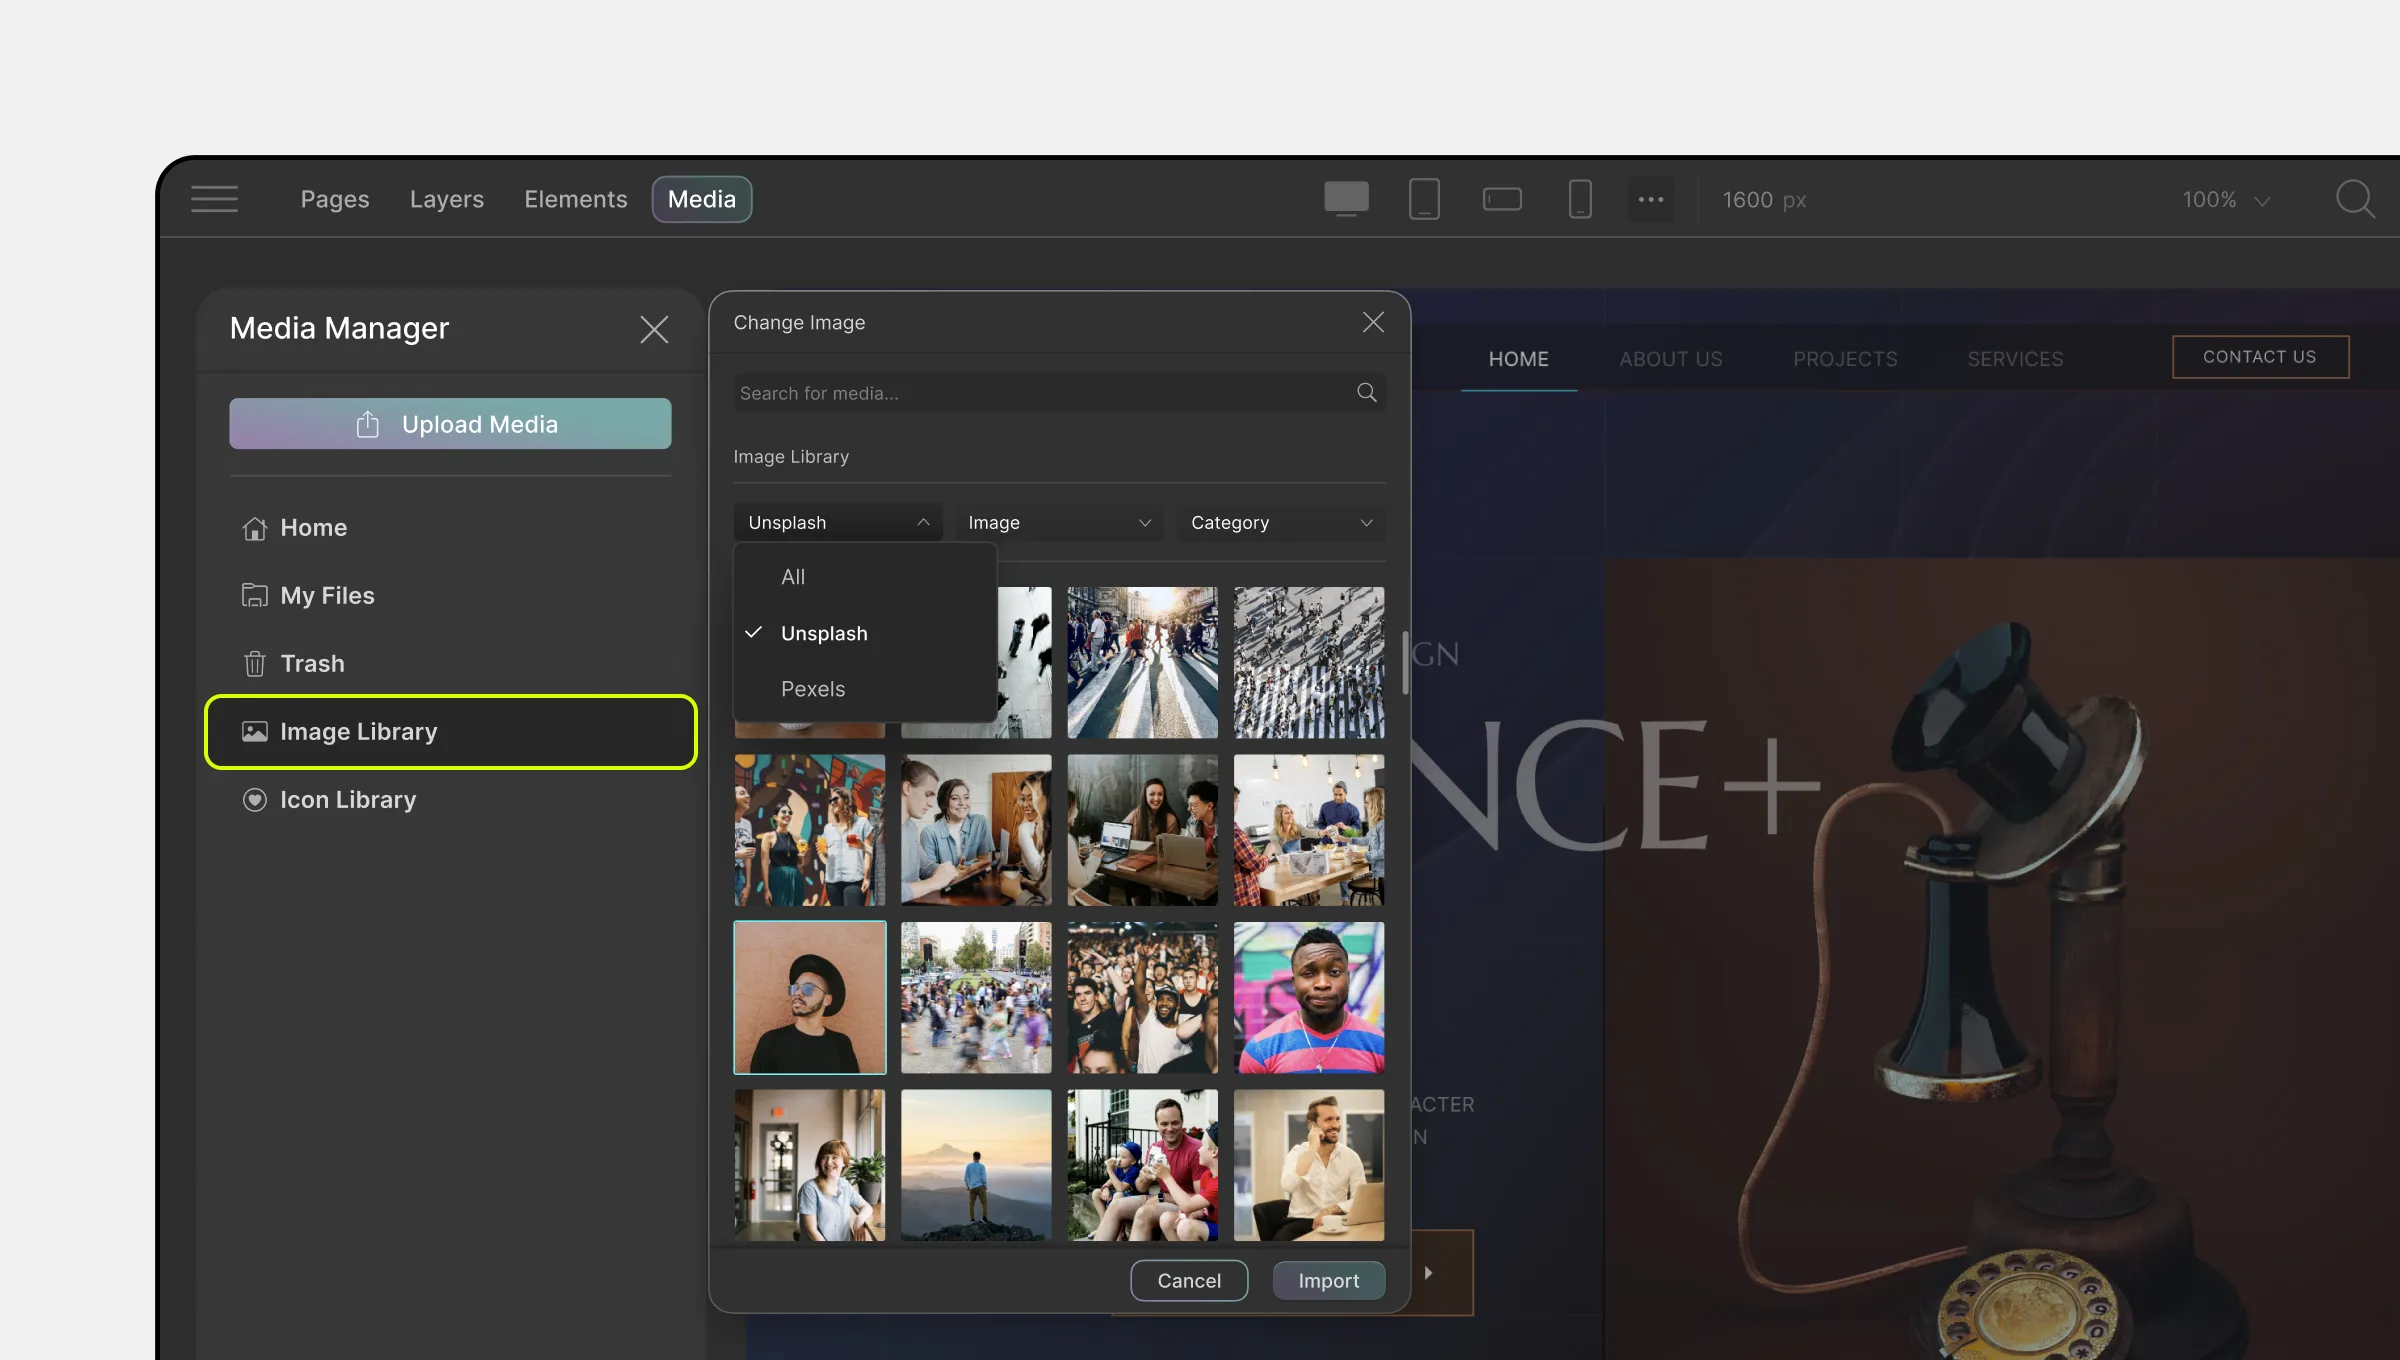
The Image Library is where you can access the images from open-source libraries such as Unsplash and Pexels if connected using their respective API Integrations.
If connected, you can use the following options to find and filter their open-source media:
Search: Use the Search field to find keyword-specific images and videos.
Library: From the dropdown on the top-left select which library you want to browse. Options are Unsplash and Pexels.
Media Type: From the middle dropdown, choose what type of media type you want to browse. Options are Photos and Videos.
Orientation: From the last dropdown, choose which orientation of images you want to browse. Options are Orientation, Landscape, Horizontal, and Square.
To add an image, simply select one and click on Add. You’ll also see the usual options Crop & Edit, Adjust, and Filters appear on the right when you do.
You can also right-click on any image to find the Get URL Link option.
Icon Library
As the name suggests, the Icon Library is home to a plethora of icons to choose from and add to your page.
Category: Click on the dropdown at the top to access the various icon categories available. By default, the Default Icon category should be selected but here you’ll also find the following options:
- Material Icons: When selected, these can be filtered using the following options which appear on the left sidebar:
- Filled
- Outlined
- Round
- Sharp
- Two Tone
- Line Awesome Icons
- Mono Icons
- CSS Icons
- ZW Icons
Search: Use this field to search for a specific icon.
Select an icon to access the options on the right sidebar which include the following:
Thumbnail: First up, you’ll see a preview of the Icon you’ve selected followed by its name.
Color: Next up you’ll see the color options available for this icon. Click on one to select it.
Code: Here, you’ll find a read-only code editor containing its code and you can copy it by clicking on the copy icon.
Don’t forget to click on the Add/Update button to add the Icon to the page or apply your changes.
Clip-Path & Shape Editor
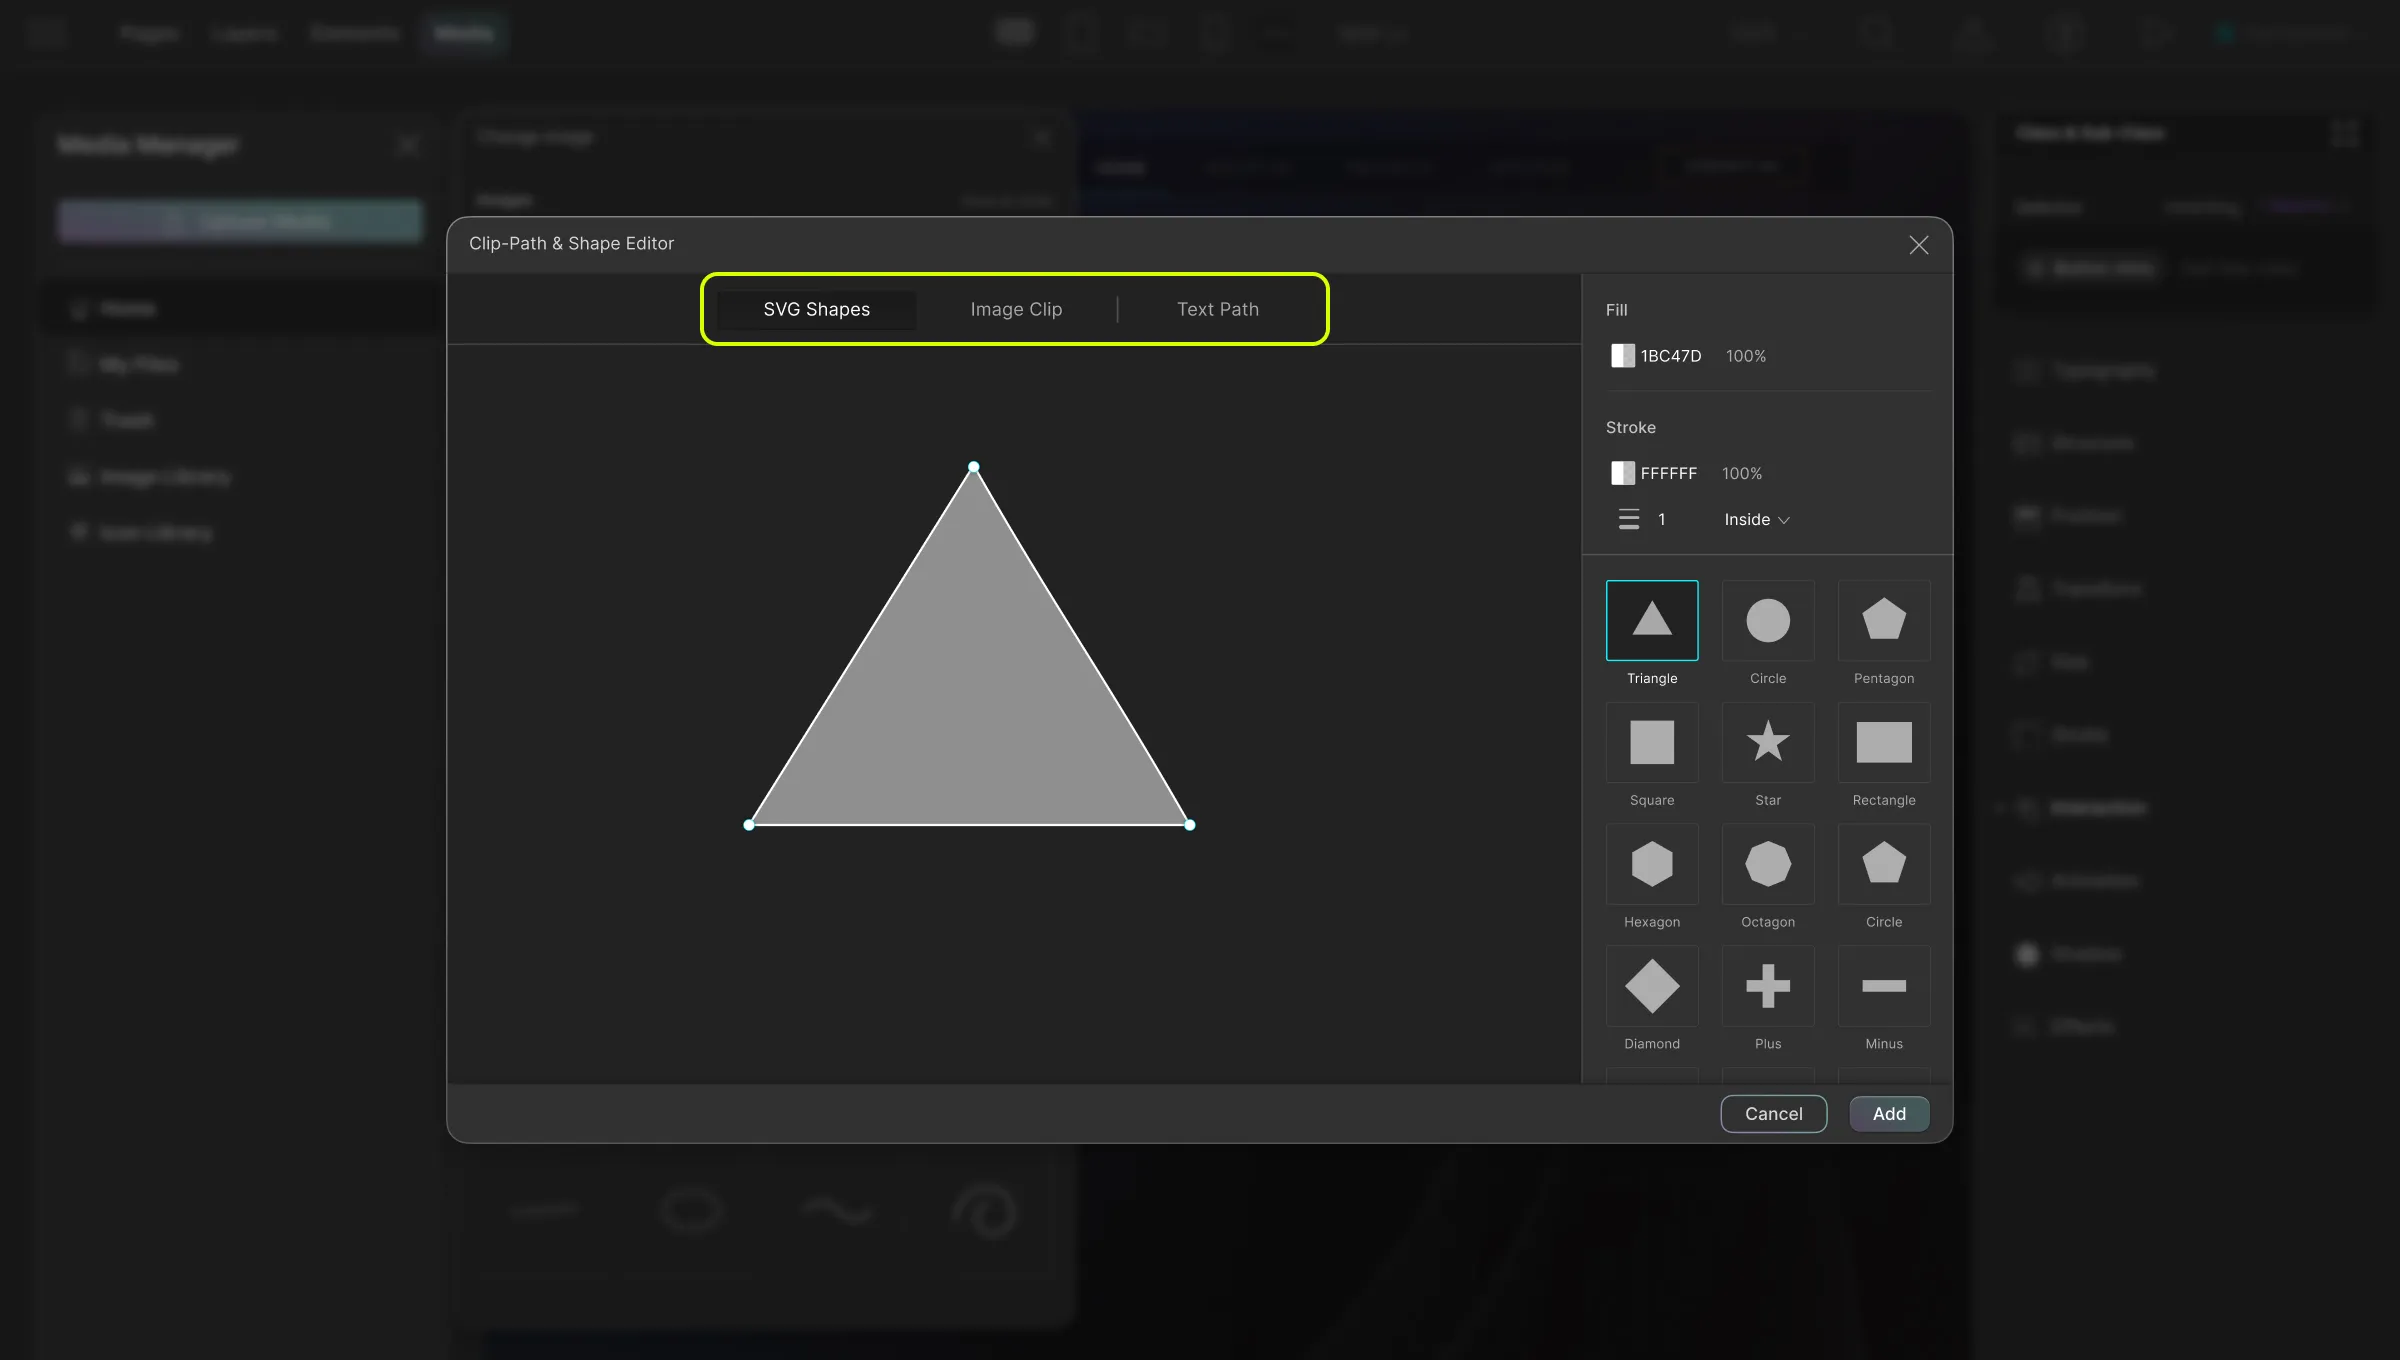
The Clip-Path & Shape Editor empowers creative design with three distinct tabs:
- SVG Shapes: Customize shapes from the Shape Library, with options to adjust fill, stroke color, and weight.
- Image Clip: Crop images into desired shapes using preset options or uploaded images.
- Text Path: Manipulate text path shapes, customize stroke properties, and adjust text positioning.
SVG Shapes
Under SVG Shapes, on the right side panel, you’ll find the Shape Library containing various Shapes to choose from which you can also later customize to suit your needs.
Once you’ve chosen your shape it should appear on the Preview Pane. You can drag the shape’s vertices to adjust it and you can also hover over an edge and click to add more vertices.
On the right side panel you’ll find the following options:
- Fill: Set the color & the opacity of your shape from here.
- Stroke Color: Set the color & the opacity of your shape’s outline from here.
- Stroke Weight: Set the weight of the stroke by entering into the field that’s below the Stroke Color toggle.
Image Clip
Using the Image Clip feature, you can crop an image to take a particular shape.
On the Preview Pane, you should be able to see the image you’ll be clipping along with the shape you selected overlaying this image.
You can choose from many preset shapes from the panel on the right-hand side.
Change Image: Click on this option to replace the current image with a different one. This will open the Home section of the Media Manager from where you can select any image of your choice.
Upload Image: Directly upload an image to clip into shape.
Once you’ve chosen the shape you want to clip your image into, you can drag its vertices to customize it and even add new vertices by clicking on any edge if needed.
Text Path
Text Path is a really nifty feature that lets you customize the path your text will lie on.
On the Preview Pane, you’ll see the Text lying on a path and the shape of this path can be selected from the preset options available on the right. Options include:
- Line
- Wave
- Cubic S
- Cubic C
- Arc
- Quad
Once you have selected the shape of your path, you can customize it on the Preview Pane by dragging its vertices. And to change the default text simply double-click on it and start typing.
Following the Preset Shapes for Path, you’ll find the following customization options:
Path Stroke: By default, the Path Stroke is disabled meaning that the stroke cannot be seen but you can simply click on the eye icon to make it visible. Then you can set its
- Color
- Opacity
- Stroke Weight
Vertical Offset: Set the vertical gap between the Path Stroke and the text.
Horizontal Offset: Set by how much the text will shift to the right.
