Collections are a powerful way to fetch dynamic data to showcase on your website. Popular website pages that you can create using this element are Blog Archive Pages, Author List Pages, Documentation Archive Pages, and more!
Using Droip’s Collection element, you can easily narrow down the exact scope of the data you want to fetch through various criteria like Collection Type, Post Type, and Taxonomy! Depending on the structure of your website, the options listed within these types differ as they are also fetched dynamically.
How to Add a Collection
To add a Collection to your website, follow these steps:
- From the Left Sidebar, go to Insert > Elements.
- Scroll down to the Advanced section.
- Drag & drop the Collection element onto your canvas.
Collection Types
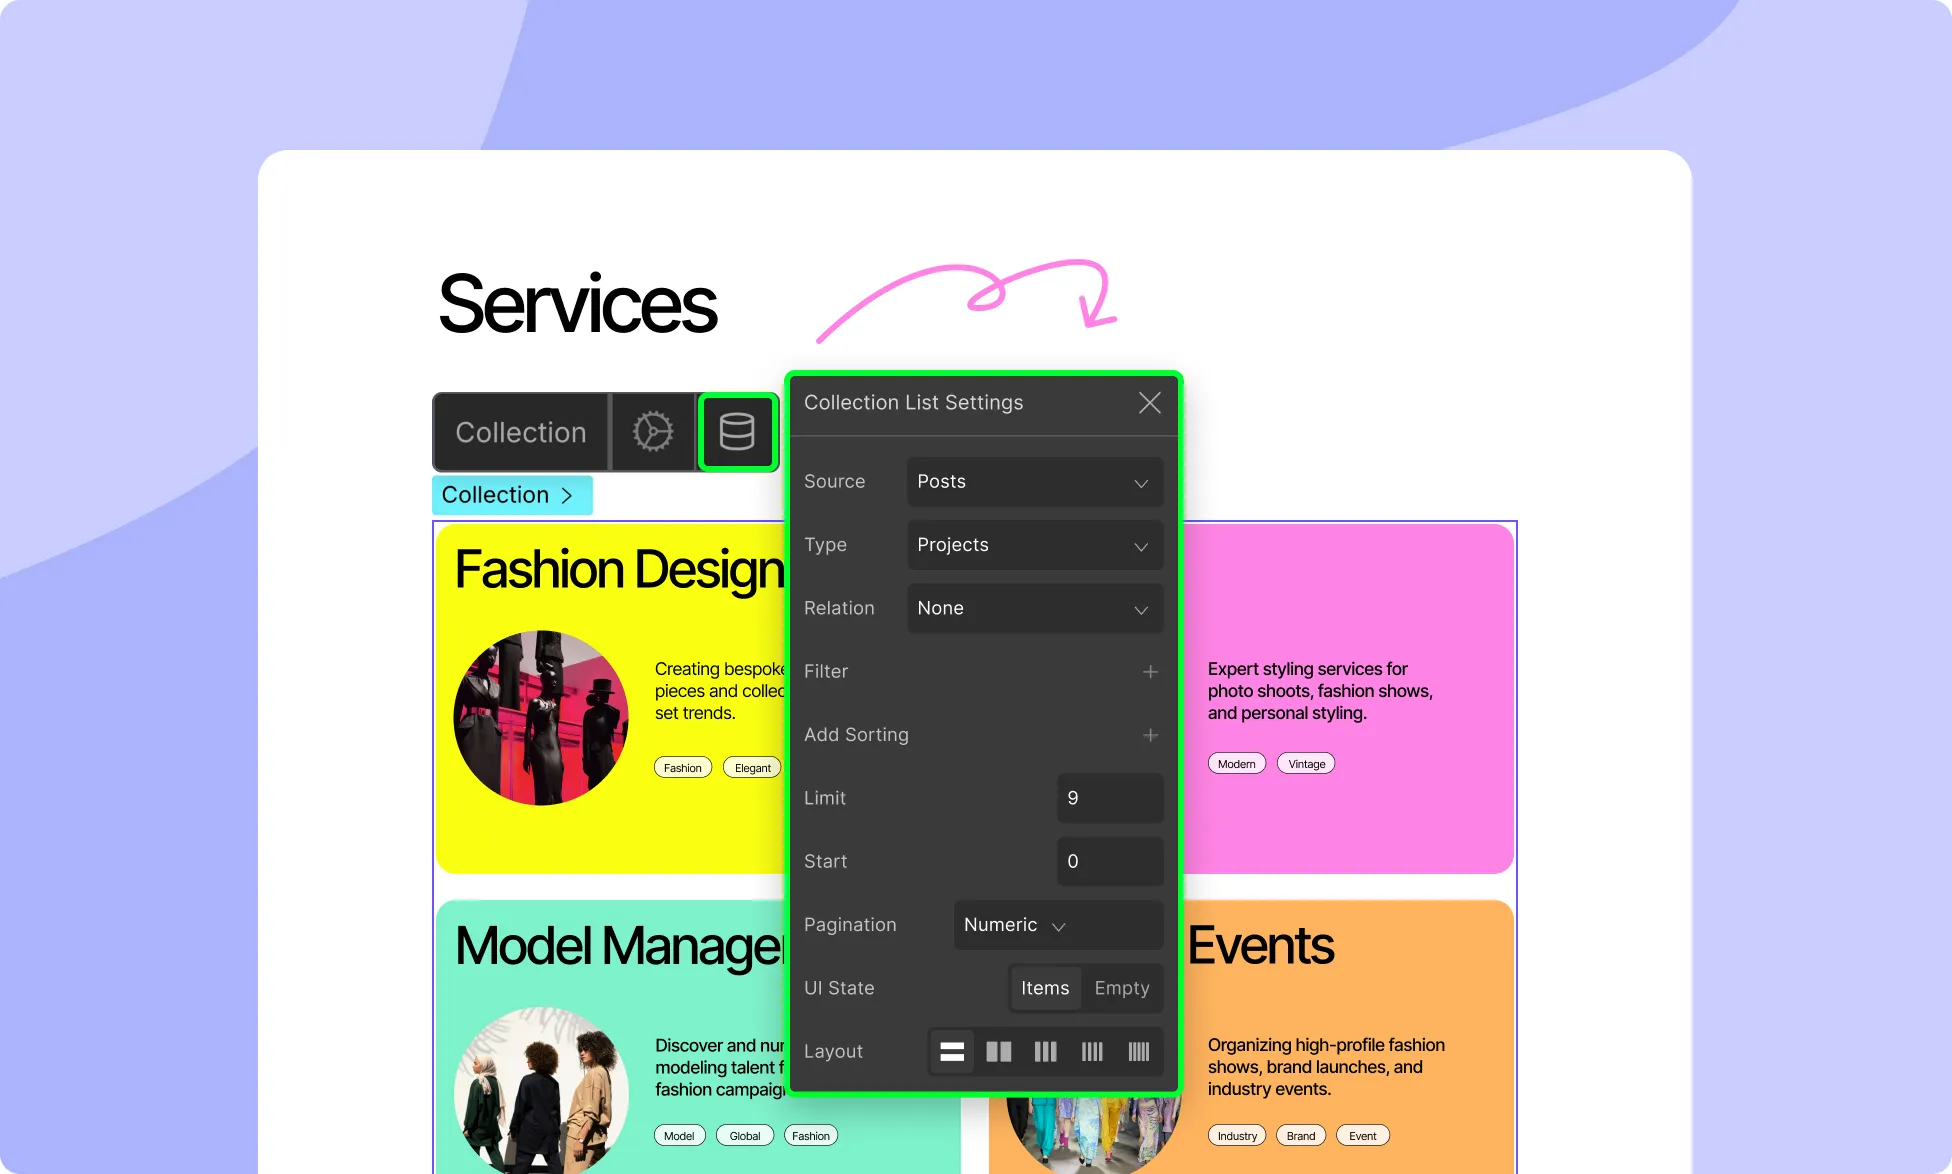
From the Collection Settings, you can define the scope of the data you want fetched and apply filtering, sorting, and other customizations. To access this, click on the Collection icon on the inline editor.
The first criterion you can set is the Collection Source. Here you’ll find the following options:
- Post: Choose Post Collection if you want to fetch content from various Post Types such as Blog Posts, Pages, Custom CSS, etc.
- Terms: Choose Terms Collection if you want to fetch the Categories, Tags, etc that your website content is organized by.
- Users: Choose User Collection to fetch user data saved on your website.
Once you’ve selected your Collection Type, you can then configure the specific settings for that type.
Post Collection Settings
The first Collection option is Post. The Post Collection option extends beyond typical Blog Posts. In WordPress, various content types fall under the Post umbrella, including Pages, Attachments, and Custom CSS, among others.
Post Type
Once you set your Collection as Post, you can then go on to choose these specific Post Types. These options will vary based on the structure of your website.
Inheritance
Posts can be inherited. You can do so by ticking the Parent checkbox.
List Items Layout
Select the number of columns you want the Collection to consist of, ranging from 1 to 5 Columns.
Filter
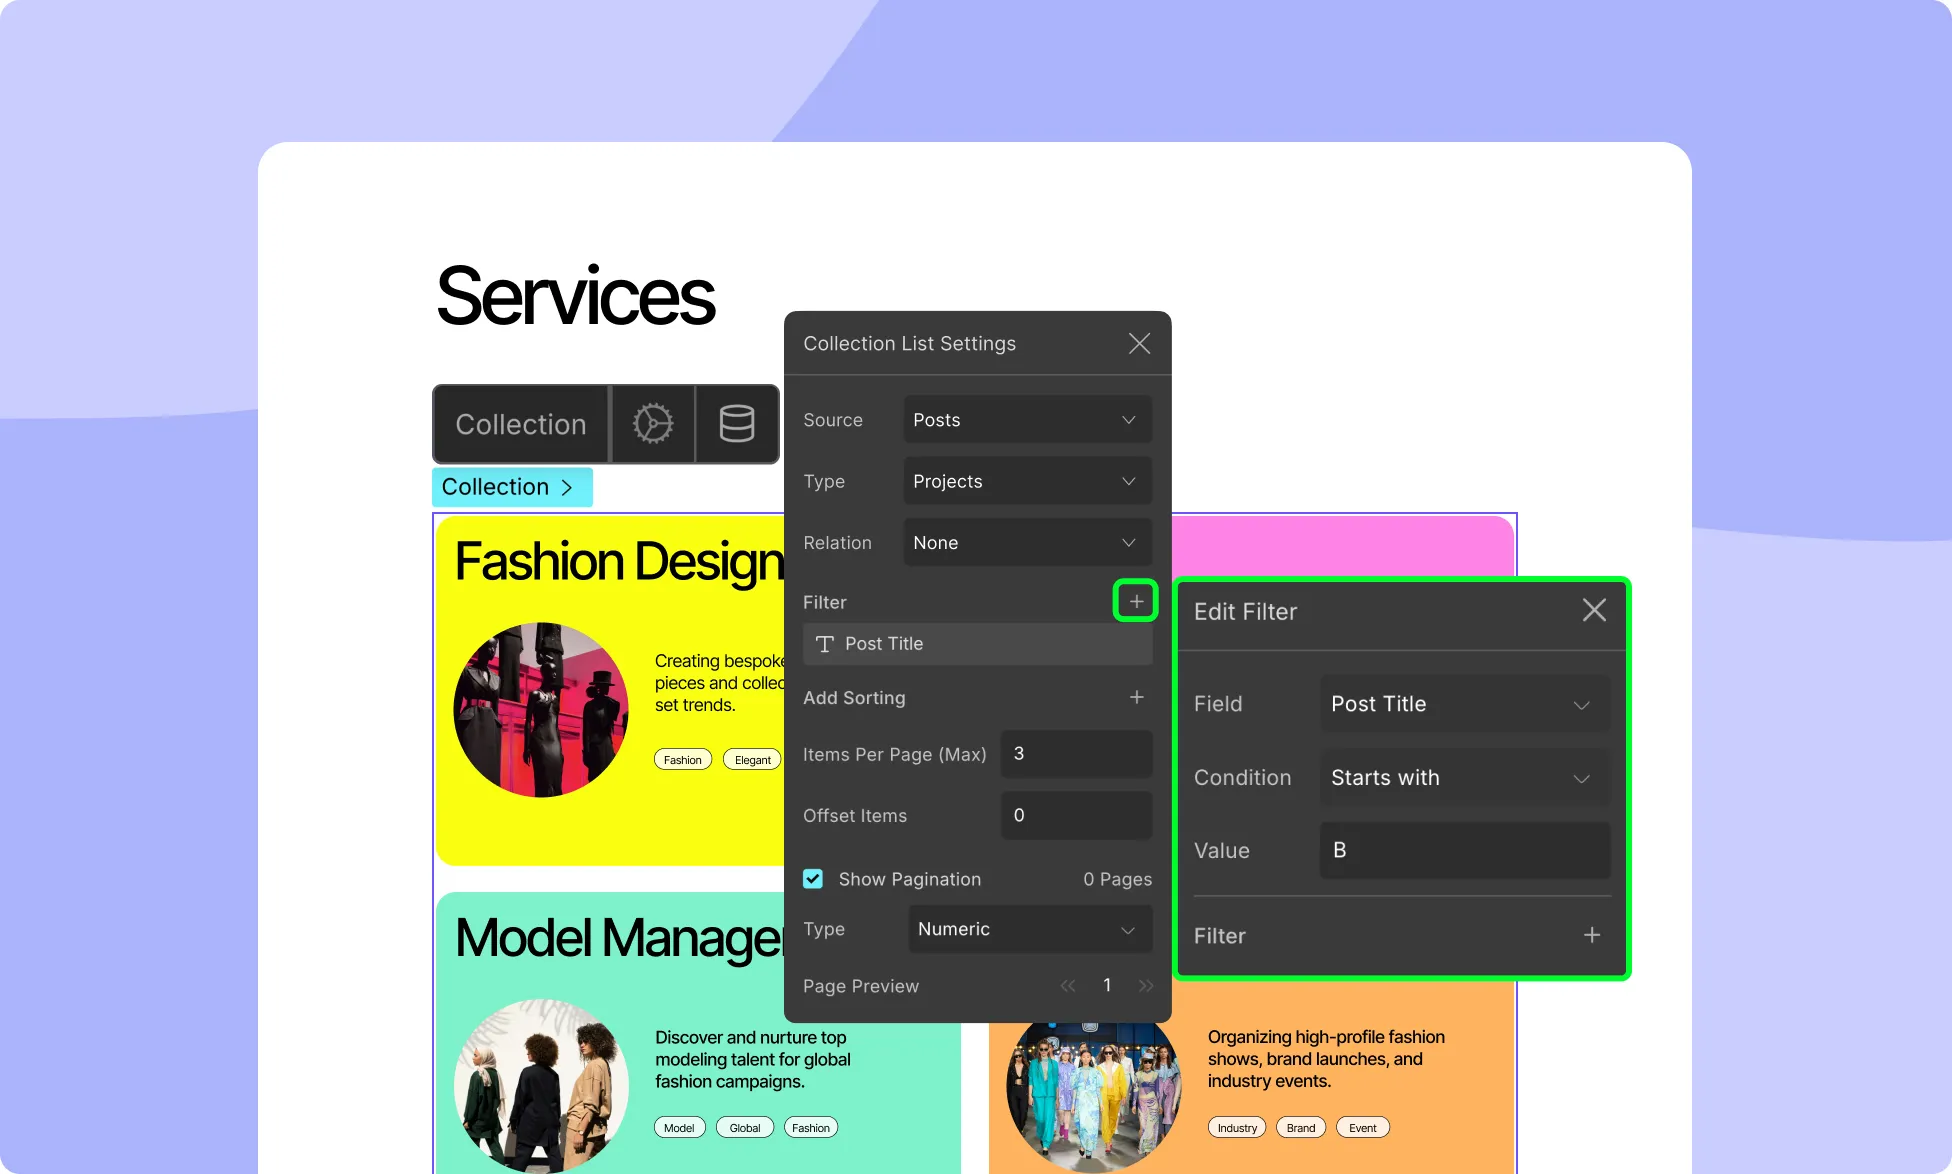
Set the filter method and criteria for the data. You can filter by:
- Date: Define a specific period of time using start and end dates.
- Category: Display data from a specific category or filter out data from a specific category.
- Author: Show data from a specific author or exclude data from that specific author.
To add a filter, click on the + icon that’s in this section’s top right corner. A new window called Add Filter should appear from where you can select the Method and other conditions. You can add multiple filters like this.
To edit or delete a filter, use the ellipsis icon next to each filter.
Sorting
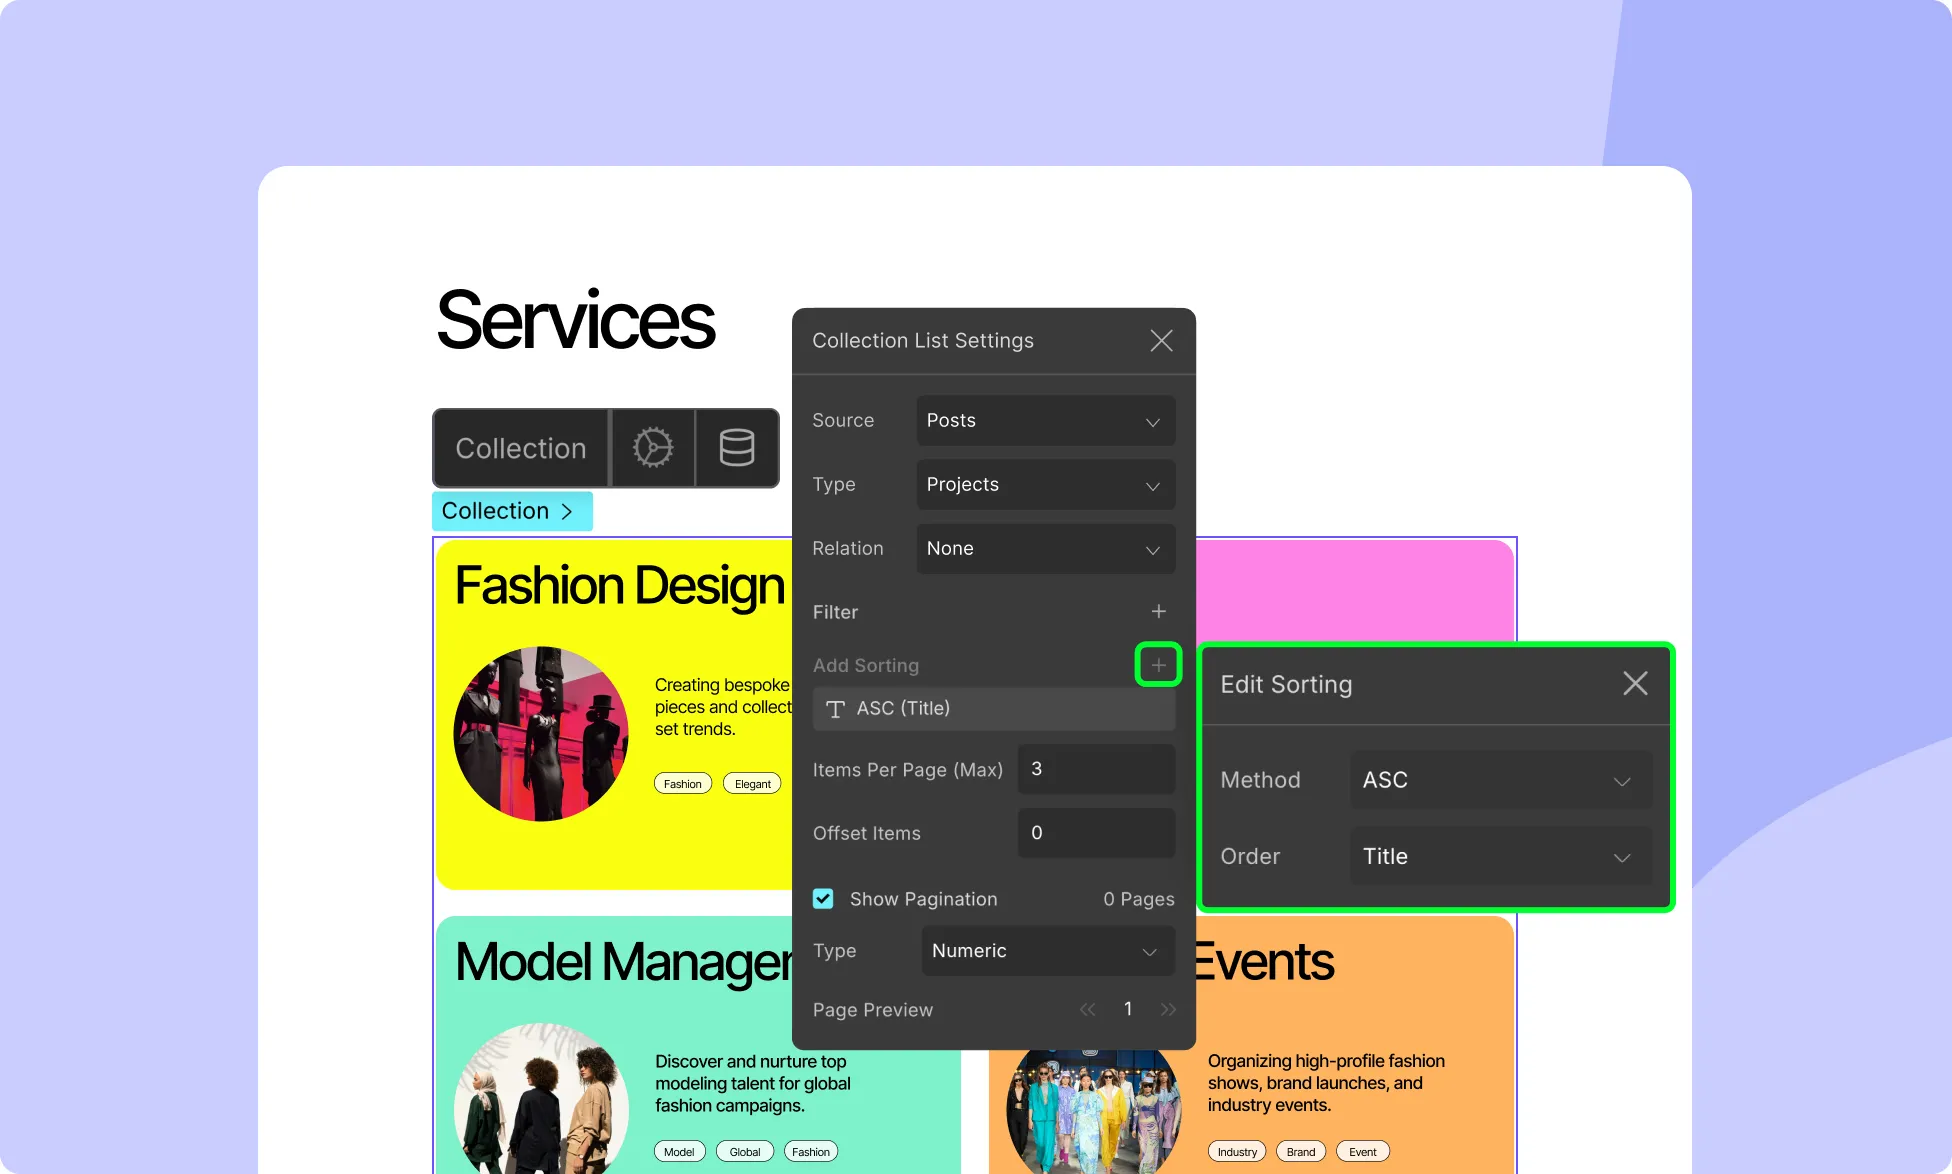
Specify the conditions to sort the Items by setting the Method and Order. From Method, you can select either Ascending or Descending. And for Order, you can choose which Attribute to sort according to.
To sort, click on the + icon that’s in the top right corner. A new window called Add Sorting will appear from where you can set the Method and Order.
To edit a Sorting, click on the three-dot icon that is beside each of them and choose the Edit option. You can also delete the Sorting by clicking on the three-dot icon again and selecting the delete option.
Items Pagination
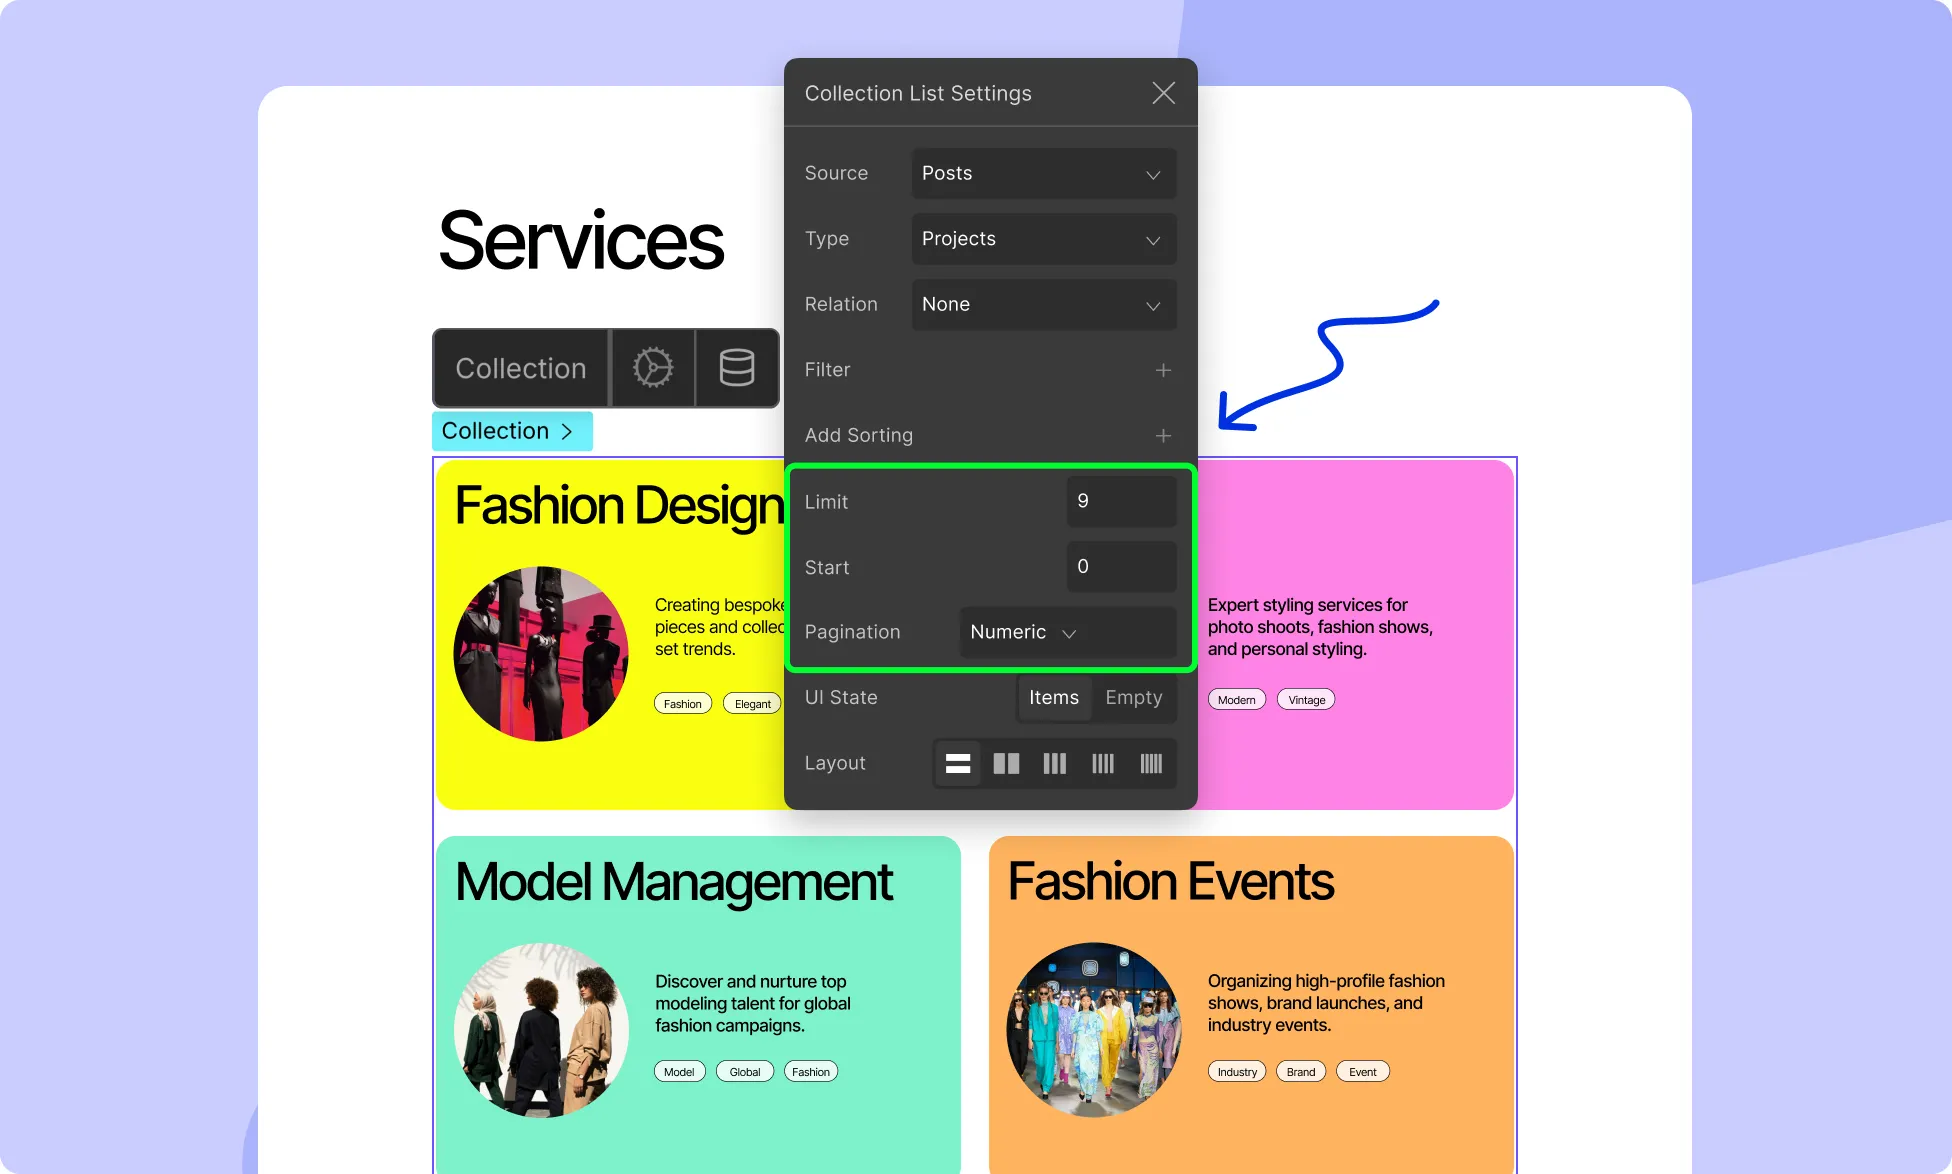
Enable Items Pagination to limit the number of items displayed on each page. Once enabled, you will be able to set the following:
- Items Per Page: Set the maximum number of items to display on each page.
- Page Preview: Set the default page to preview.
These settings will be automatically reflected inside the previously empty Pagination Wrapper.
Comment Collection Settings
Similarly, ‘Comments’ are another type of content that you’ll often find on websites.
Comment Type
If you’ve selected Comment as your Collection, you can then go on to choose the Comment Type i.e. which set of comments you want to fetch.
Depending on your website’s structure and what’s installed on it, there can also be more than one Comment Type! Examples include Blog Post Comments, Product Reviews, etc.
Inheritance
Since comments are automatically inherited, nested comments can also be showcased easily.
Filter
Set the filter method and criteria for the Comments. You can filter by:
- Date: Define a specific period of time using start and end dates.
- Status: Show or filter out comments with a specific status.
- Author: Display comments from a specific author or exclude ones from that specific author.
To add a filter, click on the + icon that’s in this section’s top right corner. A new window called Add Filter should appear from where you can select the Method and other conditions. You can add multiple filters like this.
To edit or delete a filter, use the ellipsis icon next to each filter.
Sort
Specify the conditions to sort the Comments by setting the Method and Order. From Method, you can select either Ascending or Descending. And for Order, you can choose which Attribute to sort according to.
To sort, click on the + icon that’s in the top right corner. A new window called Add Sorting will appear from where you can set the Method and Order.
To edit a Sorting, click on the three-dot icon that is beside each of them and choose the Edit option. You can also delete the Sorting by clicking on the three-dot icon again and selecting the delete option.
Items Pagination
Enable Items Pagination to limit the number of items displayed on each page. Once enabled, you will be able to set the following:
- Items Per Page: Set the maximum number of items to display on each page.
- Page Preview: Set the default page to preview.
These settings will be automatically reflected inside the previously empty Pagination Wrapper.
Term Collection Settings
Lastly, we have Terms. Terms can be anything from Categories to Tags. For this, you can select the following:
Post Type
As mentioned previously, a Post Type encompasses many forms of content in WordPress. Here, you’ll find the options for Posts, Pages, and more.
Taxonomy
In WordPress, Taxonomy is a grouping mechanism used to organize content. Examples include Categories, Tags, etc. You can also create custom Taxonomies for every Post Type.
The options in Taxonomy will differ based on the Post Type selected as each Post Type has a different set of Terms.
Inheritance
Terms can also be inherited. You can do so by ticking the Parent checkbox.
Collection List Content
After you’ve configured the Collection element settings, your Collection List will be populated by this content dynamically. This is because the elements that make up a Collection Item have been set up by default to dynamically retrieve the information from the CMS itself.
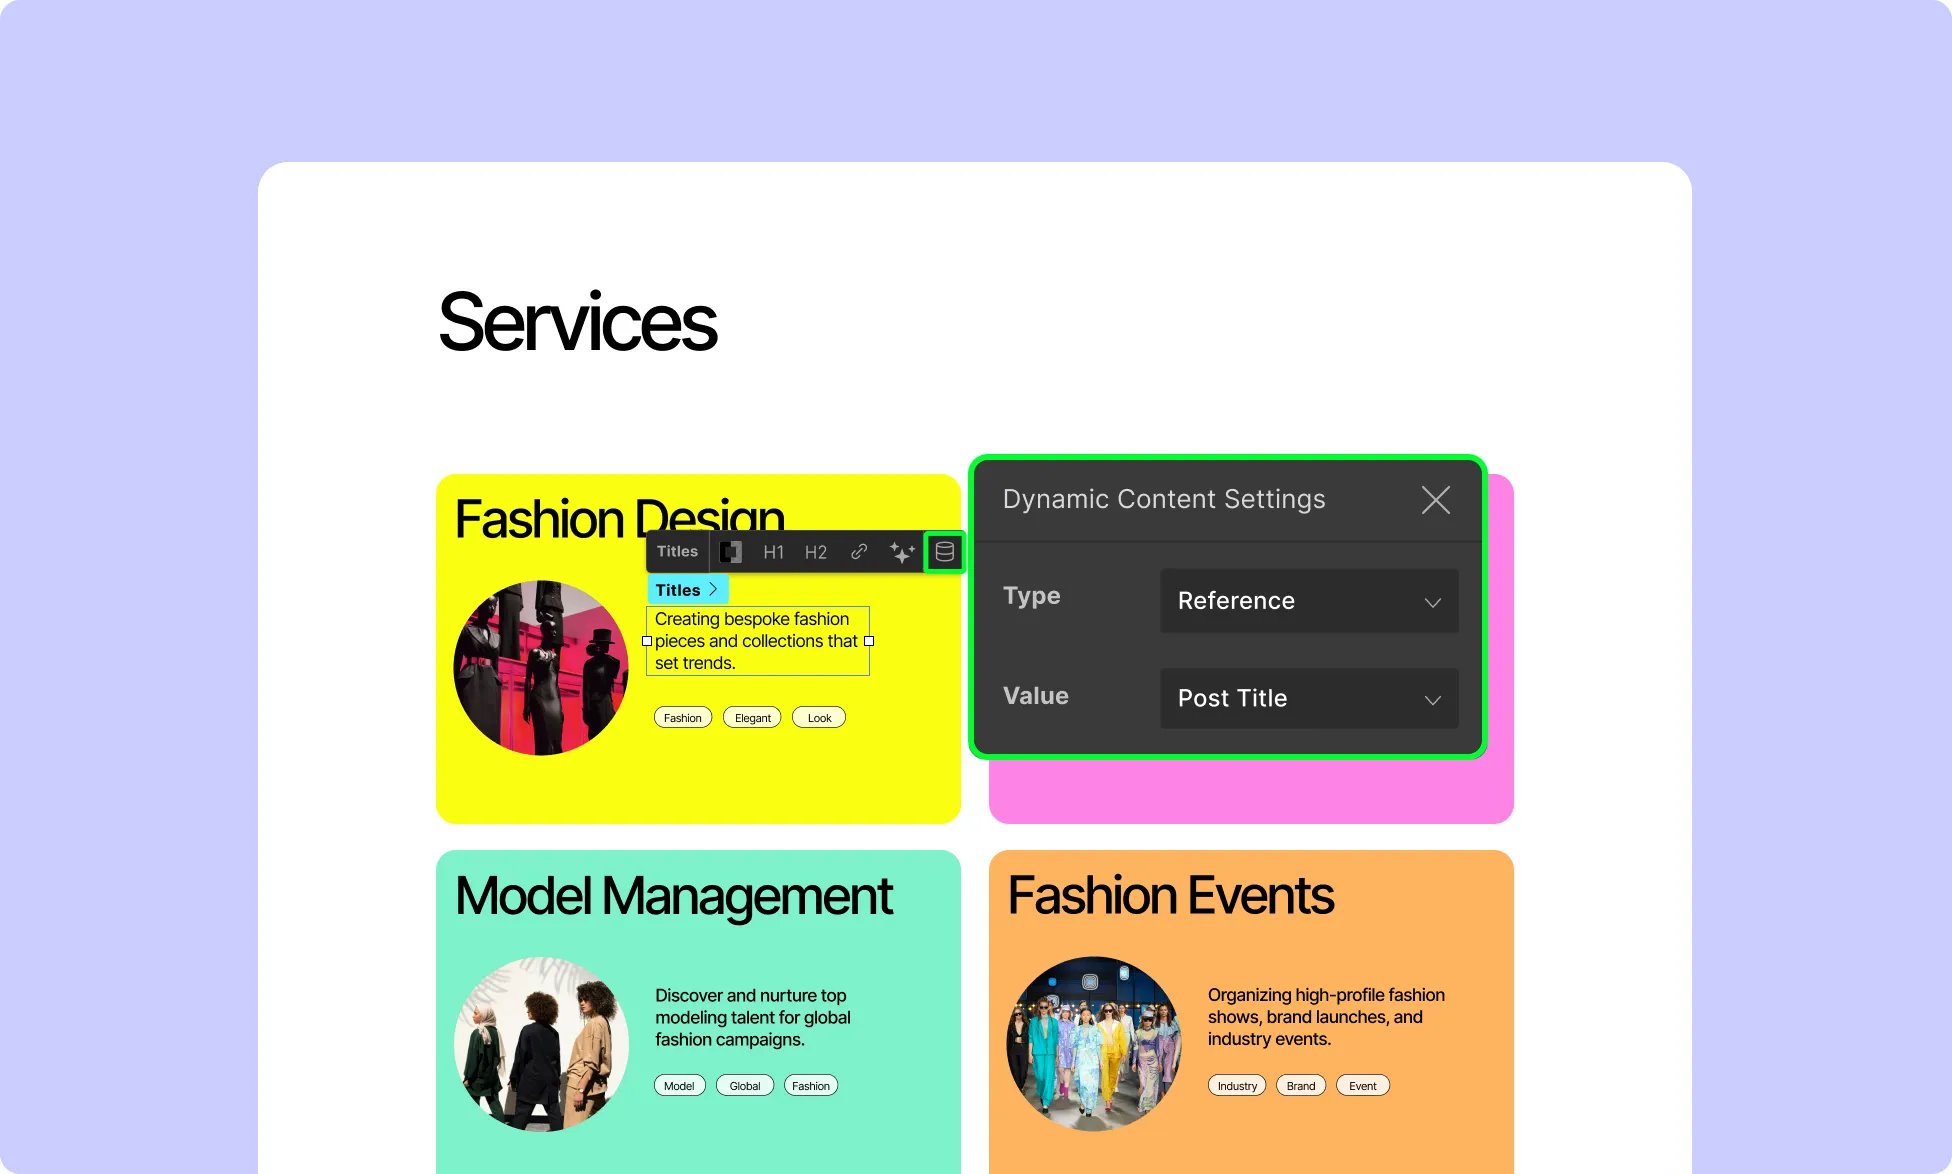
You can edit these settings by clicking on any one of these elements and opening its Dynamic Content Settings from their inline editor as shown in the image above. Here, you can choose the Type of Content in your data set you want to retrieve as well as specify its Value.
Static and Dynamic Elements in Collection
You can have both static and dynamic elements in your Collection List:
Static Elements
Static elements remain the same for all Collection Items. Simply drag and drop them from the Elements Panel into the collection, and they will be static by default.
Dynamic Elements
Certain Static Elements can be set up to fetch and show Dynamic Data. All you have to do is select it and click on the Data Collection icon to configure it.
Was this page helpful?