Forms are an integral part of any website — from collecting data to capturing leads and more.
But let’s face it — implementing this powerful tool can often mean wrestling with complex code or relying on clunky third-party plugins.
Well, not anymore! Today, we’re giving you a complete breakdown of how to create forms in WordPress & manage data without extra plugins and no code!
Types of Website Forms and Why You Need One
Now, as we mentioned earlier, forms come in all shapes and sizes so to speak from collecting user information to lead generation and more!
So before we learn how to create them, let’s take a look at some of the different types of website forms and why you need one:
Registration Forms
Used to allow new users to sign up for an account or event, Registration Forms are essential to creating user profiles. They help you gather key information like names, emails, passwords, etc.
By using these user profiles, you can control and customize the level of access these users will have on your website and fortify its security.
Contact Forms
Contact Forms are the key to letting users reach out to you without exposing your email address, helping you to reduce the risk of spam.
They not only enhance security but also simplify the process for users and by being directly on the website, encourage more inquiries!
Lead Generation Forms
Never miss an opportunity to reach out to visitors by converting them to leads through Lead Generation Forms!
Often found on landing pages or pop-ups, they capture crucial details like email addresses in exchange for valuable incentives, perfect for growing your mailing list and nurturing returning visitors.
Customer Feedback / Survey Forms
Want to know what your audience is thinking? Well, Customer Feedback or Survey Forms might be just the thing you need to gather insight into user opinions and satisfaction.
By collecting this valuable input, you can make informed improvements to your brand and offerings.
Consent Forms
Obtain explicit permission from users with Consent Forms — whether it’s for collecting data, sending marketing emails, or other purposes.
This not only helps you build trust with your audience but also ensures your website is GDPR compliant!
Choosing the Right Form Builder Tool
So we’ve just explored a few of the many website forms you can create! But this begs the question — how can you create these powerful forms without relying on complex code or third-party plugins?
Well, it all comes down to choosing the right form builder tool and the key to finding them is looking for the following capabilities:
- Ease of Use: Crafting your forms should be a breeze with a user-friendly, drag-and-drop interface.
- Variety of Form Fields: You should have a diverse range of field options at your disposal, from label fields and selector dropdowns to file uploads and more.
- Customizability: Be sure that you can fully customize your forms to perfectly fit your website’s branding and specific needs.
- Integration Capabilities: Ensure that the tool you’re using can be seamlessly integrated with powerful platforms like Mailchimp.
- Responsiveness: The forms you create must be fully responsive to give your users a seamless user experience across all platforms.
- Security: Form Security is of the utmost importance so make sure you choose a form builder tool that offers spam protection features like reCAPTCHA to safeguard your data and website.
Looking at this list, a certain no-code website builder tool comes to mind. Because why rely on a third-party form builder when a website builder already has it all?
That’s right — we’re talking about none other than the Droip WordPress website builder which checks off all of these capabilities and more with its built-in form builder and other customization capabilities!
How to Create Forms in WordPress
So, we’ve reached the crux of the matter — how to create responsive forms in WordPress!
With the Droip WordPress website builder’s native form builder, there’s no need to install any extra plugins.
Instead, you can dive straight into creating your form right away by following the steps discussed below!
Step 1: Build Form Structure Using Form Elements
Now, the first step in creating a form is to build its structure using Form Elements, which serve as the essential building blocks.
To start, from the Droip editor, head to the Form Elements panel, and add the Form Block element to your page.
The Form Block includes a preset form design, ready for you to customize. If this fits your purpose, you can use it as is.
Or you can easily add any of the other form elements to craft contact forms, lead generation forms, consent forms — you name it!
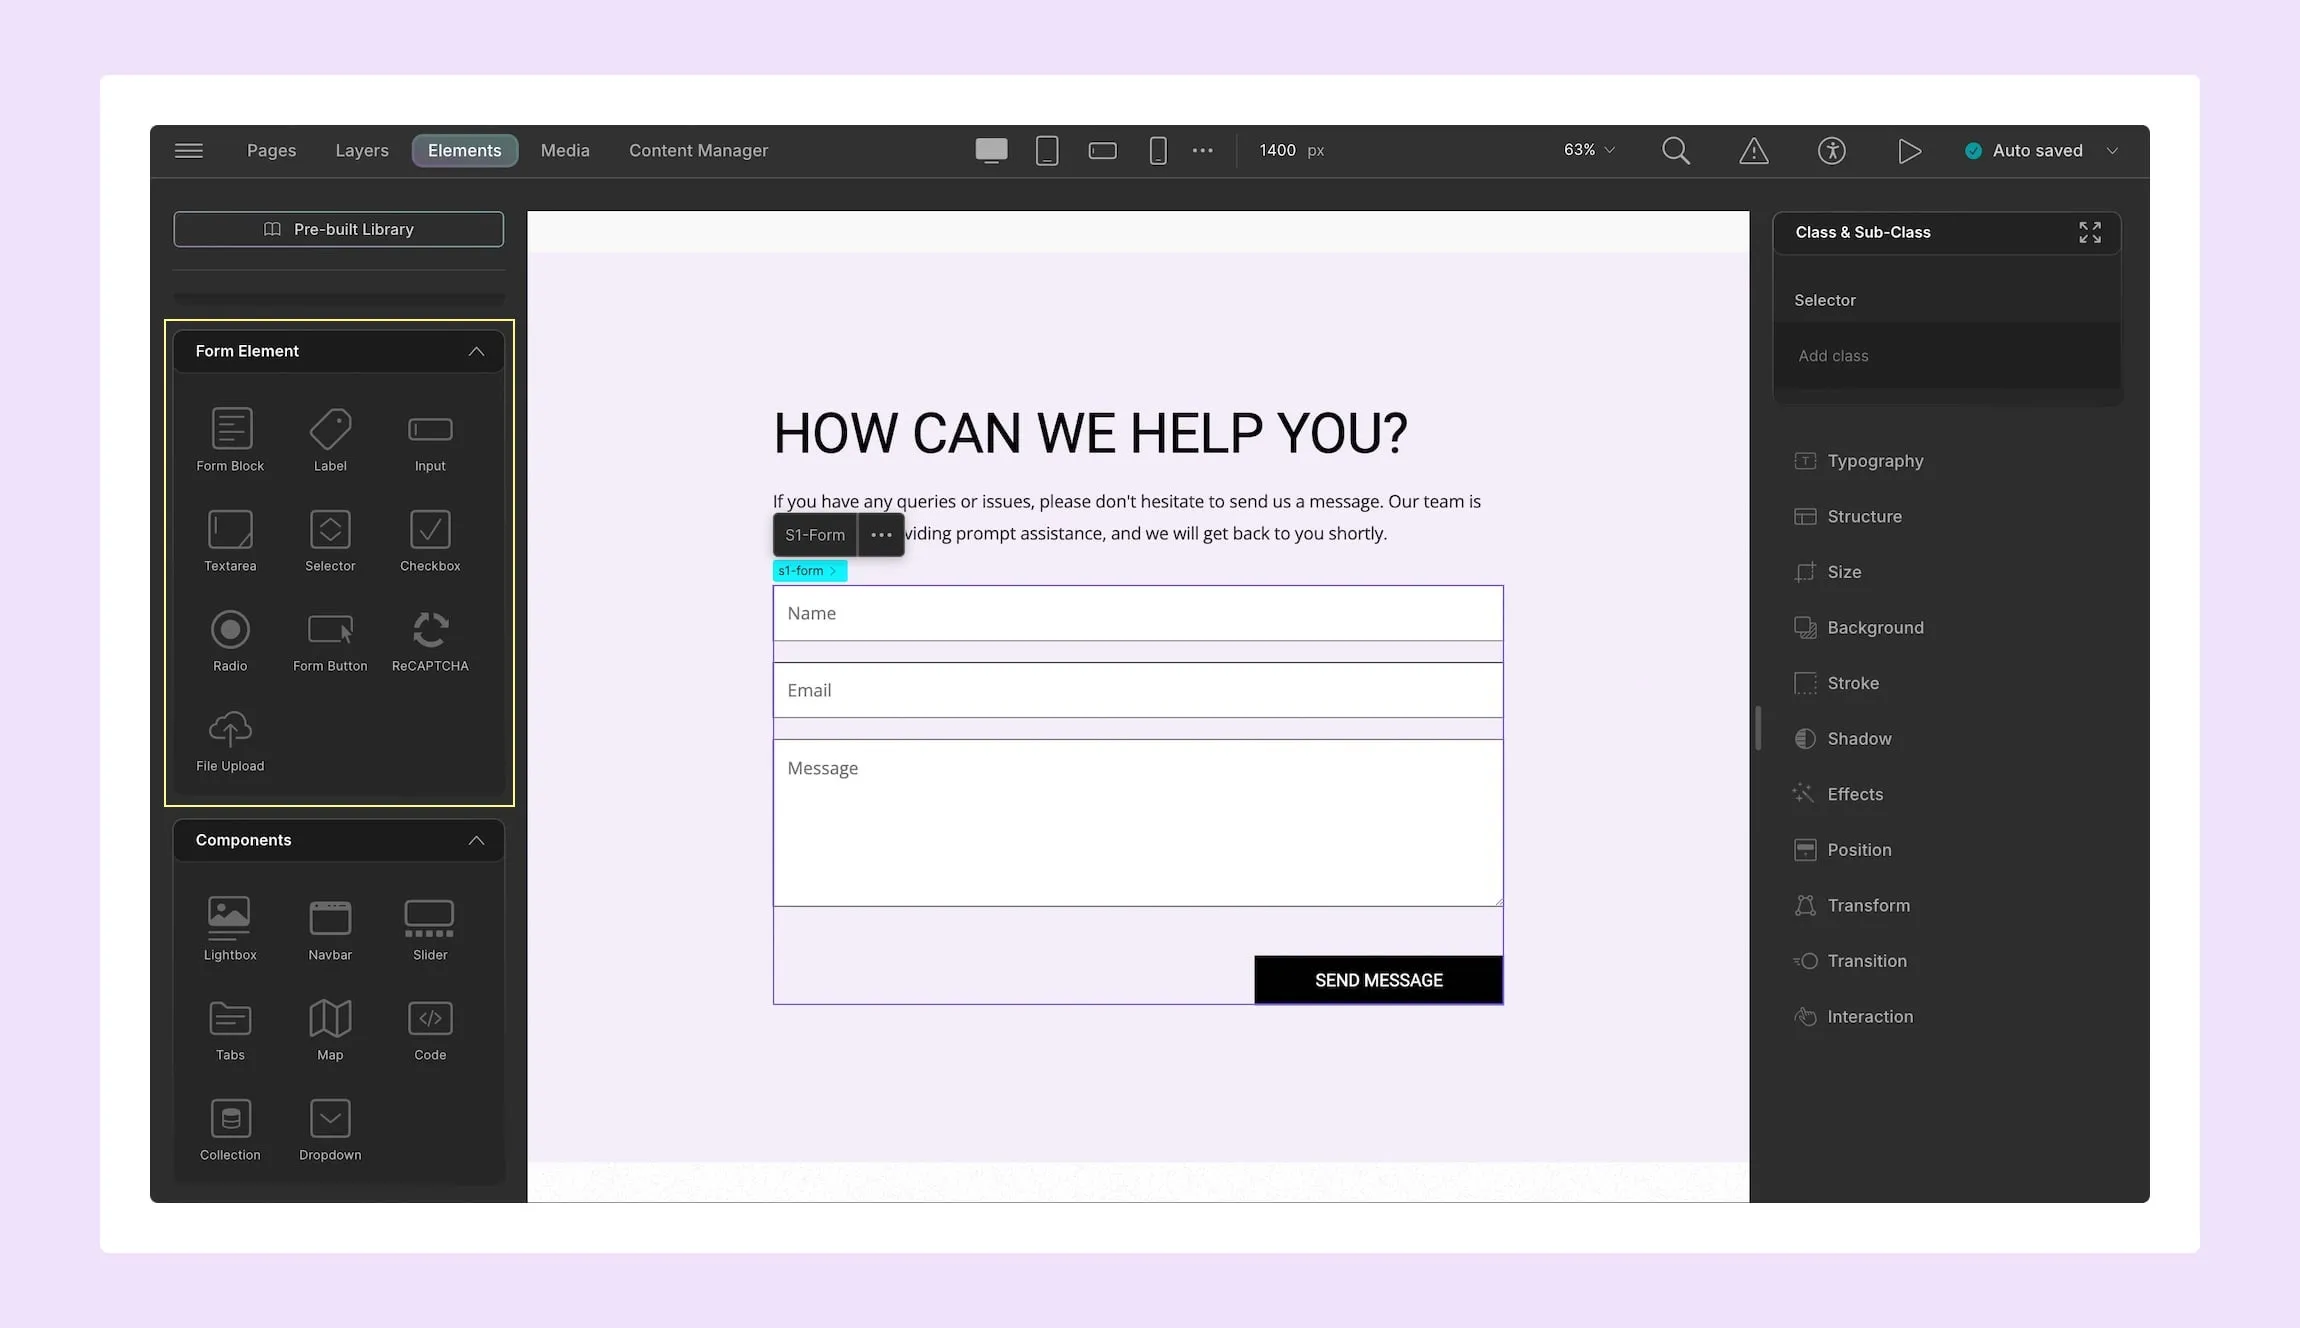
Droip offers a wide range of Form Elements that allow you to effortlessly create a variety of responsive forms, tailored to your needs. These include:
- Form Block: The foundational container of your form that holds all other form elements. Form elements can only be utilized when they’re added to this block.
- Label: Text that identifies form fields, guiding users on what information to input.
- Input: A single-line field where users can enter shorter responses, that can be configured to collect various types of data, including text, email, password, date, date-time, and number.
- Text Area: A larger multi-line field designed to collect longer responses, such as comments or messages.
- Selector: A dropdown menu that allows users to select from a pre-defined list of options.
- Checkbox: A set of small squares that users can tick to choose one or multiple options.
- Radio: A set of circular buttons that users can select to choose one option, ideal for exclusive choices.
- Form Button: A submit button that sends the form data to be saved in the server and triggers an after-submit action.
- reCAPTCHA: A security feature designed to protect your form from spam by requiring users to verify they’re human. More on this will be discussed later.
- File Upload: A feature that allows users to input files such as images, documents, and more directly into the form.
For more detailed info, check out our Form Elements documentation!
💡 Tip: Want to give yourself a head start? You can do just that with one of our gorgeous, predesigned forms from the Pre-built Library!
Step 2: Configure Form Element Settings
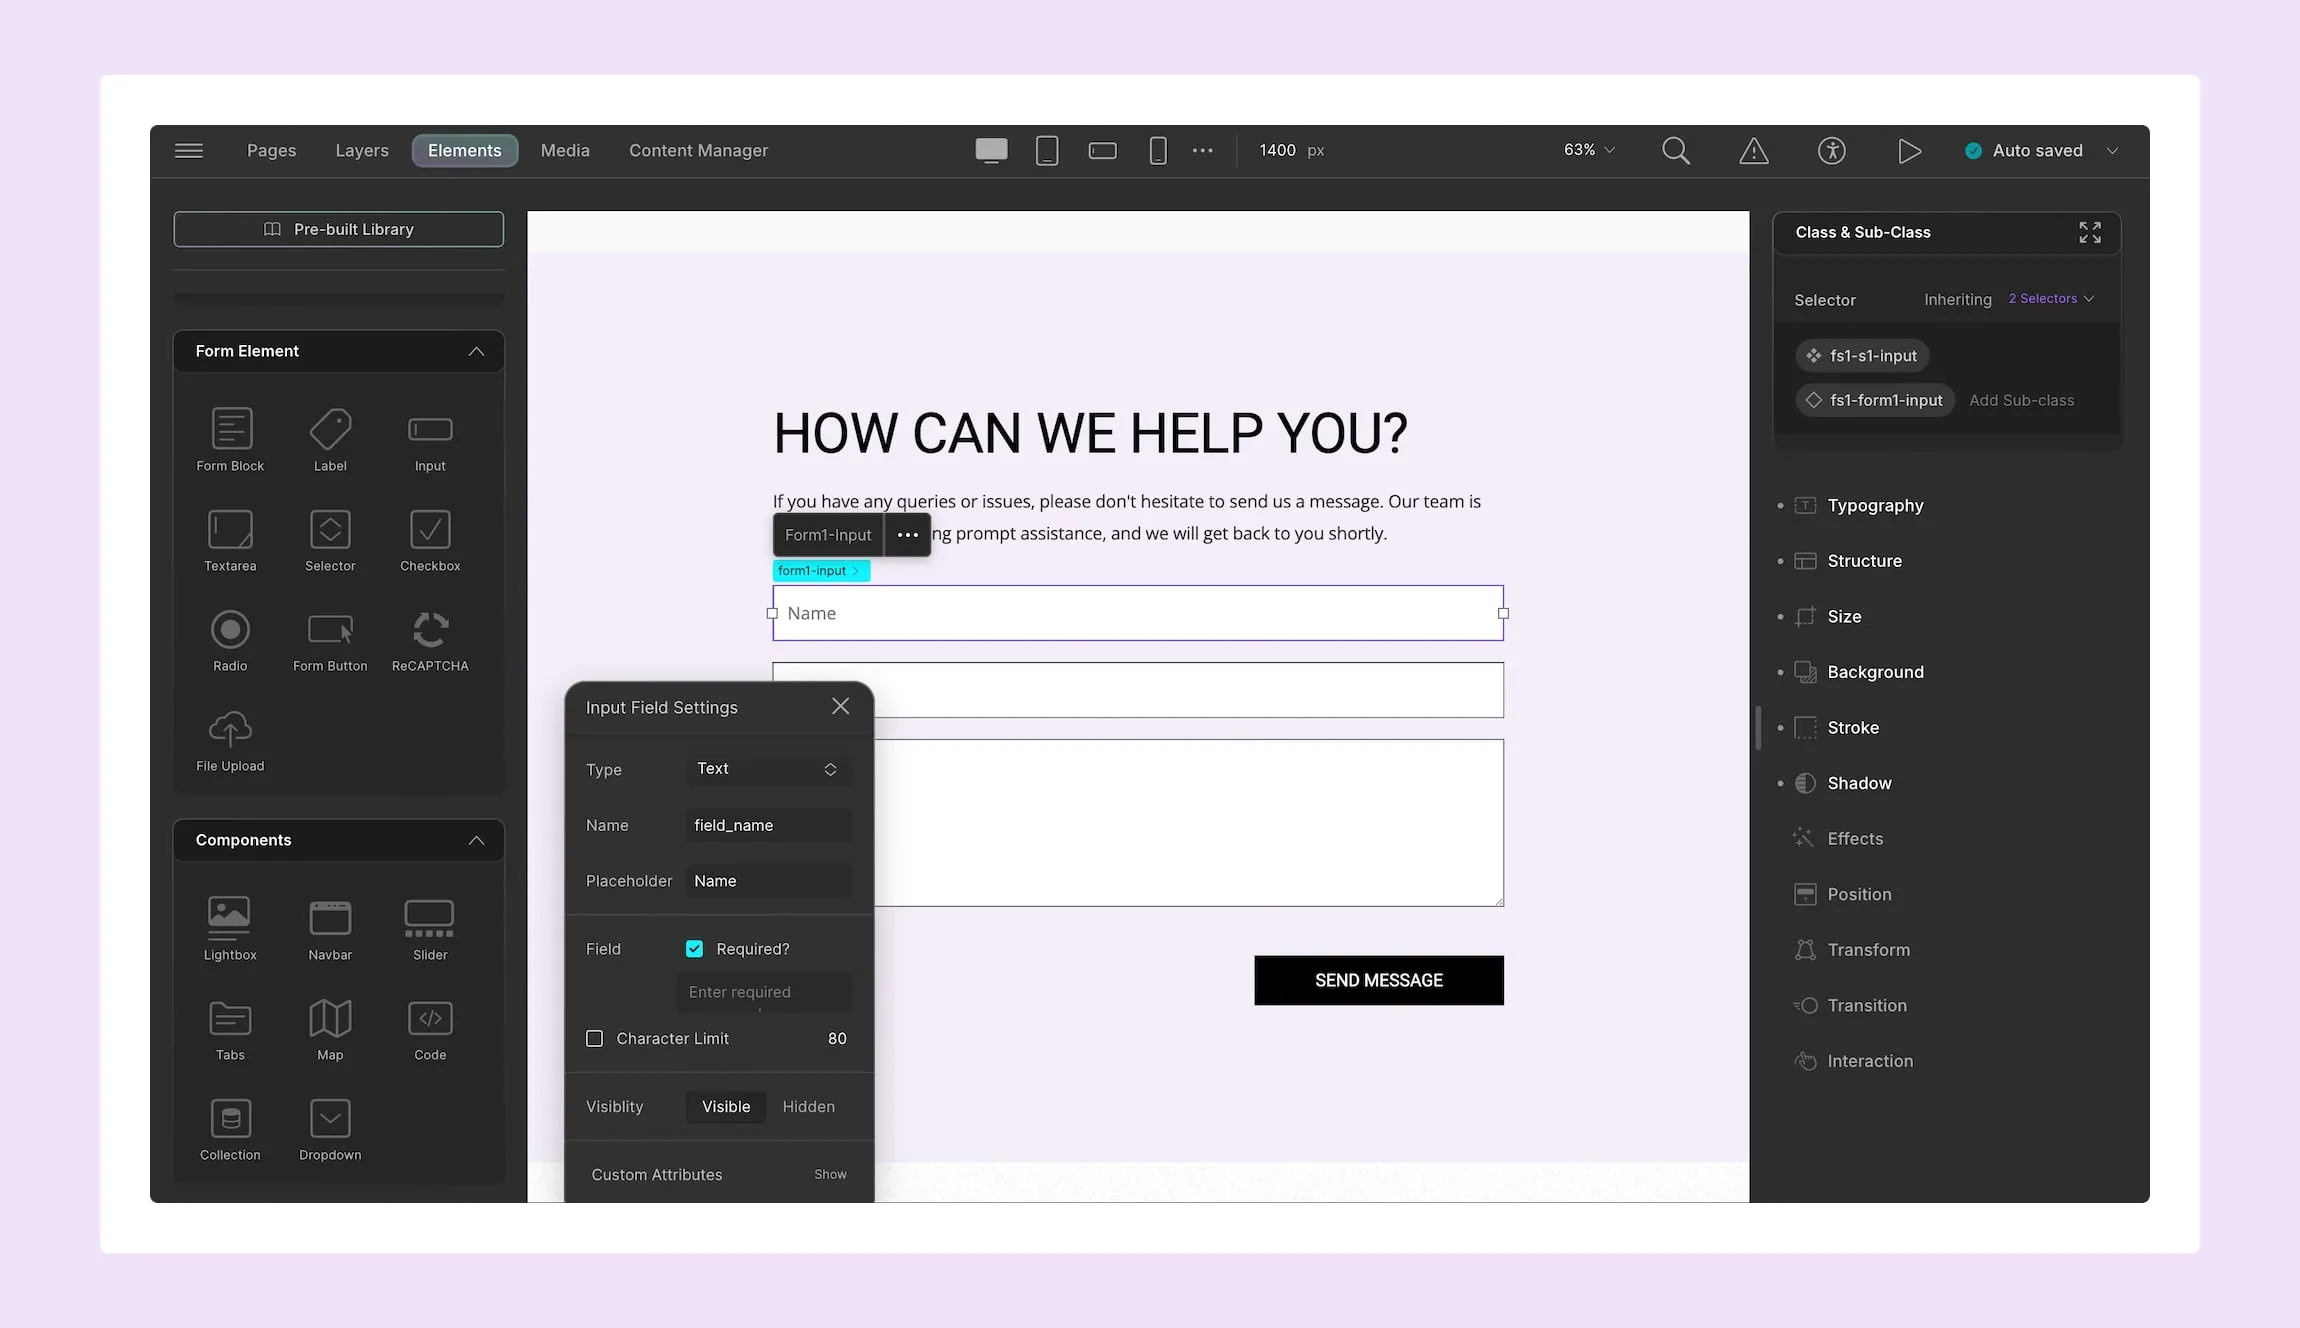
Next, it’s time to configure the form element settings. To access these settings, click on the ellipsis icon while the form element is selected.
These settings will vary based on the specific element. For instance, you can define the element’s name, set it as required, and, if applicable, select the type, add a placeholder, define the character limit, and more.
Then, for certain elements like the Selector or Radio buttons, you’ll also find an Options tab that lets you add a list of options.
Step 3: Define Form After-Submit Actions
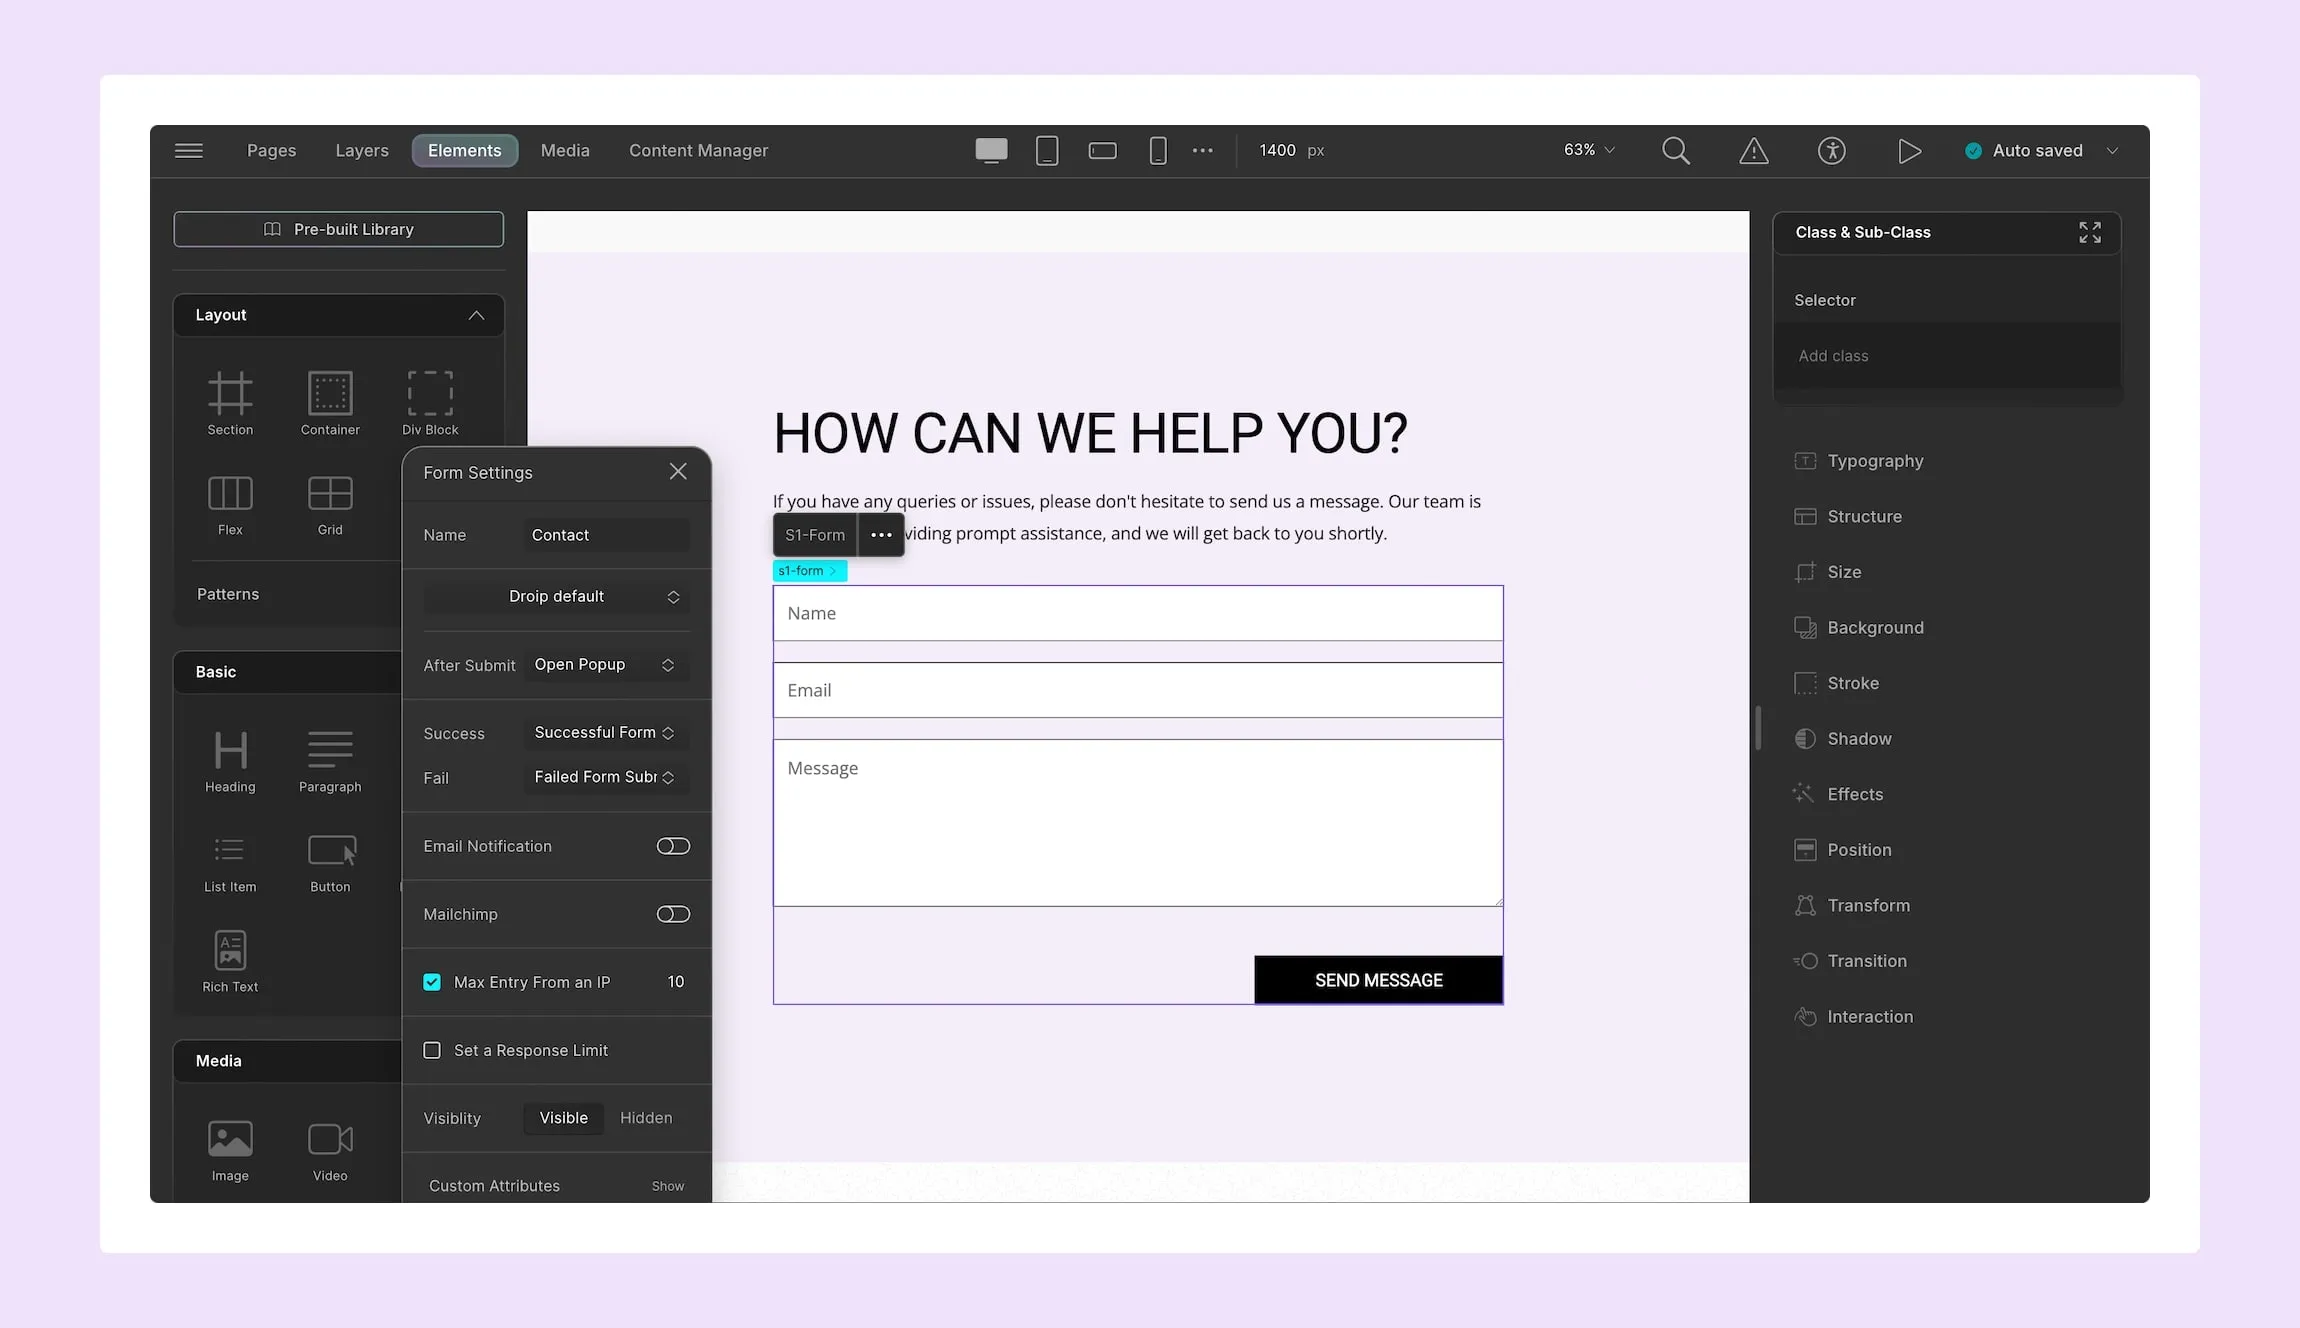
Then, it’s time for you to configure your form settings. To access these settings, select the Form Block element and click on the ellipsis icon where you can set the form’s name, enable email notification, set max entry from an IP, and more.
Most importantly, here you can choose & configure the form’s after-submit actions from the following options:
- Show Notification: On choosing this option, you can then select which state, i.e. Success or Failure, message you want to display.
- Open Pop-up: On choosing this option, you can then specify both the pop-up triggered on successful form submission and also failed form submission.
- Go to Page: On choosing this option, select the pages to which the user will be redirected upon successful form submission and also failed form submission.
- External URL: On choosing this option, set the external link to which the user will be redirected upon successful form submission and also failed form submission.
Step 4: Simplify Lead Generation
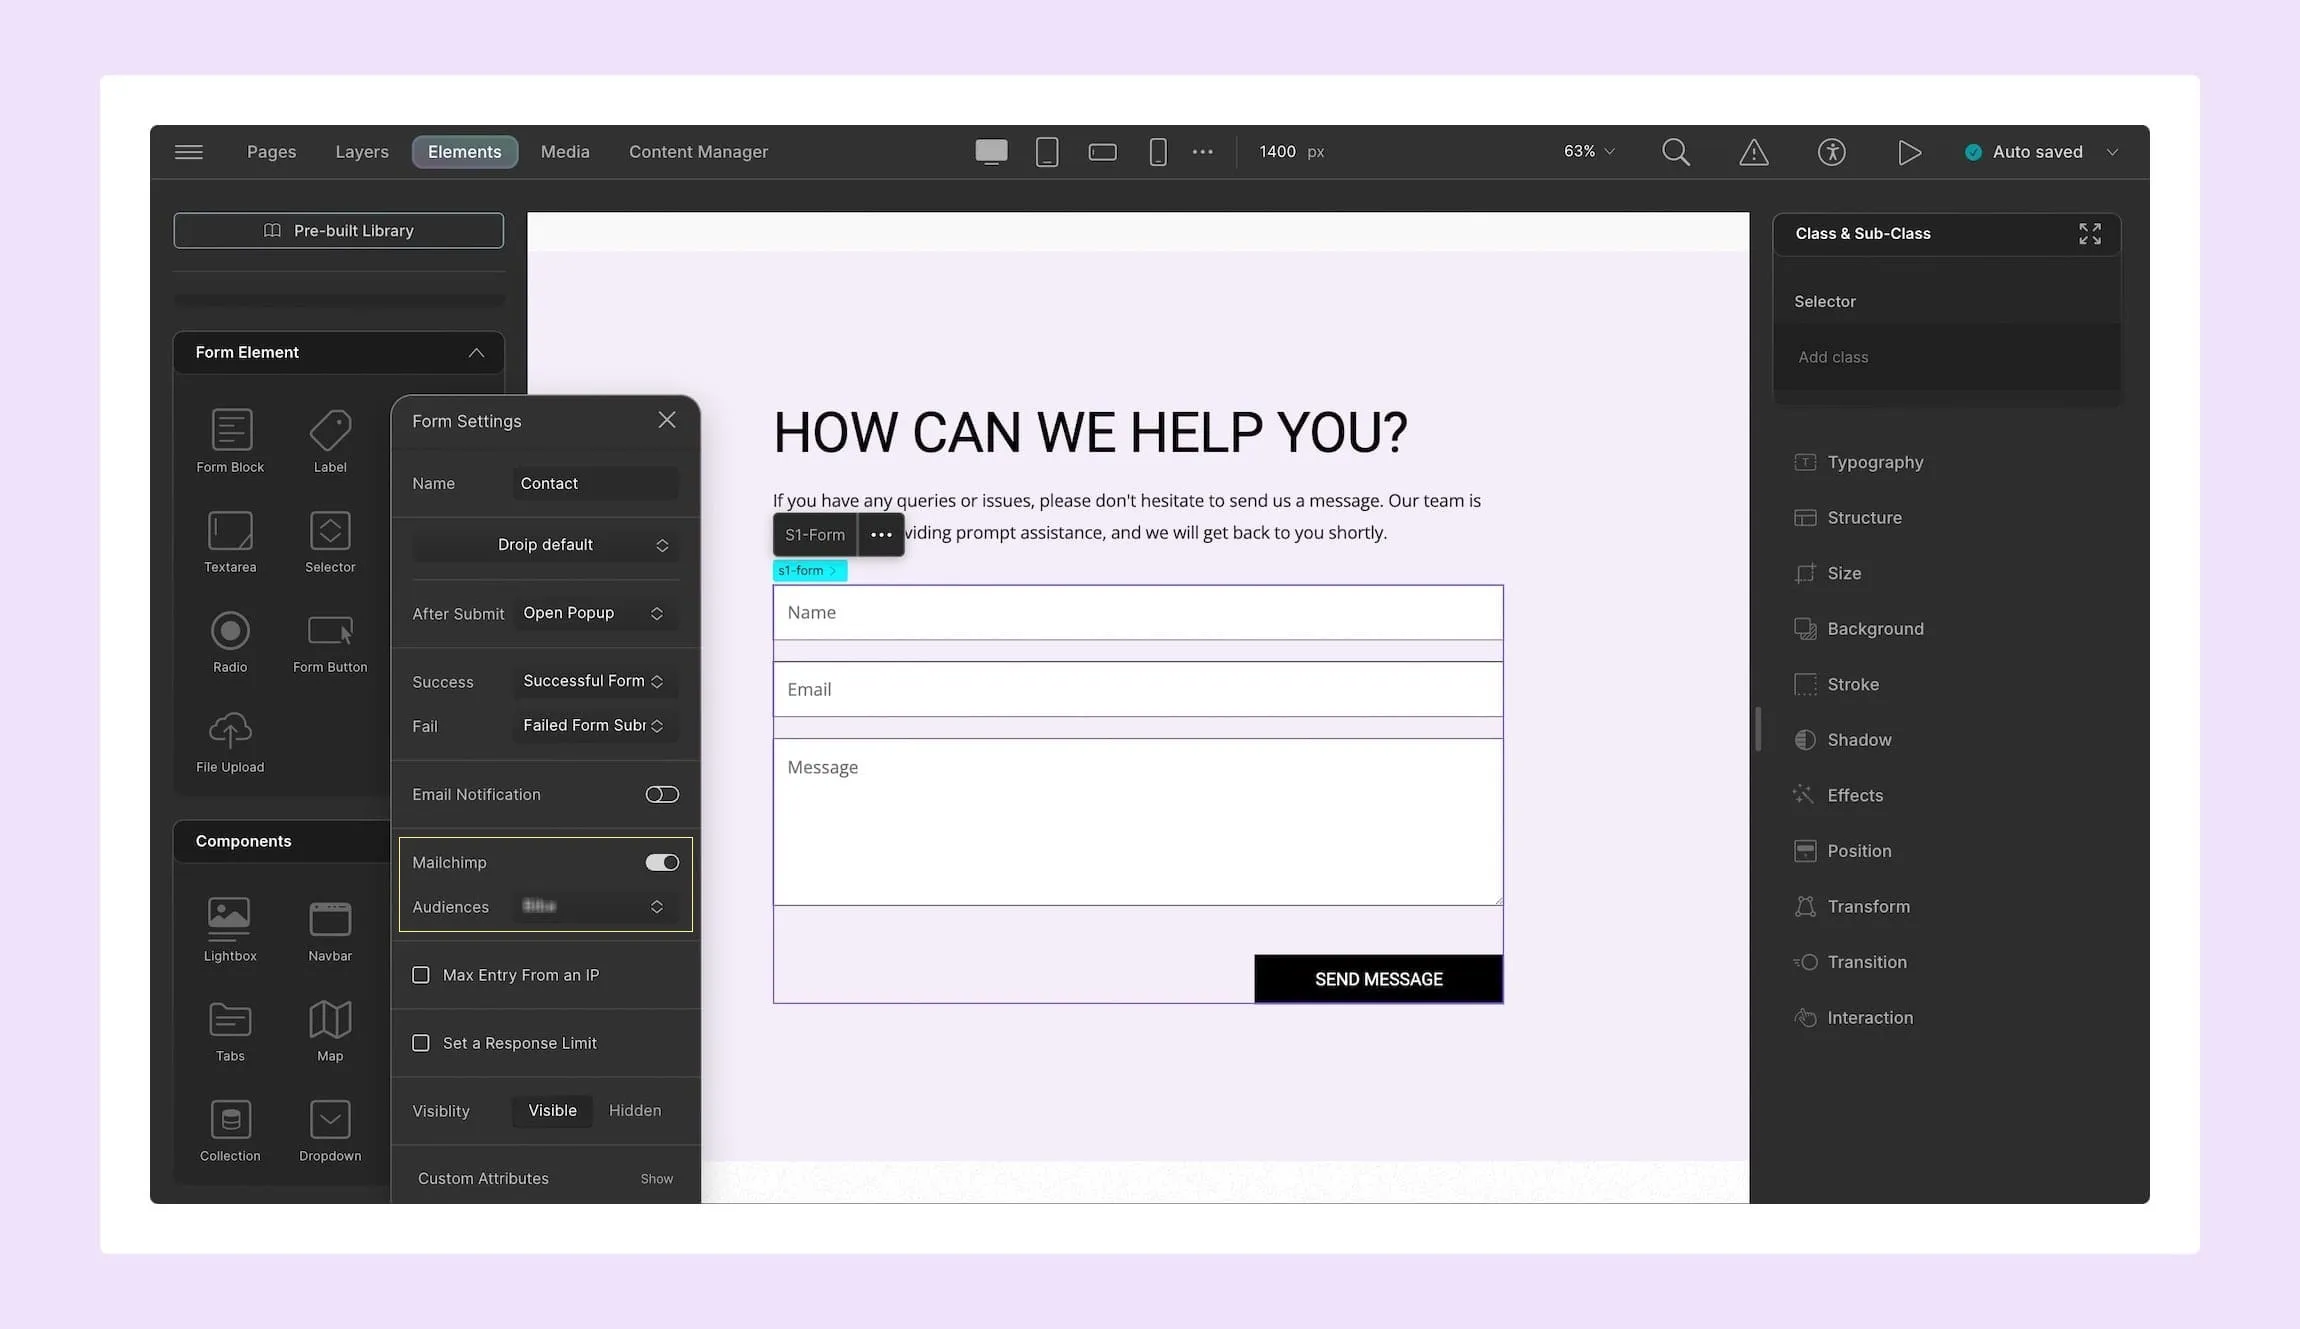
Make lead generation and email marketing effortless with Droip’s seamless integration with Mailchimp!
Using Mailchimp, you can manage mailing lists, automate your email marketing campaigns, track performance, and more — all in tandem with your forms in Droip!
To implement it, start by connecting the Mailchimp API. Then from form block settings, simply enable Mailchimp for your form.
Now, maximizing your outreach and engaging your audience is easier than ever!
Step 5: Strengthen Form Security
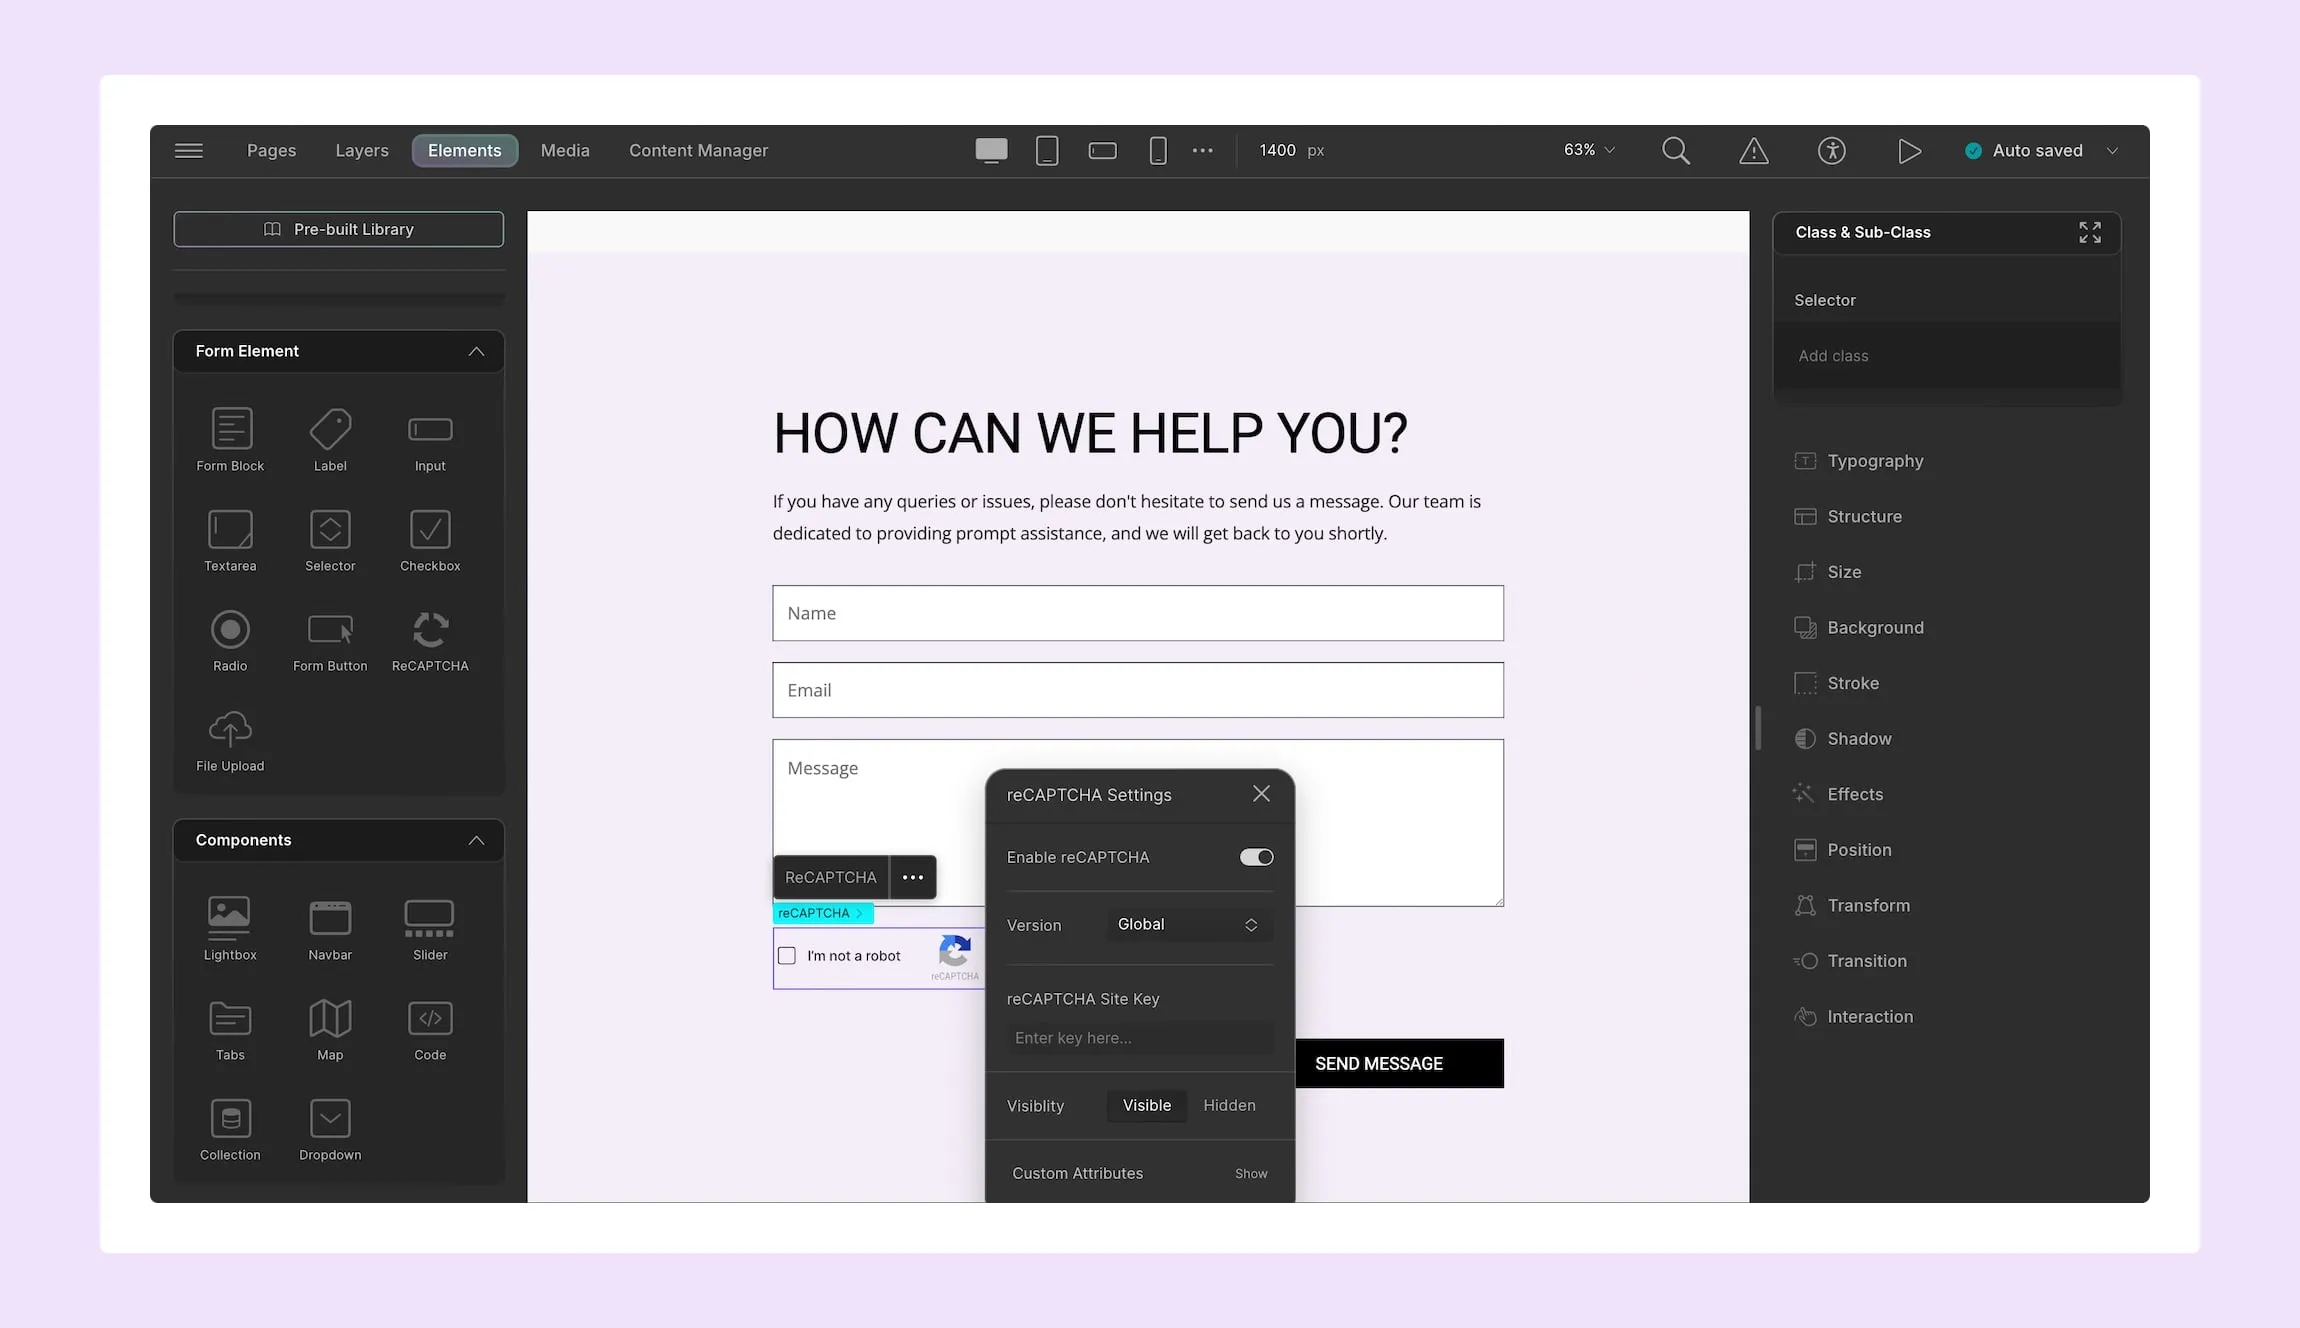
Next up, no form should be crafted without implementing proper form security to safeguard your website from spam submissions and automated threats.
Fortunately, the Droip WordPress tool ensures your forms are secure using built-in anti-spam form features like reCAPTCHA.
To implement this, you first need to connect its API. Then, add the reCAPTCHA element to your form and configure its settings.
And voila — your form now has spam protection, easily achieved right within Droip!
Step 6: Ensure You Have Responsive Forms
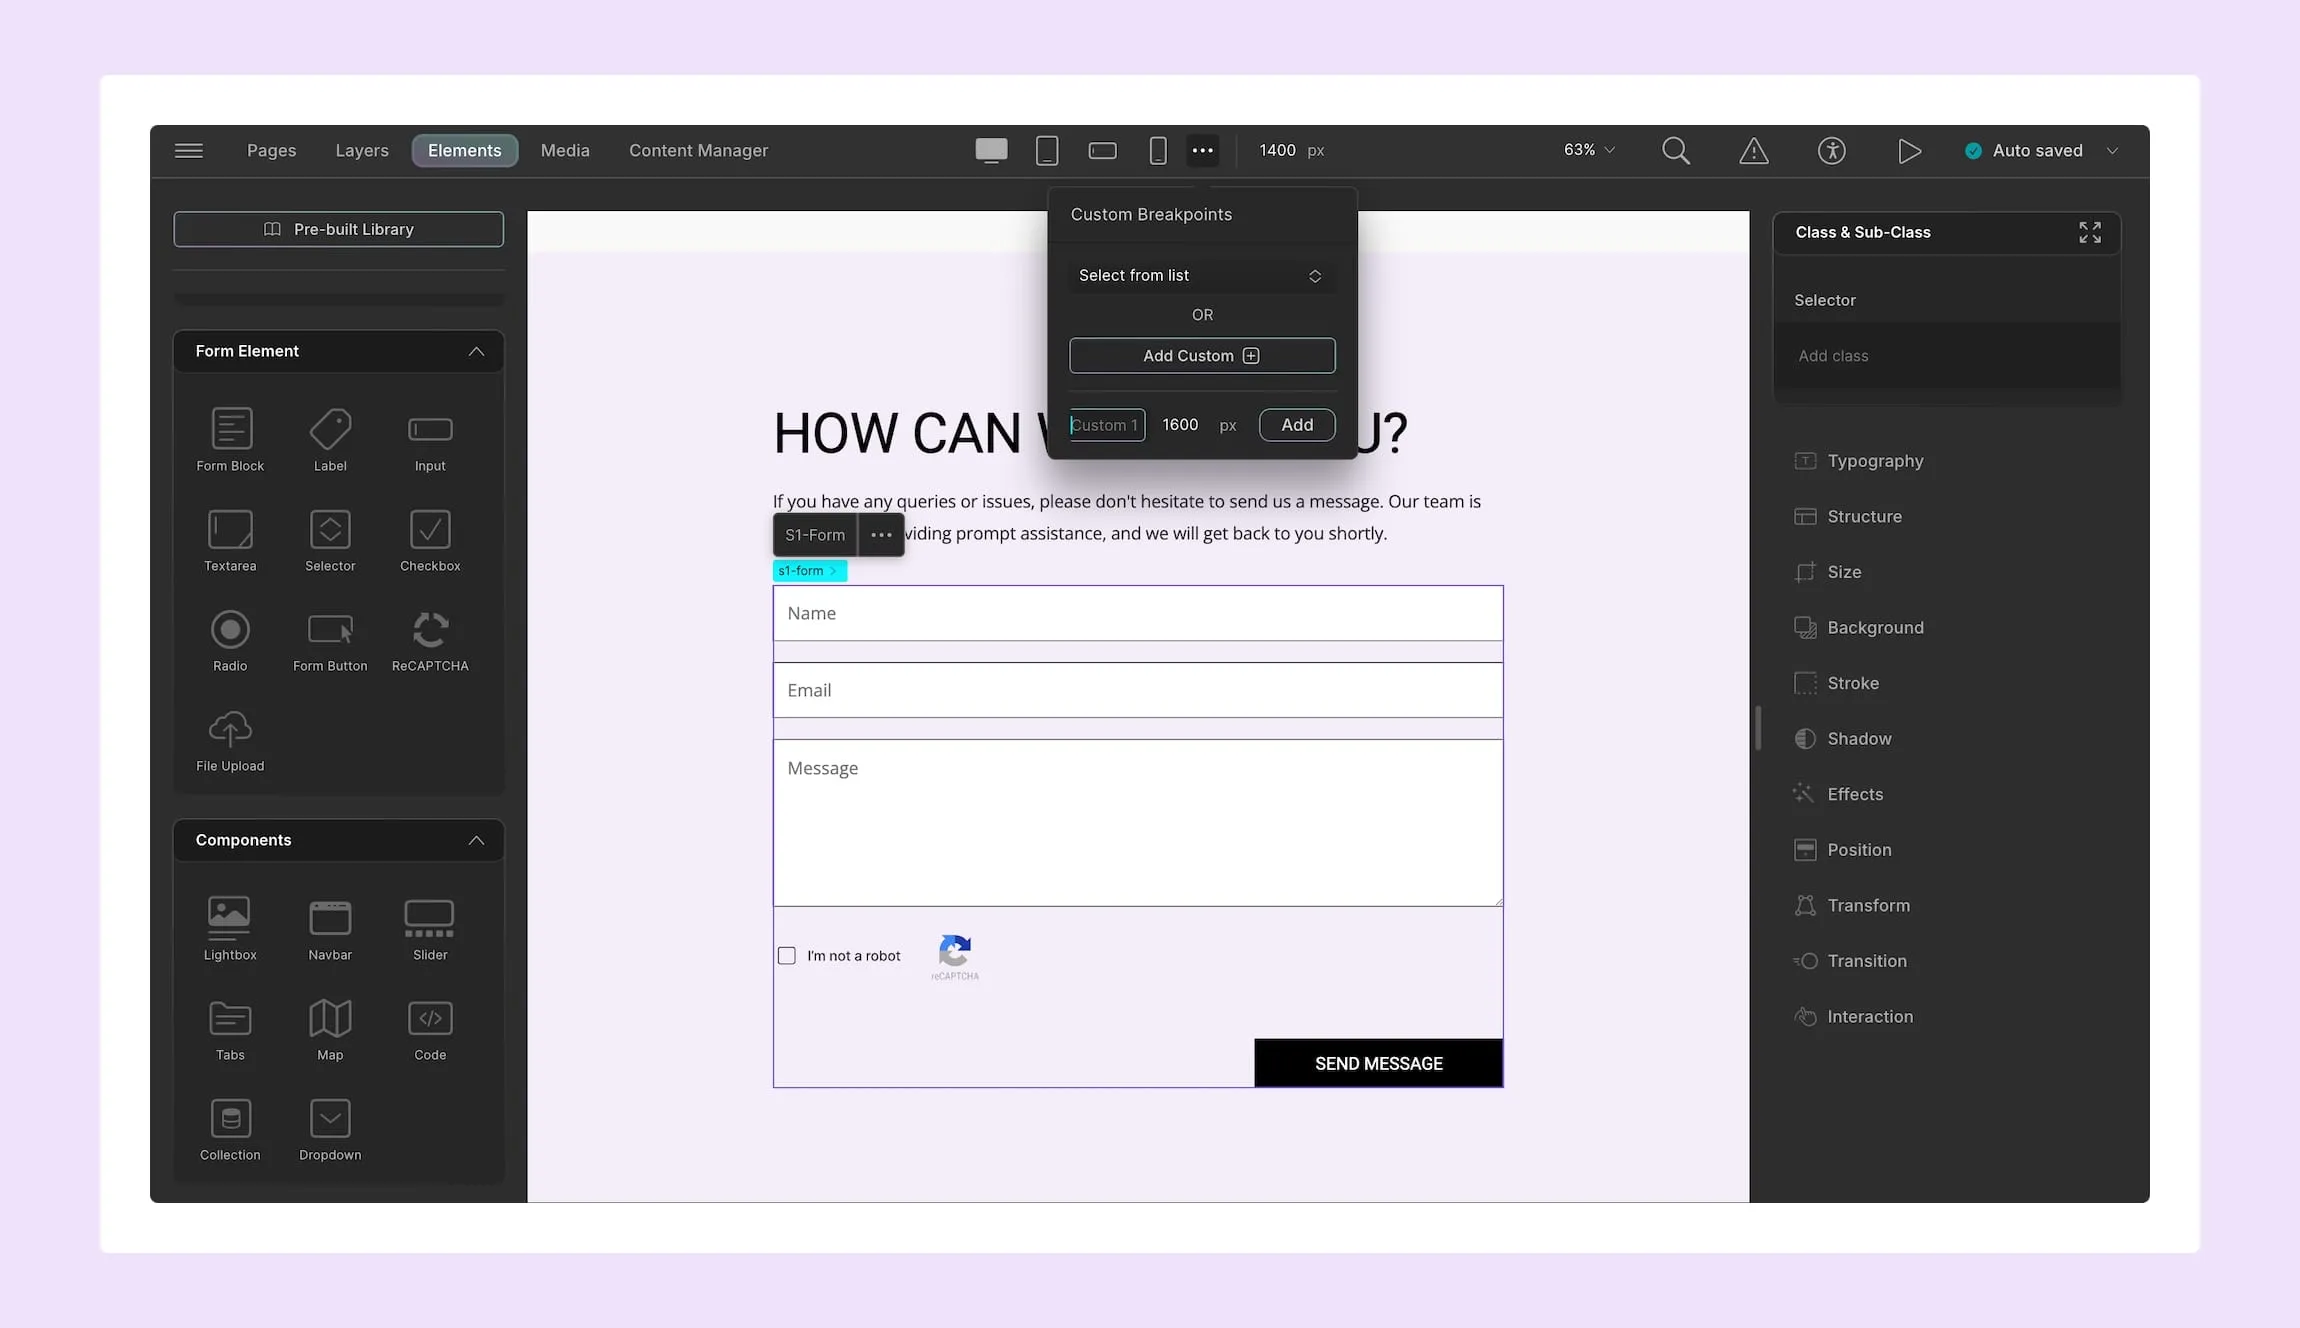
Last but not least, the final step is to make forms responsive to ensure visitors interact with them seamlessly across all platforms.
In Droip, achieving responsive forms is easier than ever using unlimited custom Breakpoints!
You can tailor your design for any of the preset viewports found on the Droip Topbar or define custom breakpoints by clicking on the ellipsis icon beside them.
And that’s it — You’re now all set to start collecting data effortlessly using secure & responsive forms for your website!
💡 Tip: Before you make your site live, use Droip’s Audit tool to check for missing form labels and other potential issues, easily ensuring your forms meet optimal quality standards!
How to Manage Form Data
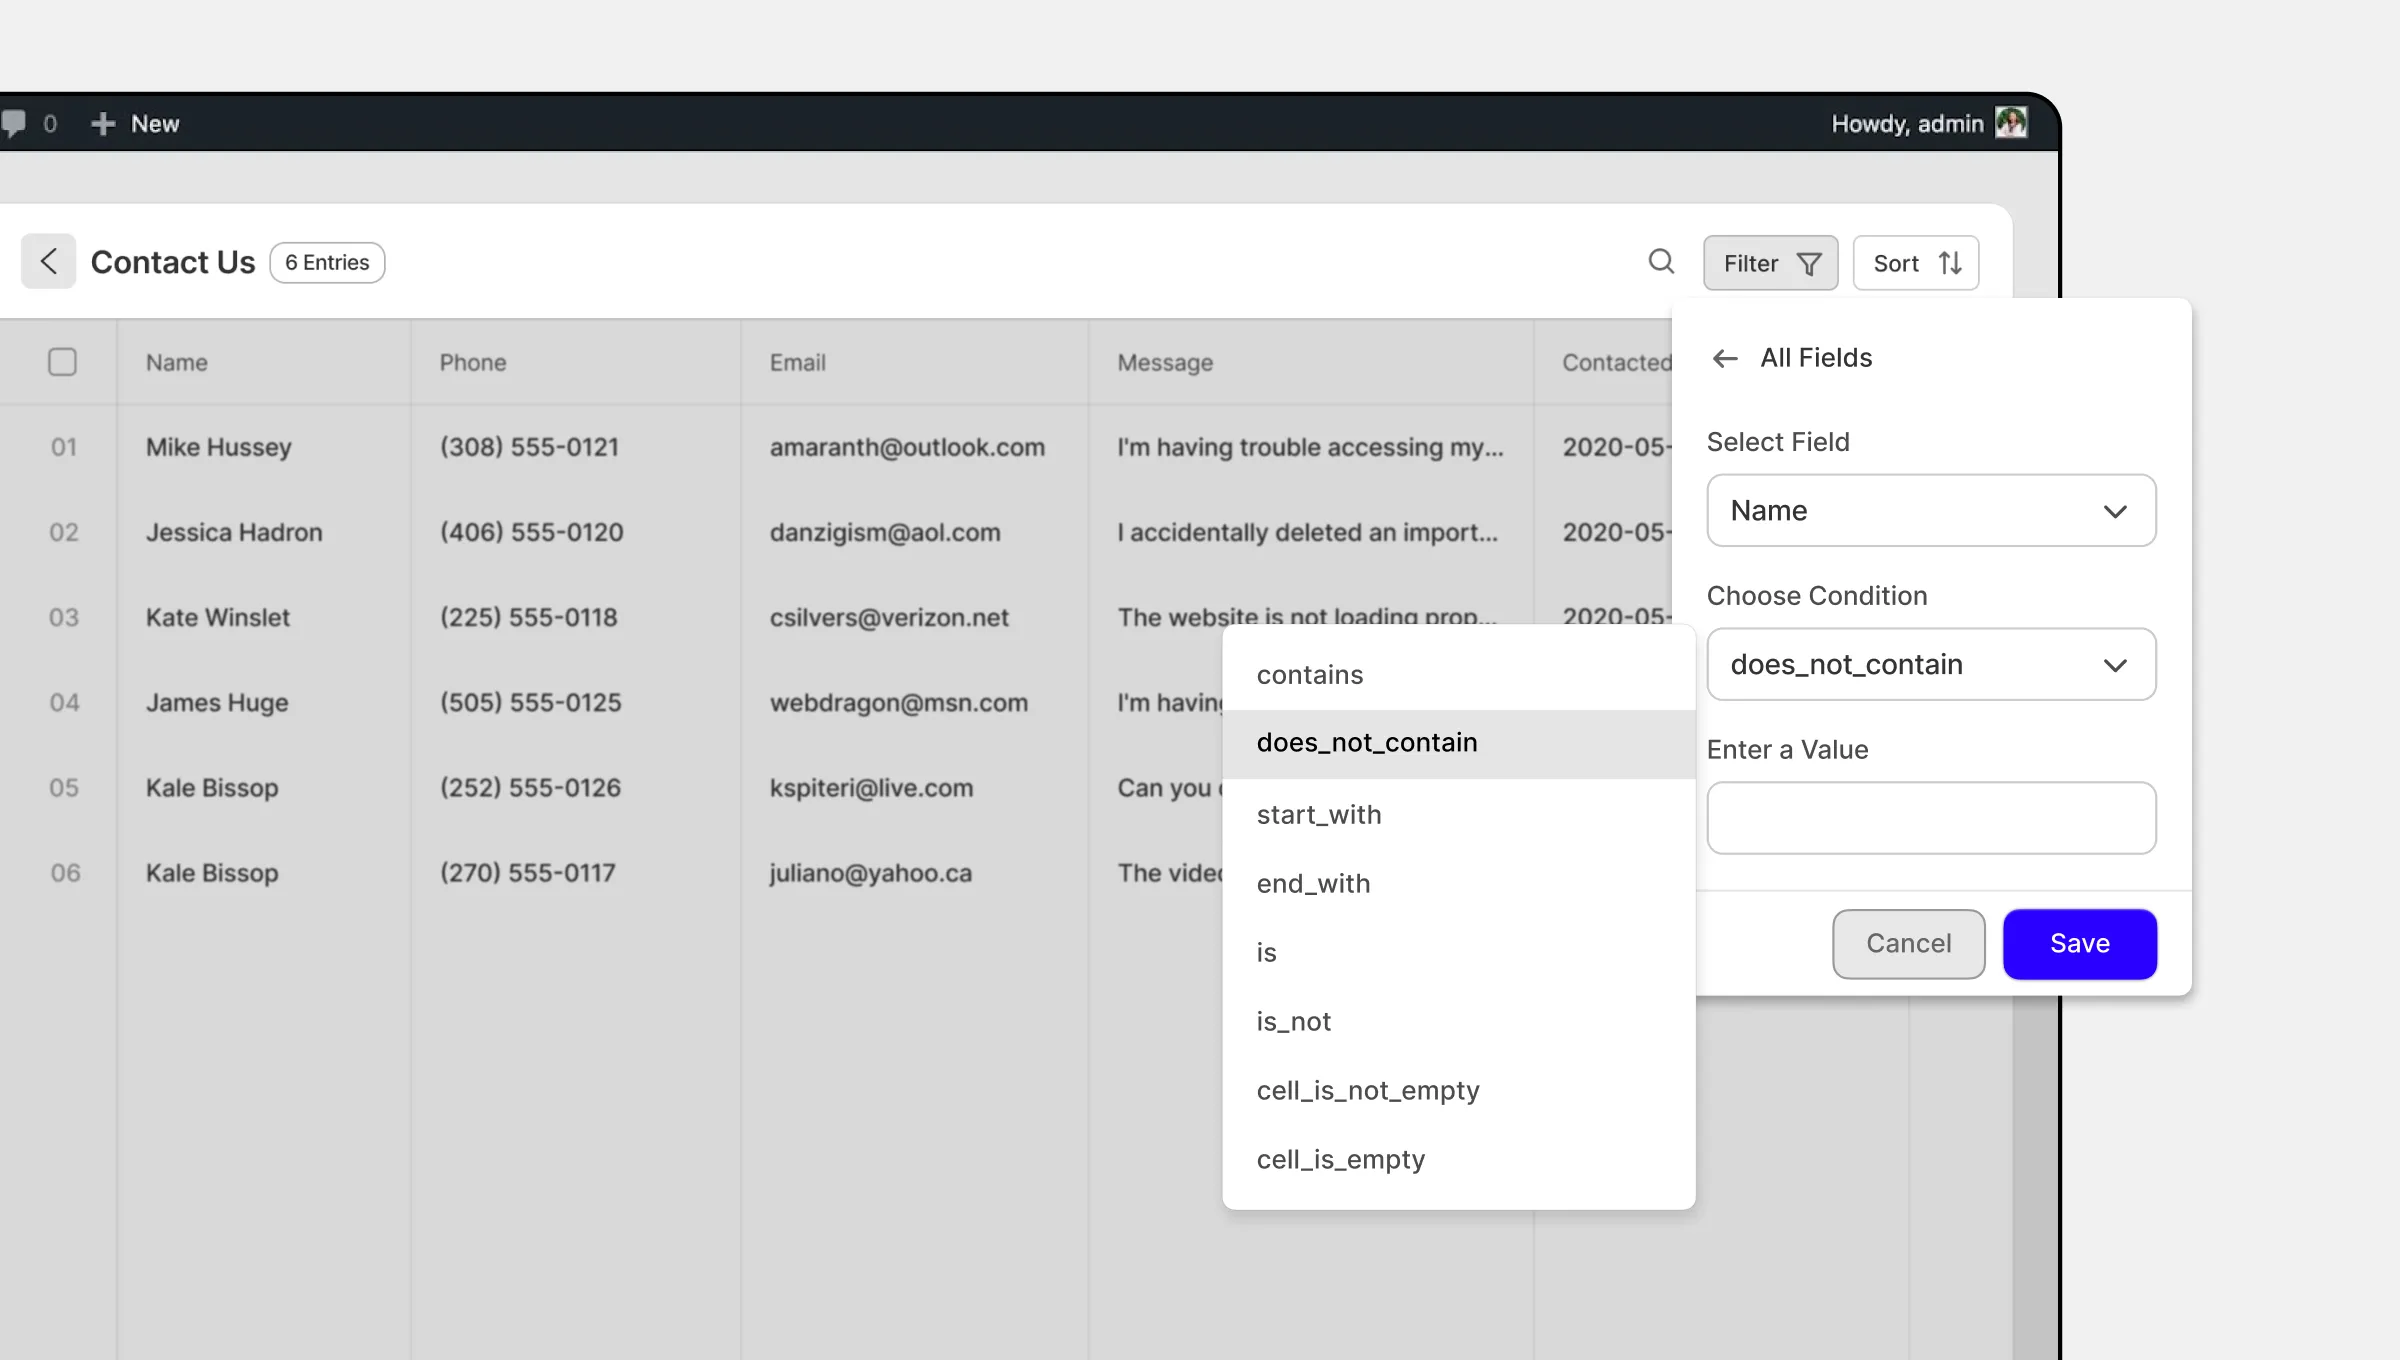
Once your forms are live and you start receiving form submissions, you’ll find that Droip makes managing and organizing your data simple through its native Form Manager.
From one central hub, you can access data collected from all forms on your website and perform various actions such as viewing, managing, filtering, sorting, and even exporting data for further analysis!
For a more in-depth guide on form data management in Droip, be sure to take a look at our Form Data documentation.
Wrapping Up
Now you know how to create forms in WordPress with no code! With Droip WordPress website builder’s native Form Builder, crafting powerful, responsive forms, has never been easier.
From contact forms to lead generation forms, Droip equips you with all the tools you need to create WordPress forms for any purpose — no coding or extra plugins required!
And that’s not all. With a built-in Form Manager, you can manage the data collected through your forms right from within Droip, further simplifying how you run your website.