
These days, building a stunning website doesn’t take a coding whizz.
All you need is a solid strategy and the right one-stop tool — and you’ll be well on your way to launching the website of your dreams, exactly as you envisioned it, without writing a single line of code!
Ready to get started? Check out our ultimate beginner’s guide, where we show you the ropes on how to create a website, visually.
TL;DR
With the right strategy and website builder, creating a website is a breeze:
- Plan First: Define your website’s purpose, audience, and goals.
- Pick a Website Builder: Go for an all-in-one platform that’s effortless and cost-effective.
- Build Your Site: Set global styles, create essential pages, and design dynamically & responsively for all devices.
- Optimize & Launch: Fine-tune SEO, boost performance, and go live.
Craft Your Website Blueprint
Before you dive into your design, lay the groundwork for your website by defining its purpose, target audience, and what you want to achieve.
Is it a freelancer portfolio, an online store, a blog, or a business site? Then, pinpoint who you’re building for, i.e., learn their age, interests, and needs. Finally, set clear short-term and long-term goals.
These details will help shape your website’s layout, features, and overall design.
Select the Best Website Builder
Once you’ve got the planning out of the way, it’s time to pick the right platform and website builder, which can make all the difference when it comes to success.
There are plenty of options out there, from traditional website-building using complex code to no-code solutions, including SaaS and CMS platforms. But if you’re looking for an option that balances flexibility, control, and cost-effectiveness — WordPress is your answer.
With that said, WordPress alone isn’t enough. You need the right website builder to pair it with, one that doesn’t cause plugin bloat, slow down your site, and overstretch your budget.
So, look for a WordPress website builder that’s truly all-in-one, that lets you design, manage, and launch your site without piling on extra plugins and costs.
A platform like the Droip WordPress website builder offers exactly that with a powerful visual editor, ready-made templates and components, a built-in dynamic content manager, Figma to WordPress handoff, and much more.
With plans starting at just $69/year for one site, including full access to pro features, it’s a cost-effective, one-stop website builder at a fraction of the price of many alternatives that offer far less in return.
Create a Website With WordPress
You’ve got your plan and the right website builder. Now it’s time to bring it all together.
So let’s get started on how to create a WordPress website using Droip!
Choose How to Start Building with Droip
Step one is choosing how you’ll get started, as Droip offers several flexible entry points:
Pick a Ready-Made WordPress Theme Template

The Droip website builder comes with an ever-growing library of fully-functional, dynamic, and responsive WordPress Themes, all designed to serve a wide range of niches.
These templates are perfect if you’re looking to save time and need a starting point. And the best part? You can test and explore as many of these as you like until you land on the right one, as they’re all included with Droip at no extra cost.
To learn how to install and edit them, check out our documentation on Droip Templates.
Import Design Instantly from Figma to WordPress
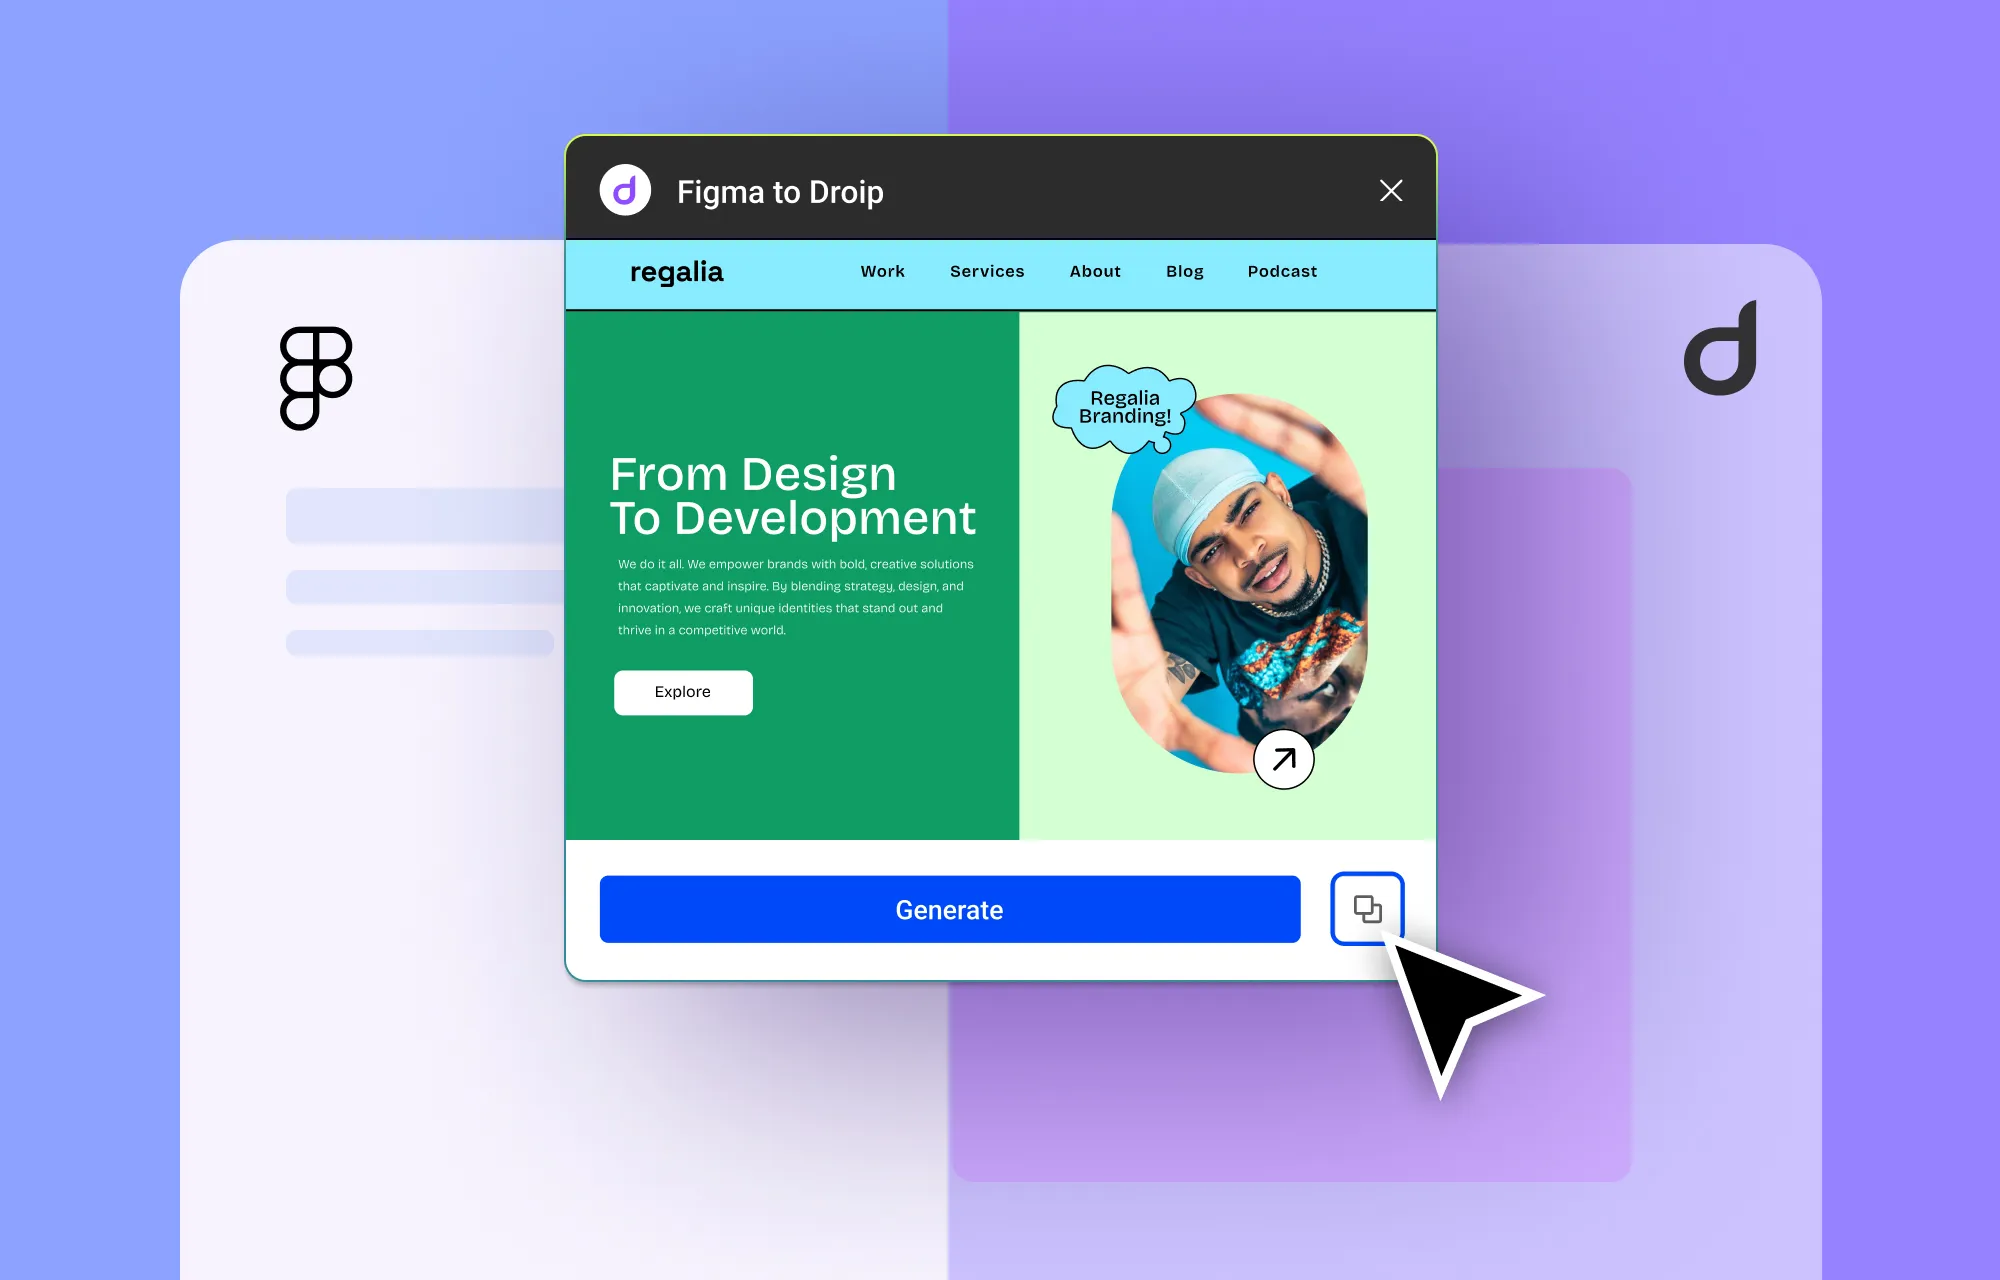
Already have a website design ready on Figma? No problem!
With Droip’s Figma to WordPress handoff tool, you can go from design to development instantly with pixel-perfect accuracy and auto-responsiveness, minus the lengthy manual conversion.
Check out our Figma to Droip documentation as well as our dedicated article on how to convert from Figma to Droip to learn more!
Use Pre-built Pages, Wireframes, Sections, or Components
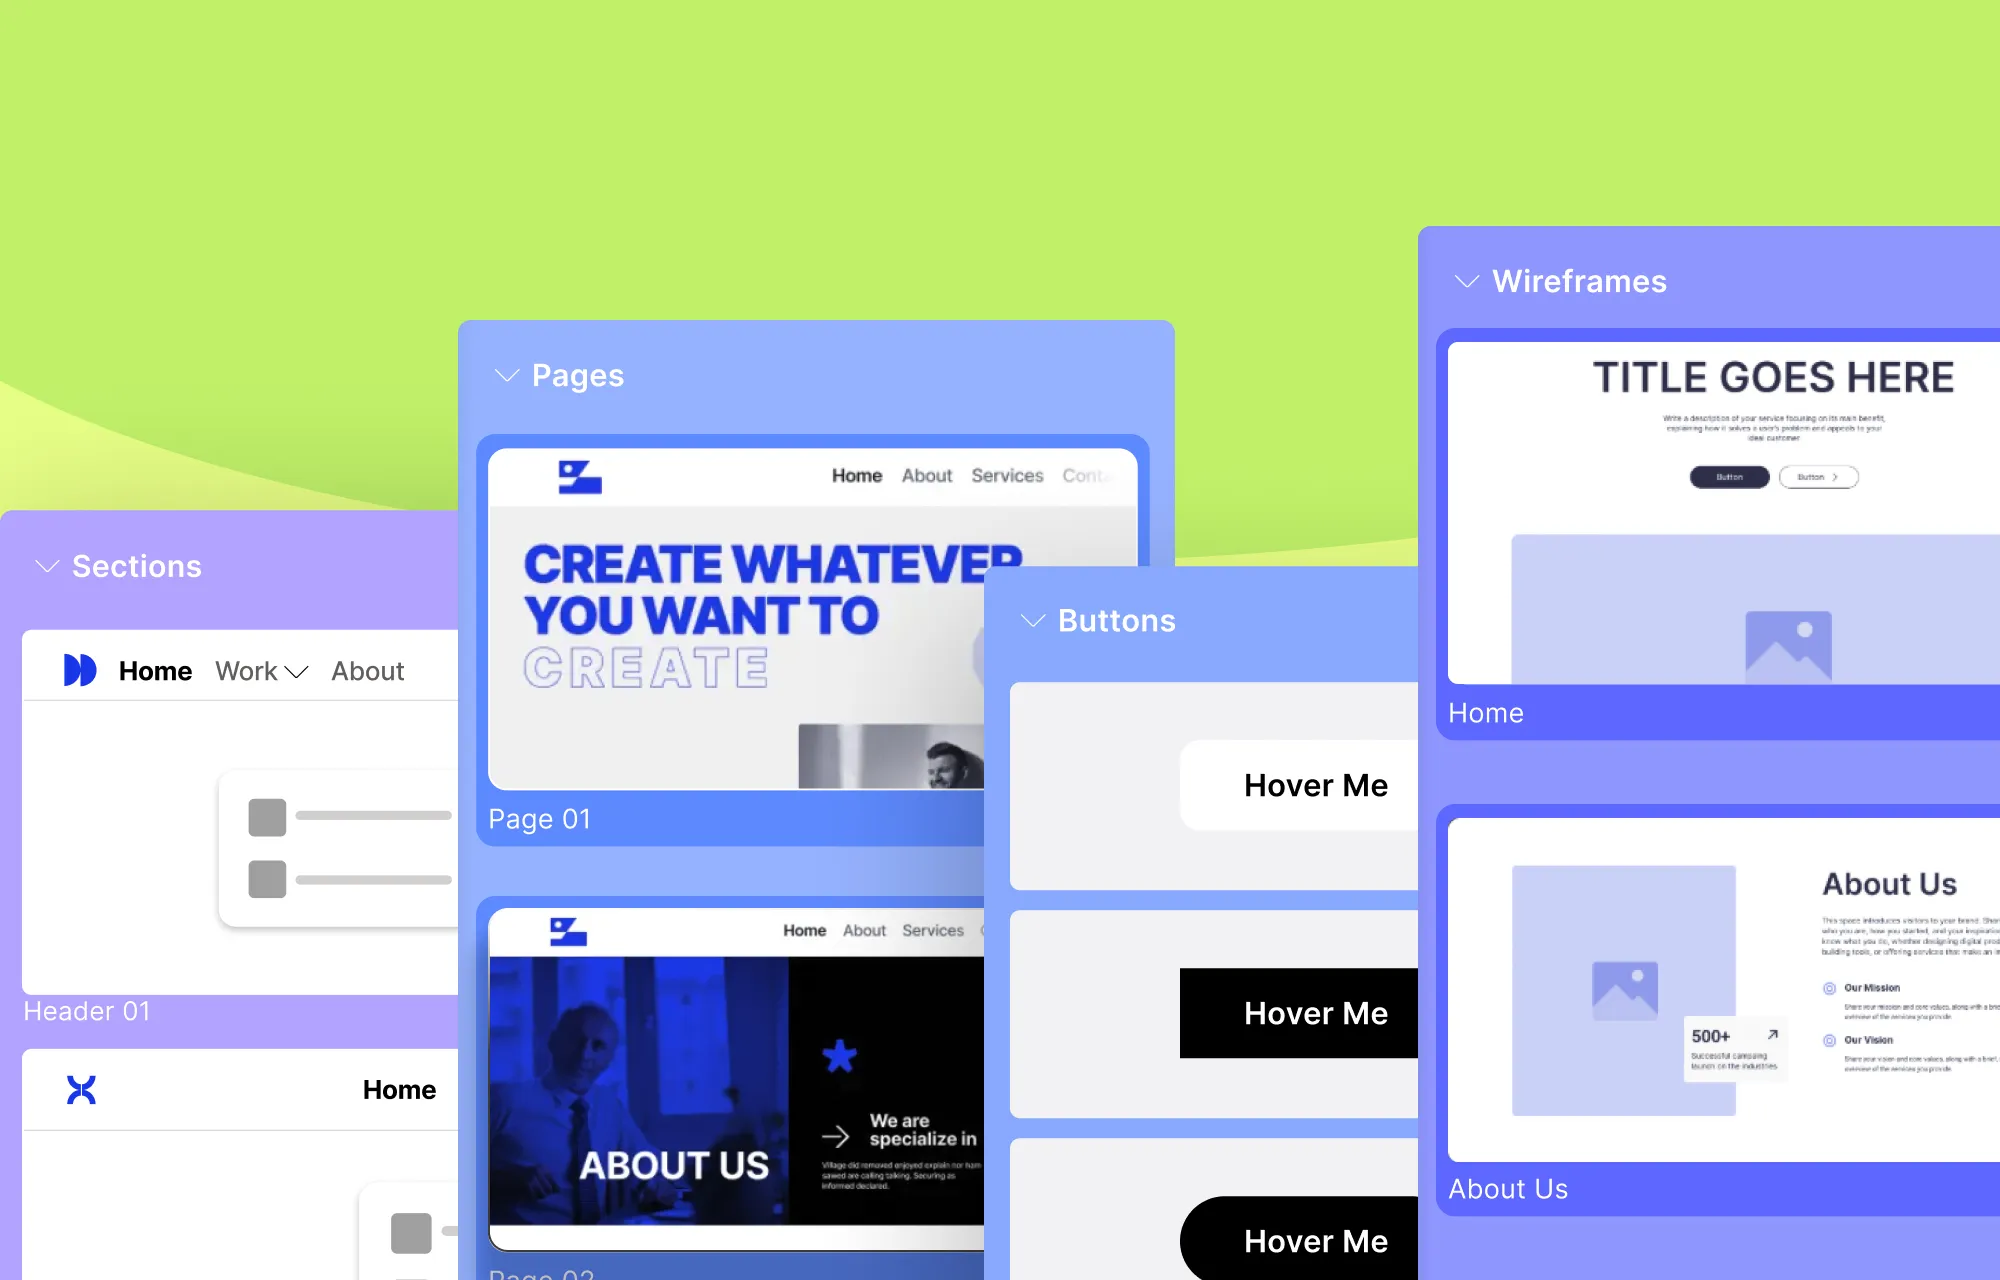
Alternatively, if you want more flexibility but don’t want a completely blank canvas, start with Droip’s pre-built pages, wireframes, sections, or components.
These are great as stepping stones without committing to a complete website layout like you do with Templates.
Build a Website From Scratch
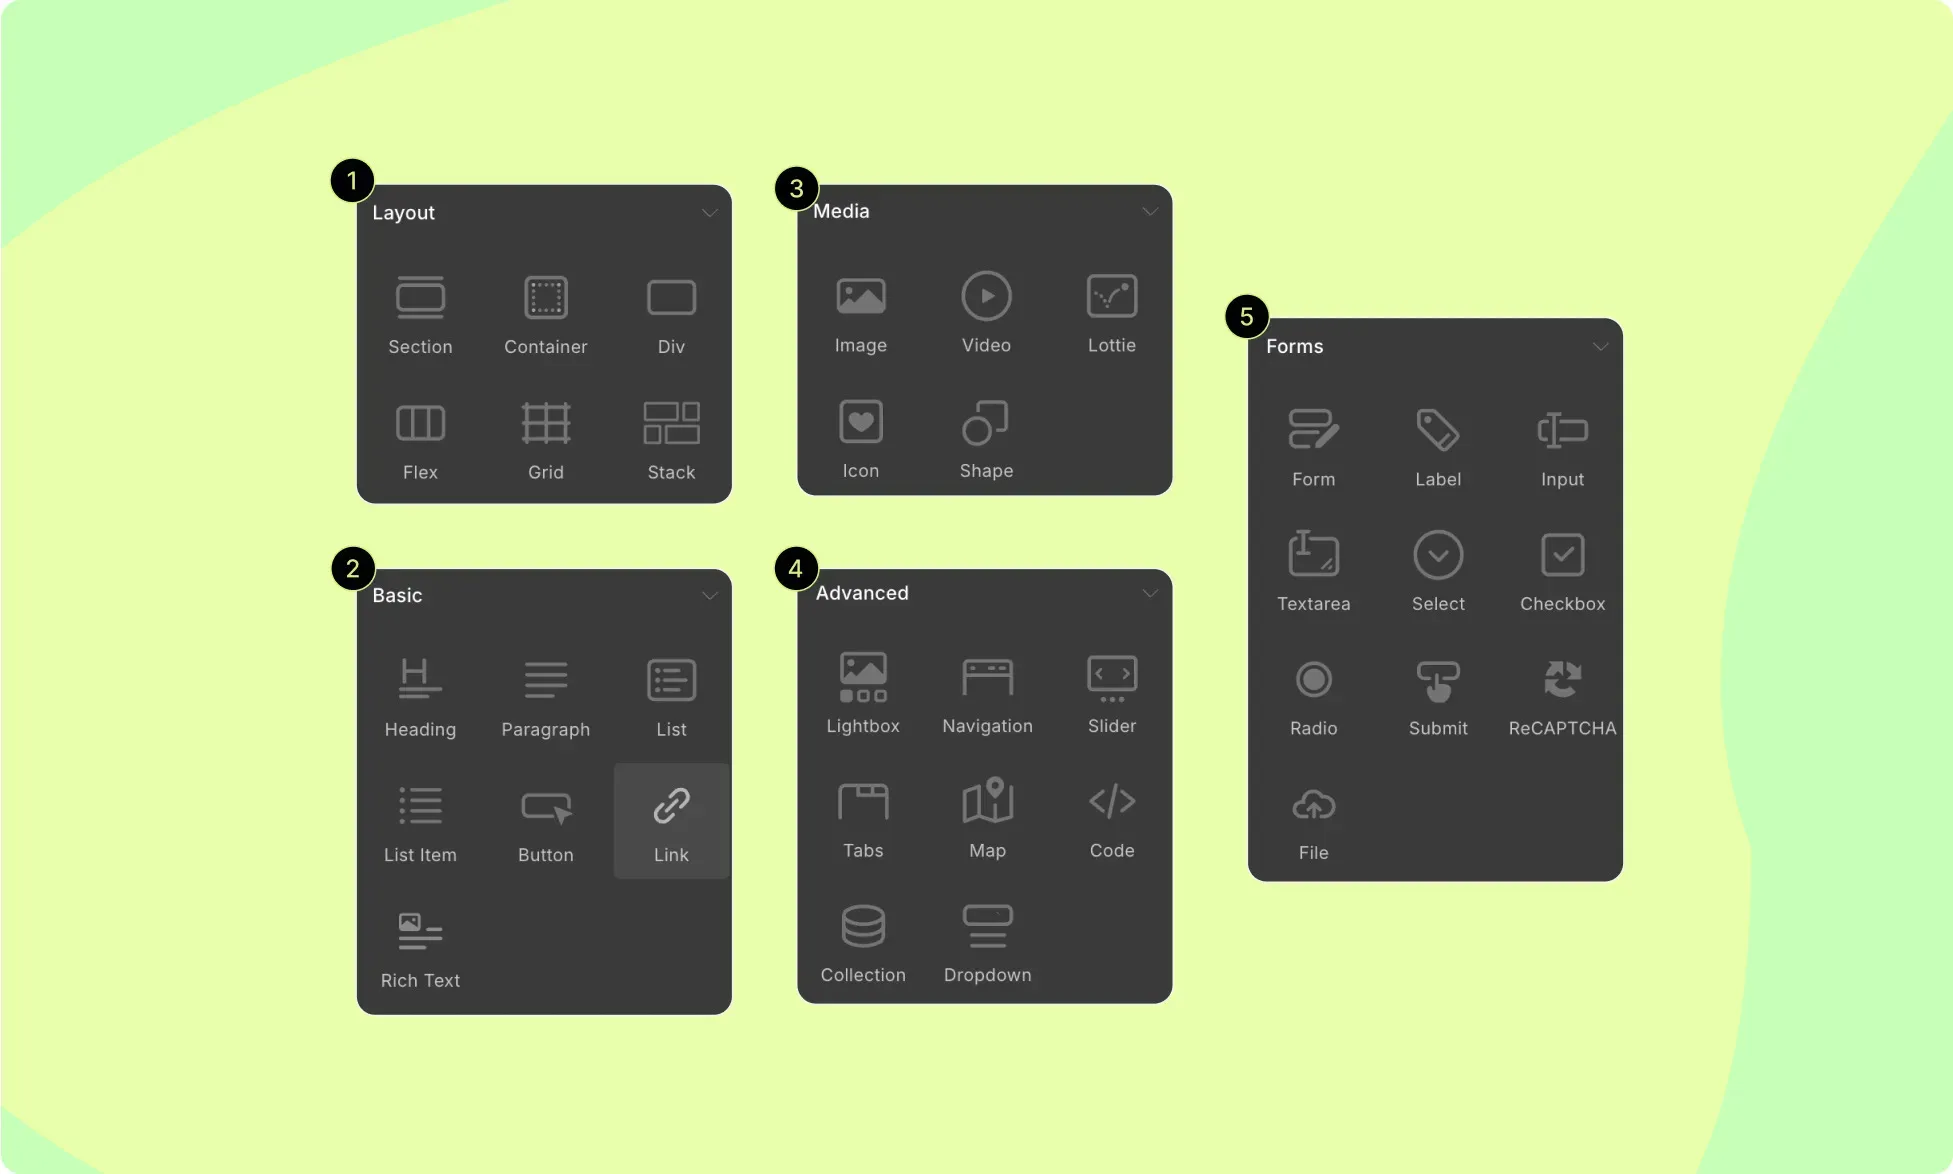
Or you could start with a blank canvas and build a website from scratch using Droip’s element library with ease.
💡 Tip: When structuring your website, make sure it is both user-friendly and responsive using elements like Grid and Flex.
For media, Droip’s built-in Media Manager can come in handy to not only upload & manage files but also edit them to fit your design. Plus, you get access to the Icon Library and Clip Path & Shape Editor in one place.
Explore our documentation to learn more about getting started in Droip.
Define Global Styles Using Variables
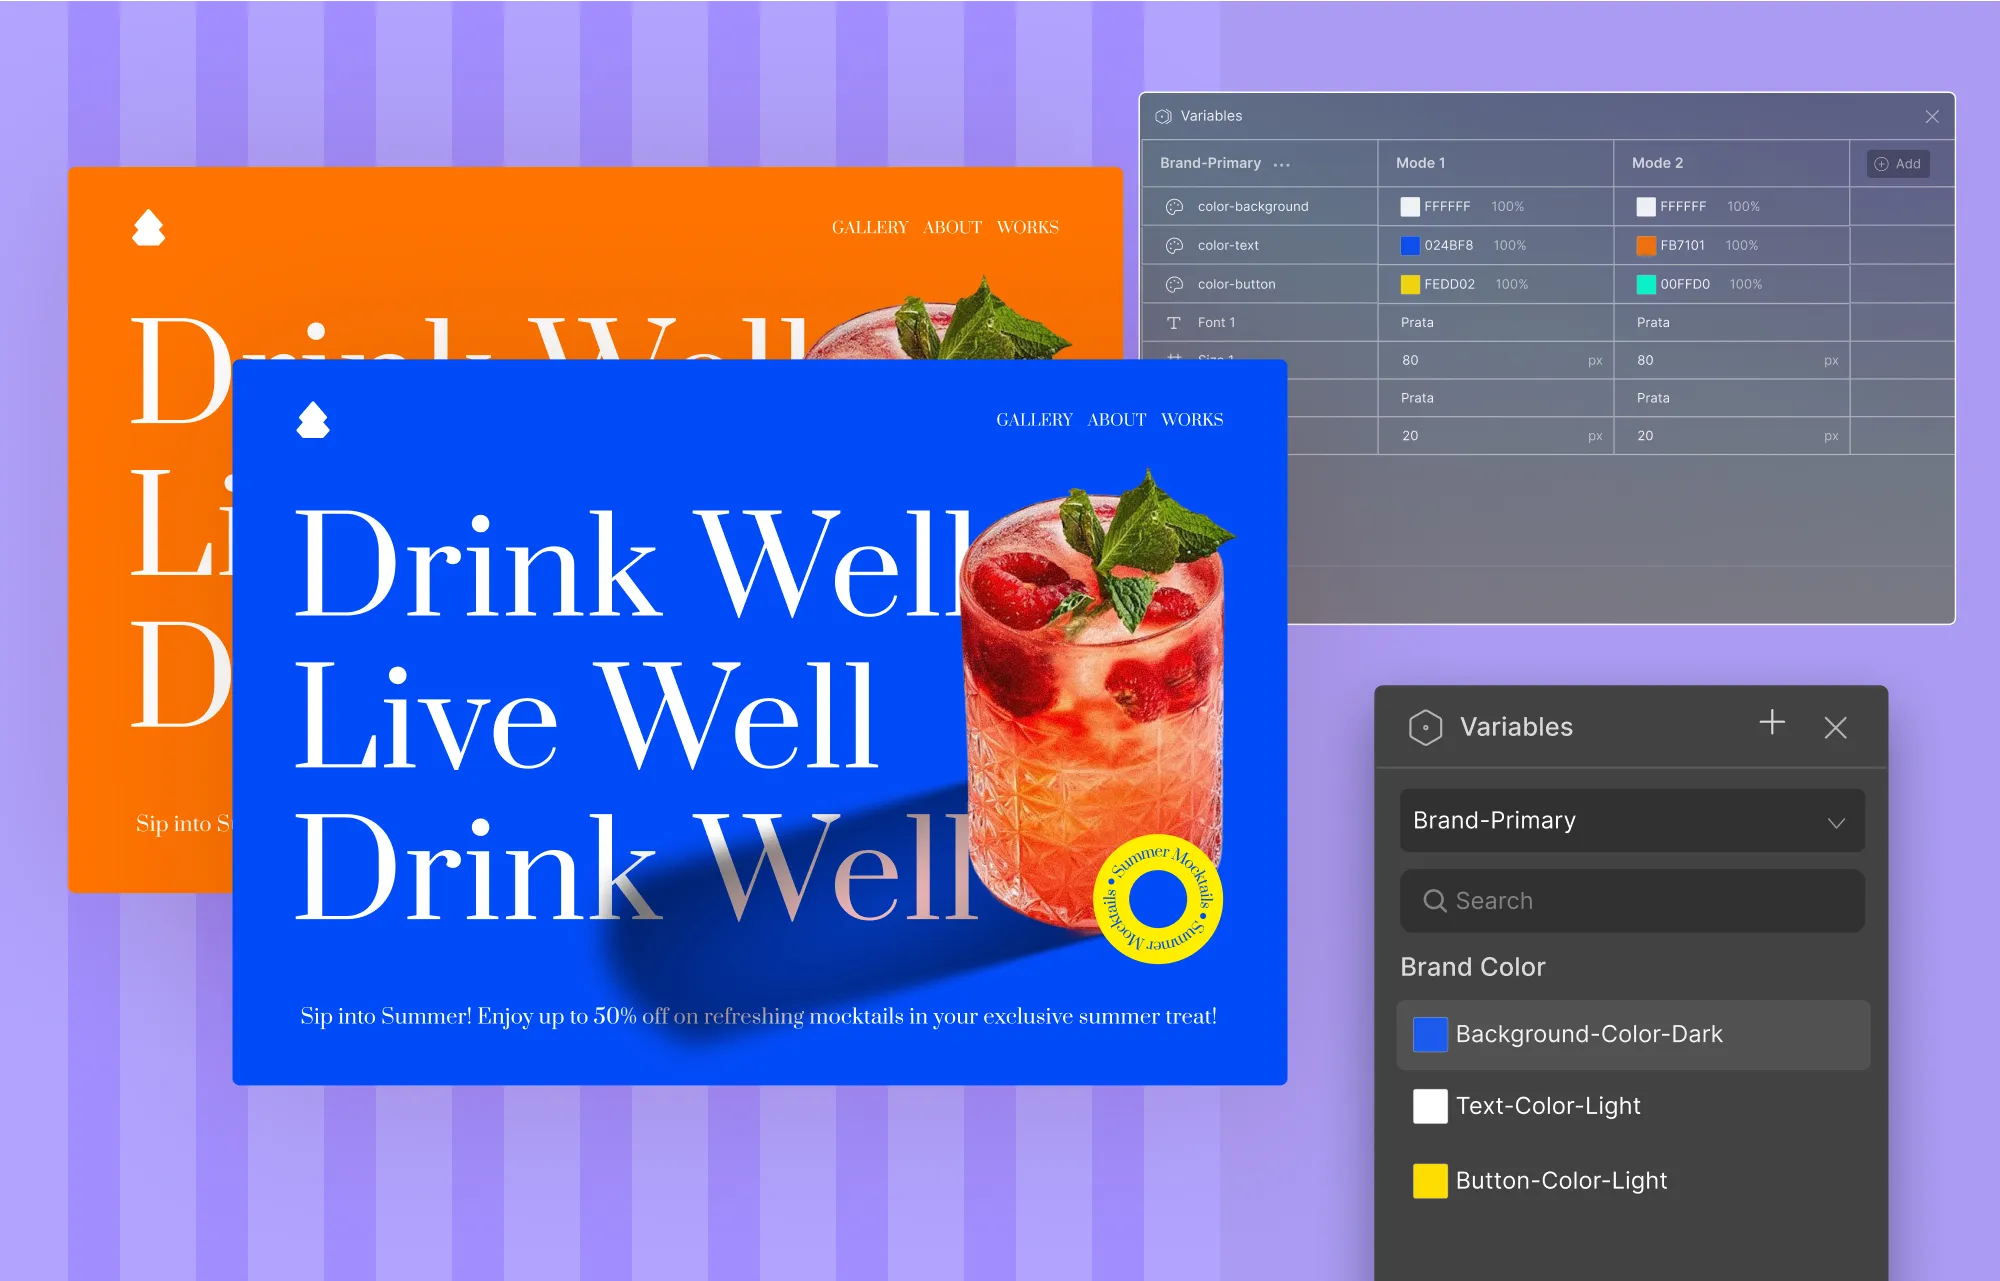
Once you’ve chosen how you’ll get started, the next step is to define your global styles in Droip using Variables.
This includes style attributes like Color, Font Family, and Size, which you can save and apply globally throughout your site. These help streamline the design process for greater efficiency, ensure design cohesion, and help solidify your brand identity.
To define Variables:
- Step 1: Click on the Variables icon on the left sidebar.
- Step 2: On the Variables dashboard, click on Create Variables and choose to add either a Color, Font Family, or Size.
- Step 3: Give it a name and define its value. Repeat to add more Variables.
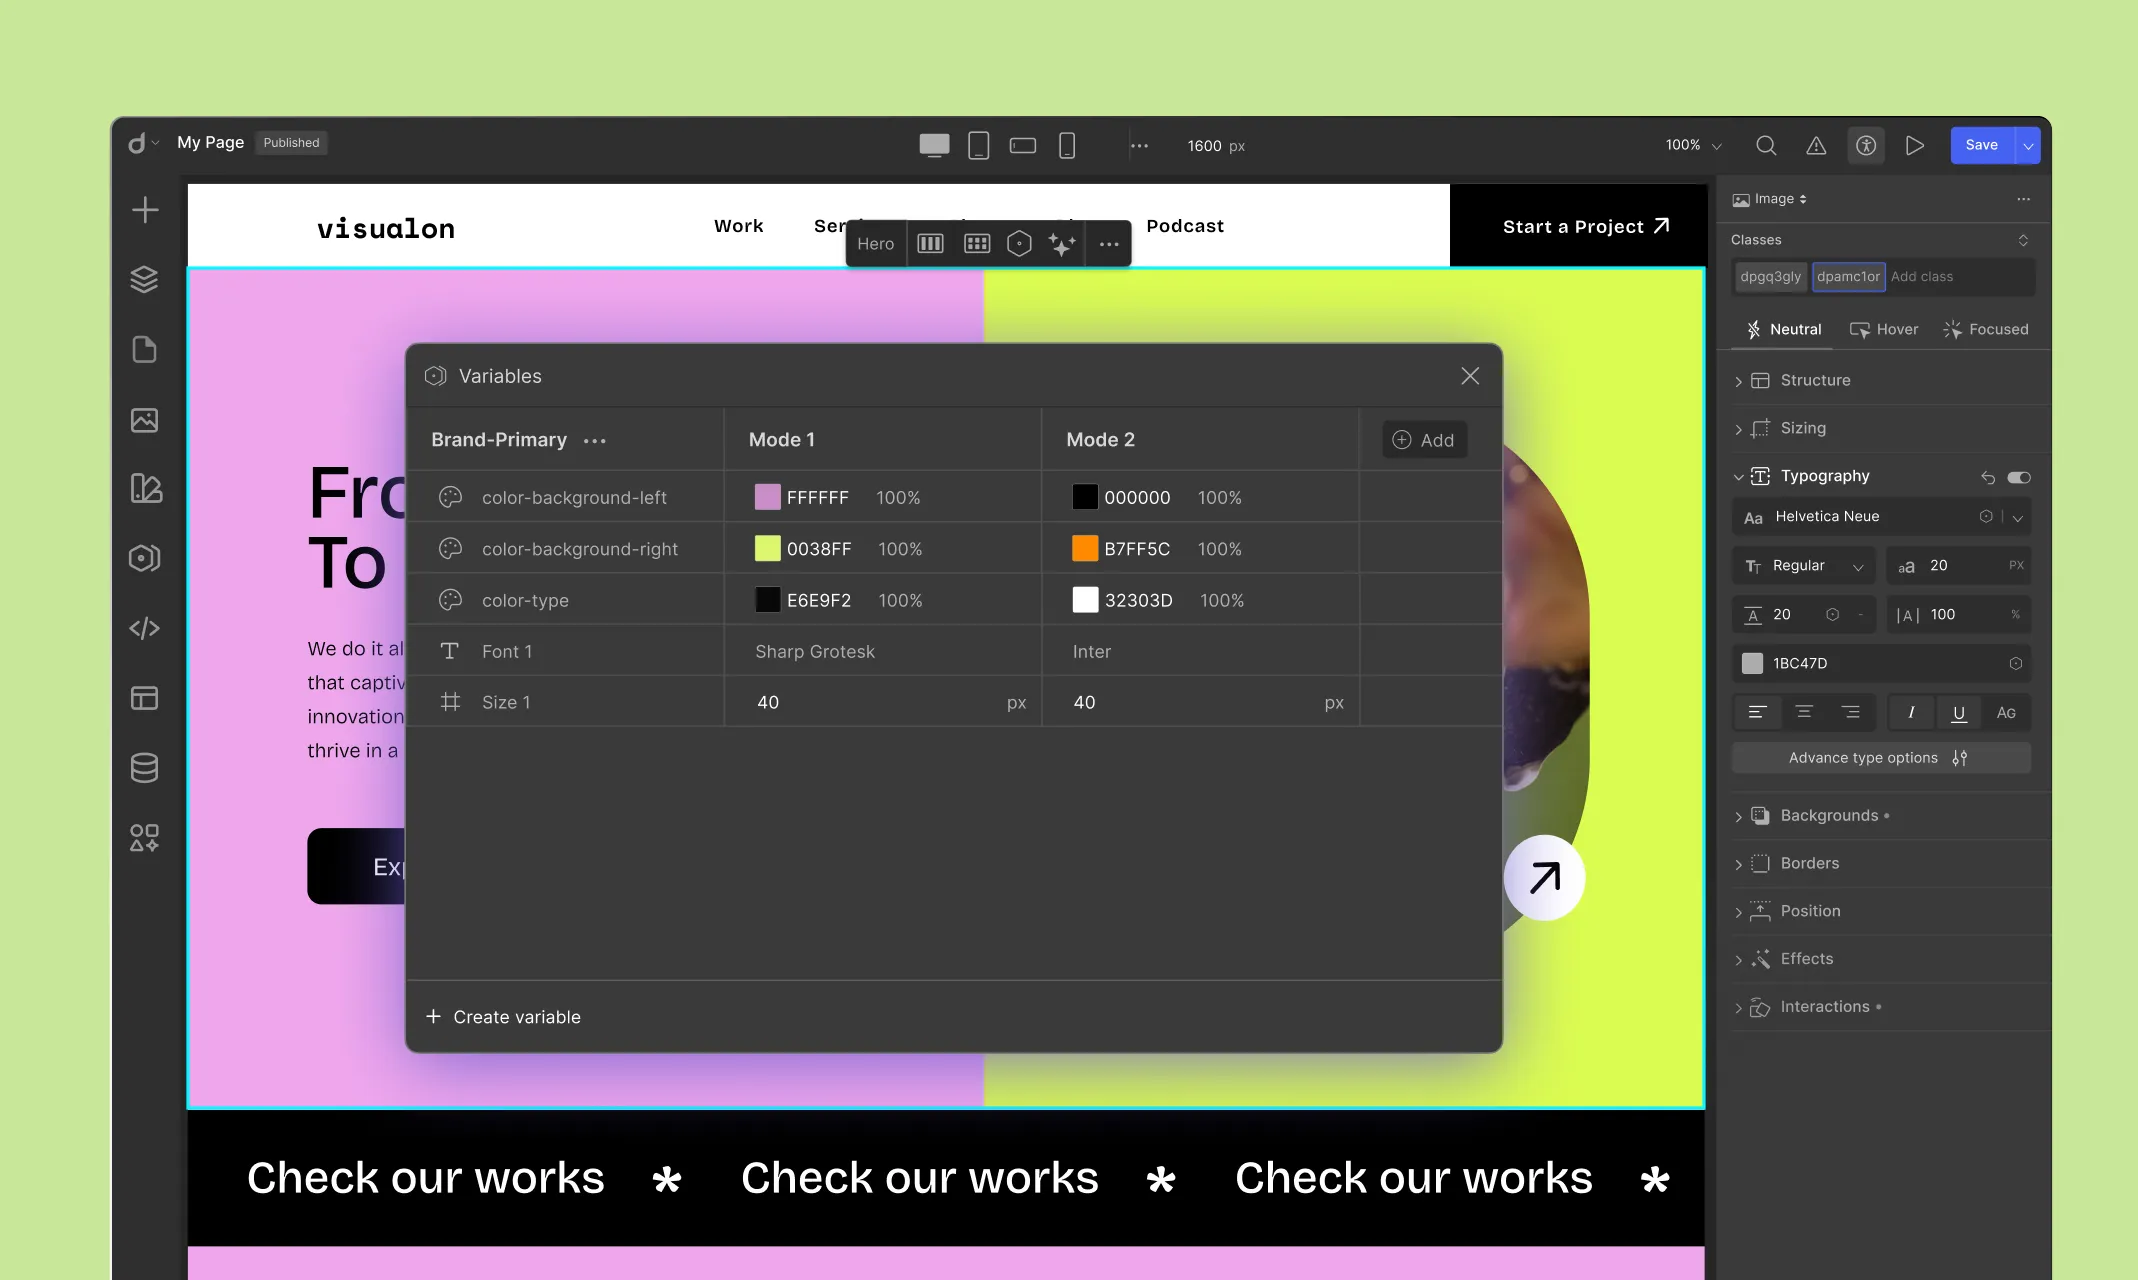
You can also define Variable Modes, that is, variations for each Variable you’ve created:
- Step 1: On the Variables dashboard, click on the Add option beside the first set of values. This will duplicate them.
- Step 2: Give the mode a name and redefine values for each variable.
Just like that, you’ve got a mode, i.e., an alternate set of global variables you can switch to for dark mode, seasonal promotions, and more!
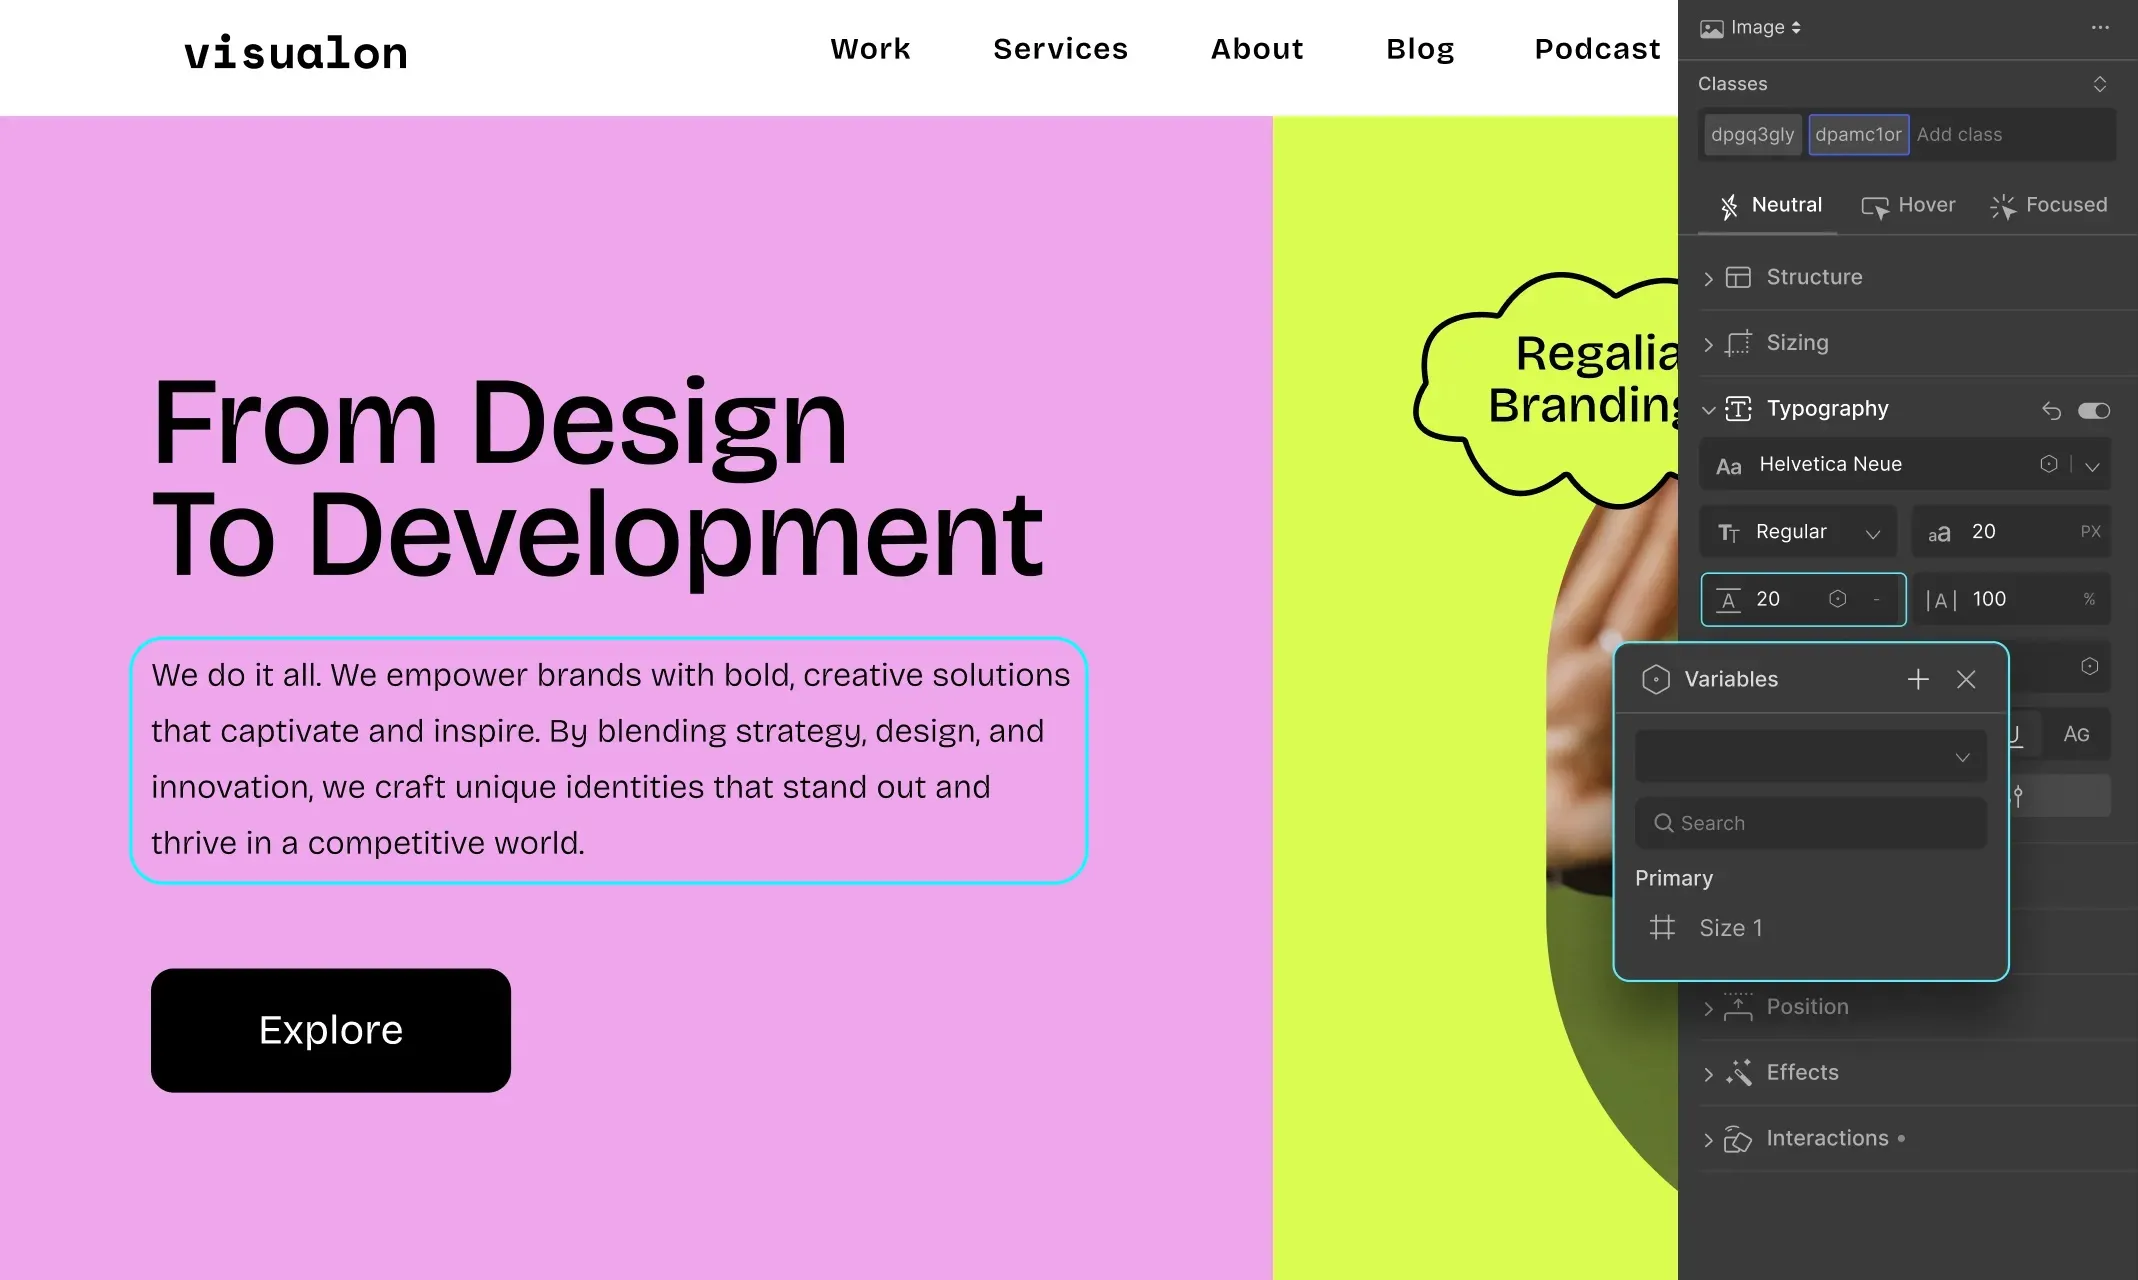
Now, all you need to do is apply these variables wherever needed through the Style Panel.
To learn more, check out the Variables documentation as well as our article on styling websites using global styles.
Design Reusable Components With Symbols
As you know, a website usually consists of a few recurring sections that appear throughout, such as headers, footers, buttons, and more.
In Droip, you can design them just once and convert them into reusable components using Symbols. You can also set any symbol as a header or footer to have it appear automatically on every page.
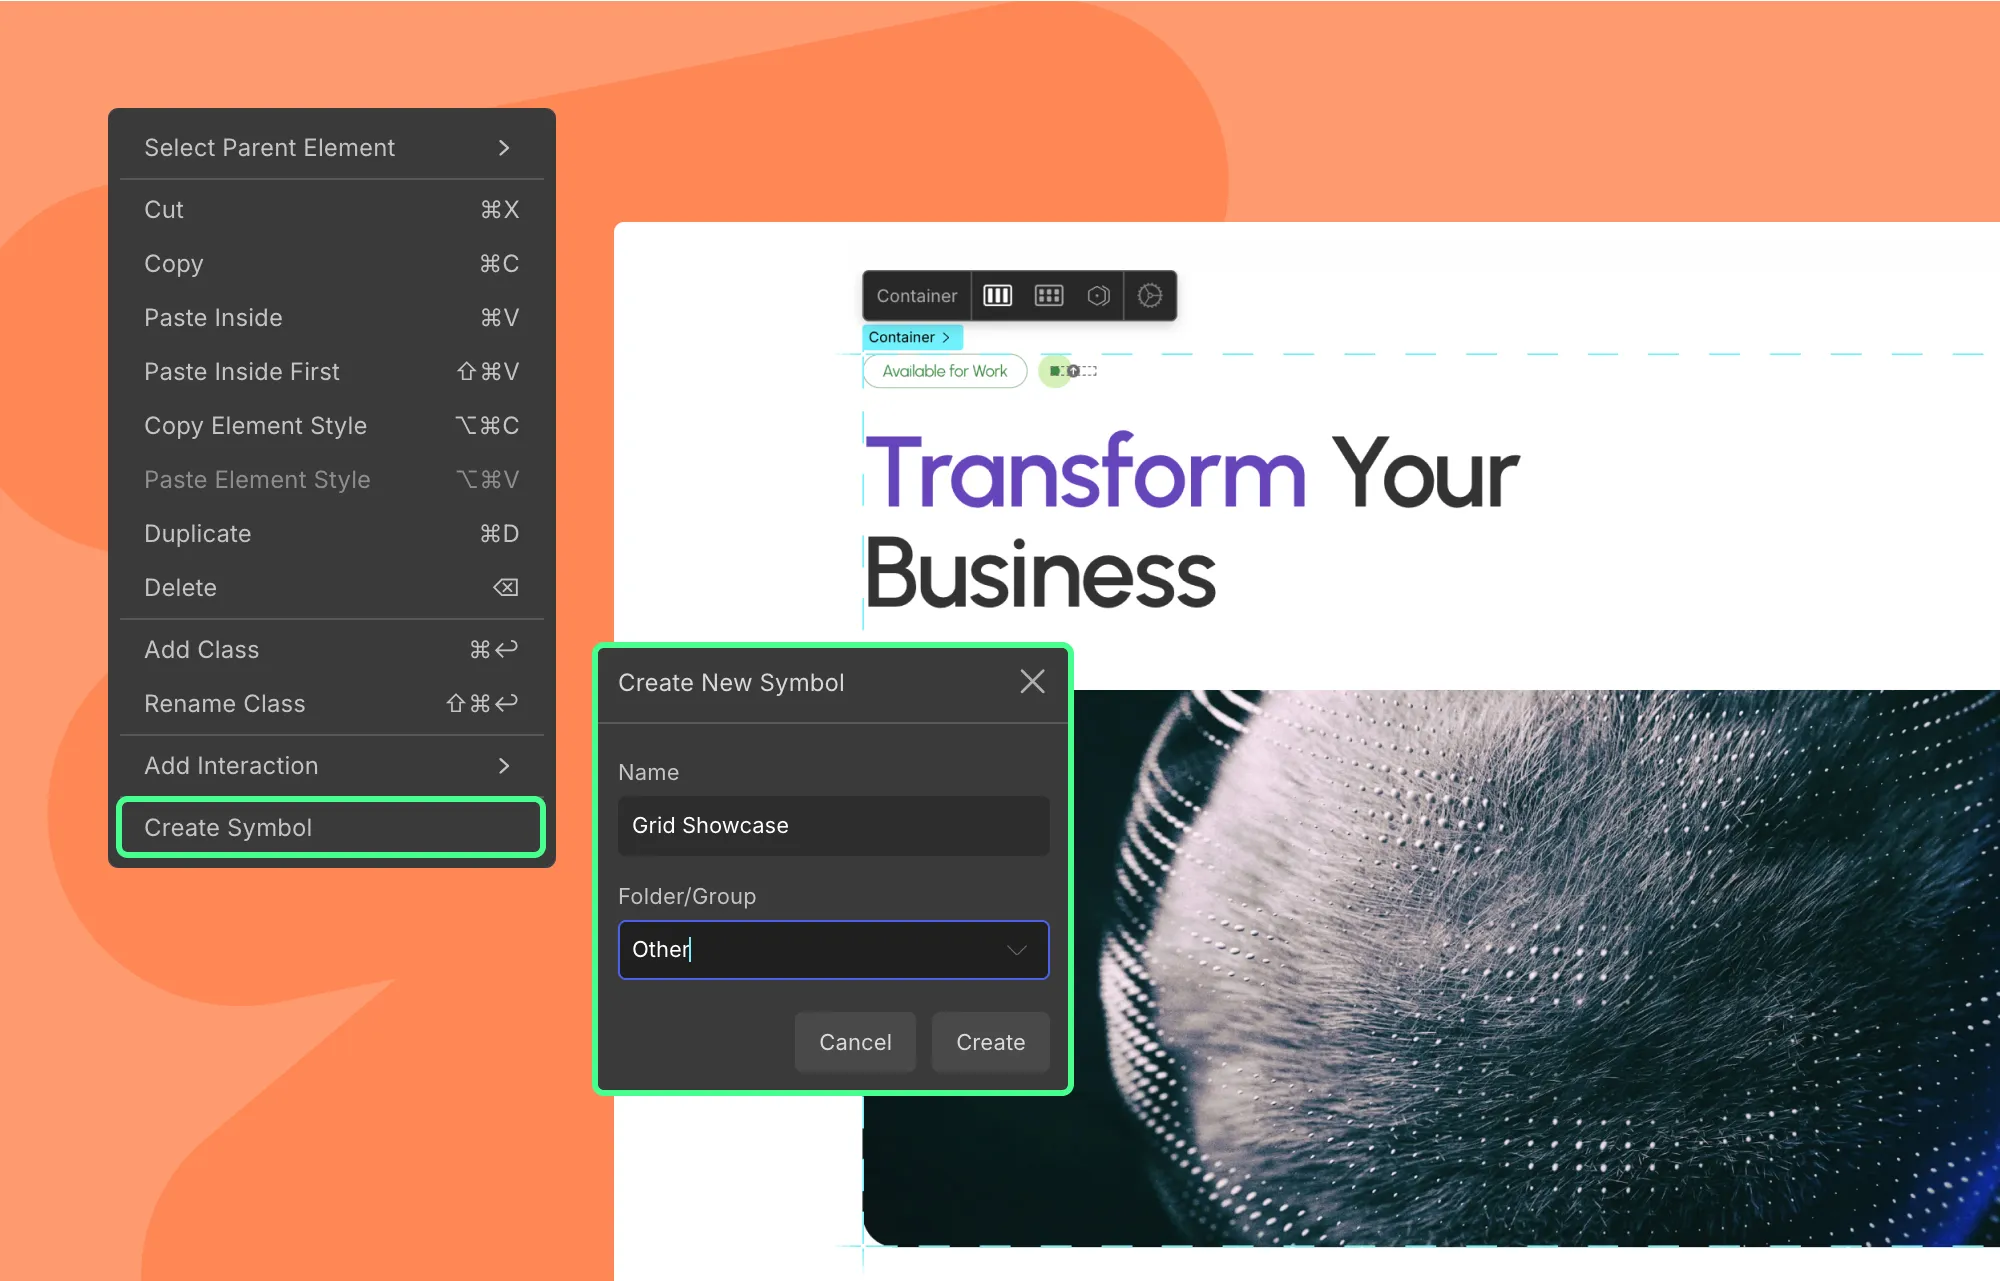
To convert a component to a Symbol:
- Step 1: Select the component, right-click, and choose Create Symbol.
- Step 2: Give the symbol a name and pick a folder (or add a new one), then hit Create.
- Step 3: Finally, to add symbols to a page, simply drag and drop them from Insert > Symbols.
💡 Tip: To have a symbol appear as a header or footer on every page automatically, click the three-dot icon next to it, and Set As > Header or Footer.
Learn more about symbols through our article on reusable blocks.
Build Website Navigation in Droip
Another important aspect of a website is navigation. Since navbars typically appear across every page to guide users, they’re often converted into symbols and set as headers in Droip.
So, website navigation in Droip can go three ways:
- Customize a template’s existing navbar
- Customize a pre-built navbar
- Build a navbar from scratch
Customize a Template’s Navbar Symbol
In Droip Templates, navbars are converted into symbols and set as the header so they appear across every page by default. To customize them:
- Step 1: Double-click the template navbar symbol on the canvas to enter editing mode.
- Step 2: Select the Navigation element to edit menu and add, remove, reorder, and more as needed. Use the Style Panel to adjust their appearance.
- Step 3: Click on other elements (like logos or buttons) to tweak their settings and styles.
You can also customize a pre-built navbar the same way. The only difference is that they’re not converted into symbols, so you don’t need to double-click to start editing.
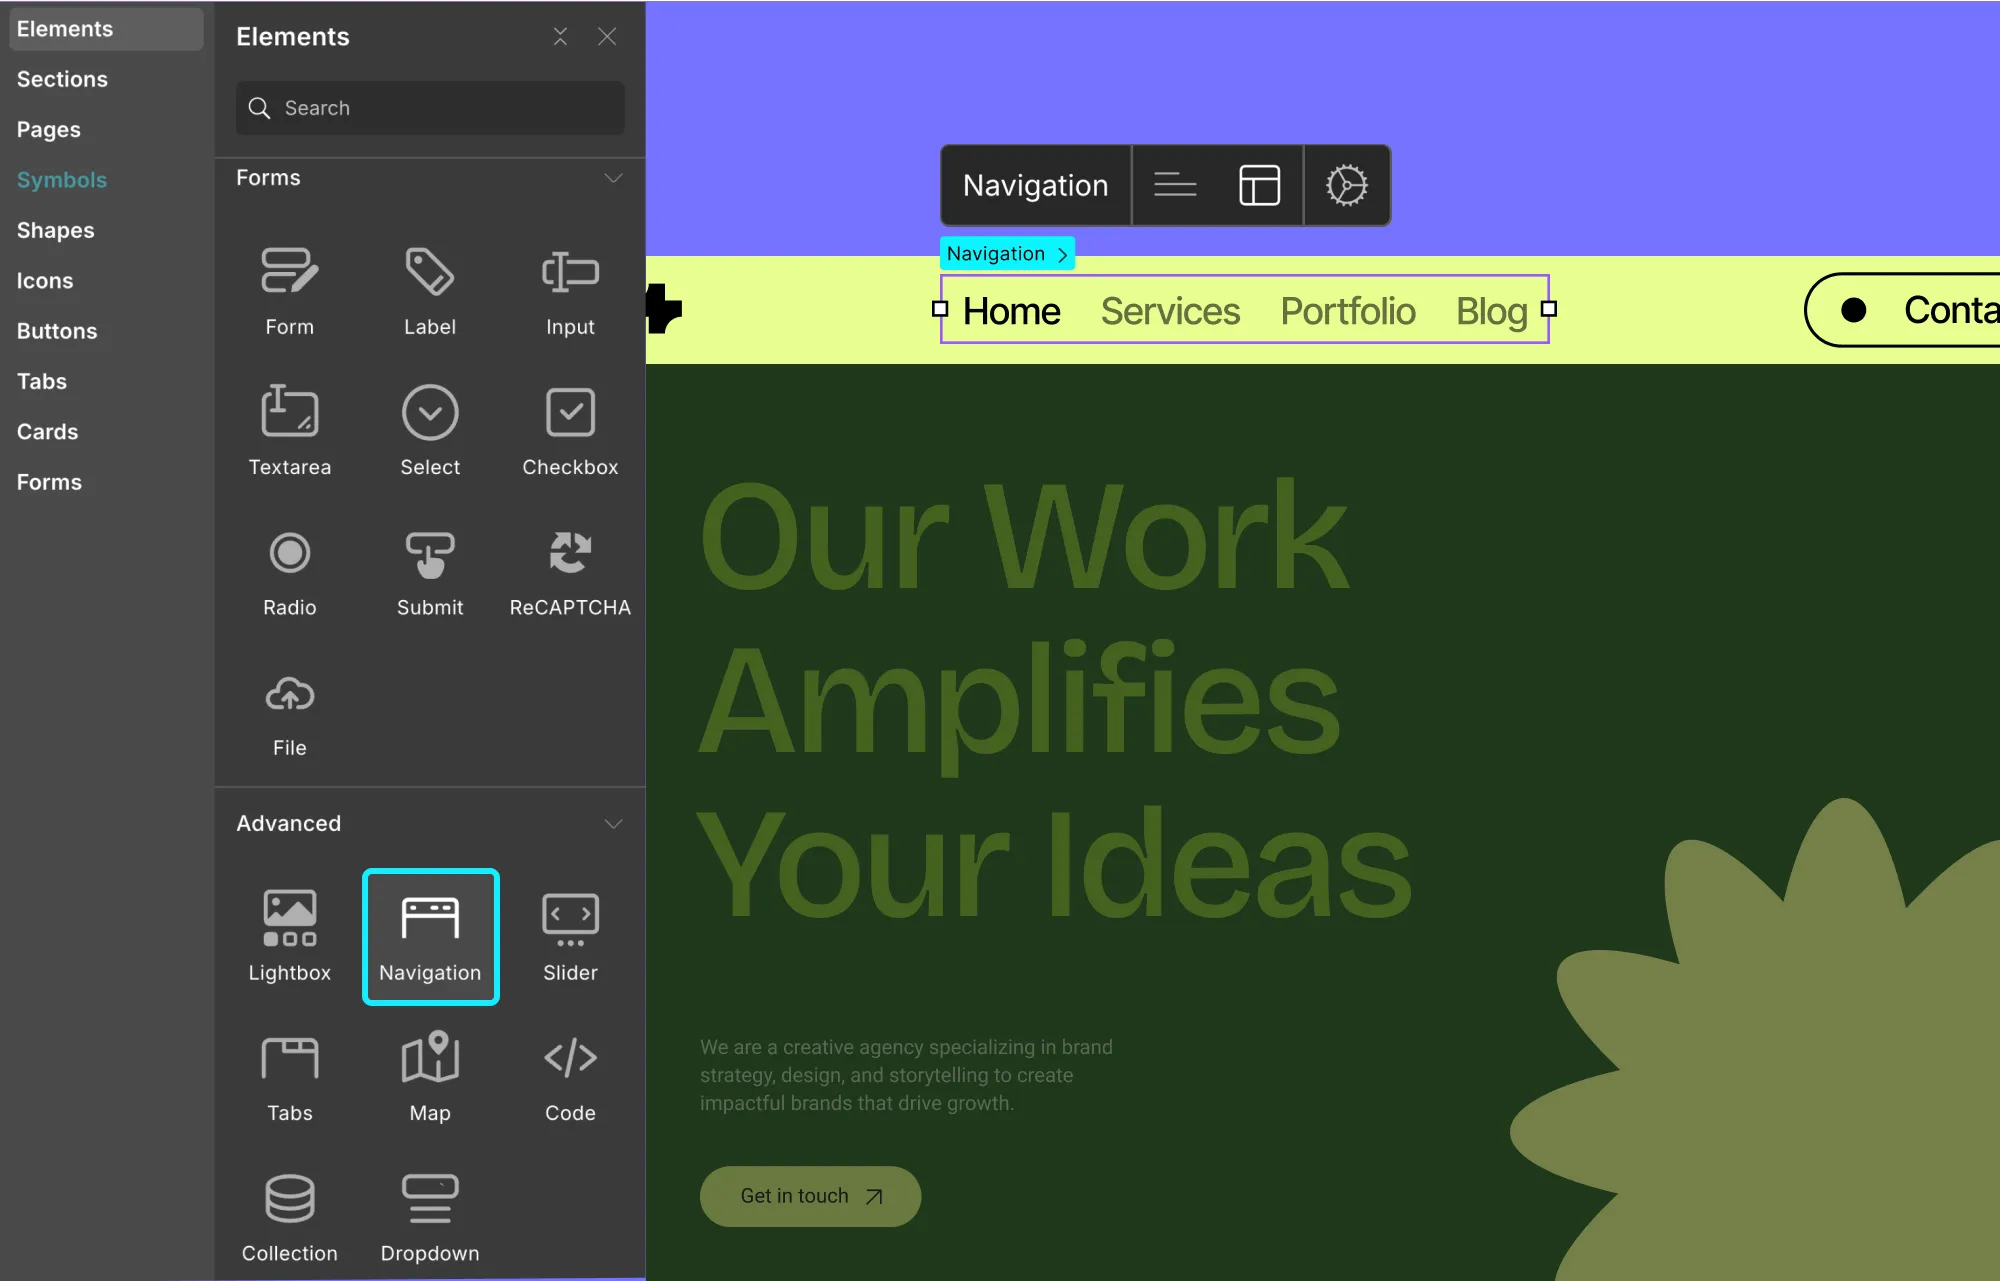
Build a Navbar From Scratch in Droip
To build a custom navbar from scratch in Droip:
- Step 1: Click on the plus icon on the left sidebar.
- Step 2: From the Elements panel, drag and drop the Navigation element onto your canvas. Use the icons in the inline editor to access its settings.
- Step 3: Select the navbar elements to customize the look and layout of your navbar.
- Step 4: Lastly, you can convert the navbar into a symbol and set it as a header so it appears automatically on every page.
For more, check out the Navbar documentation.
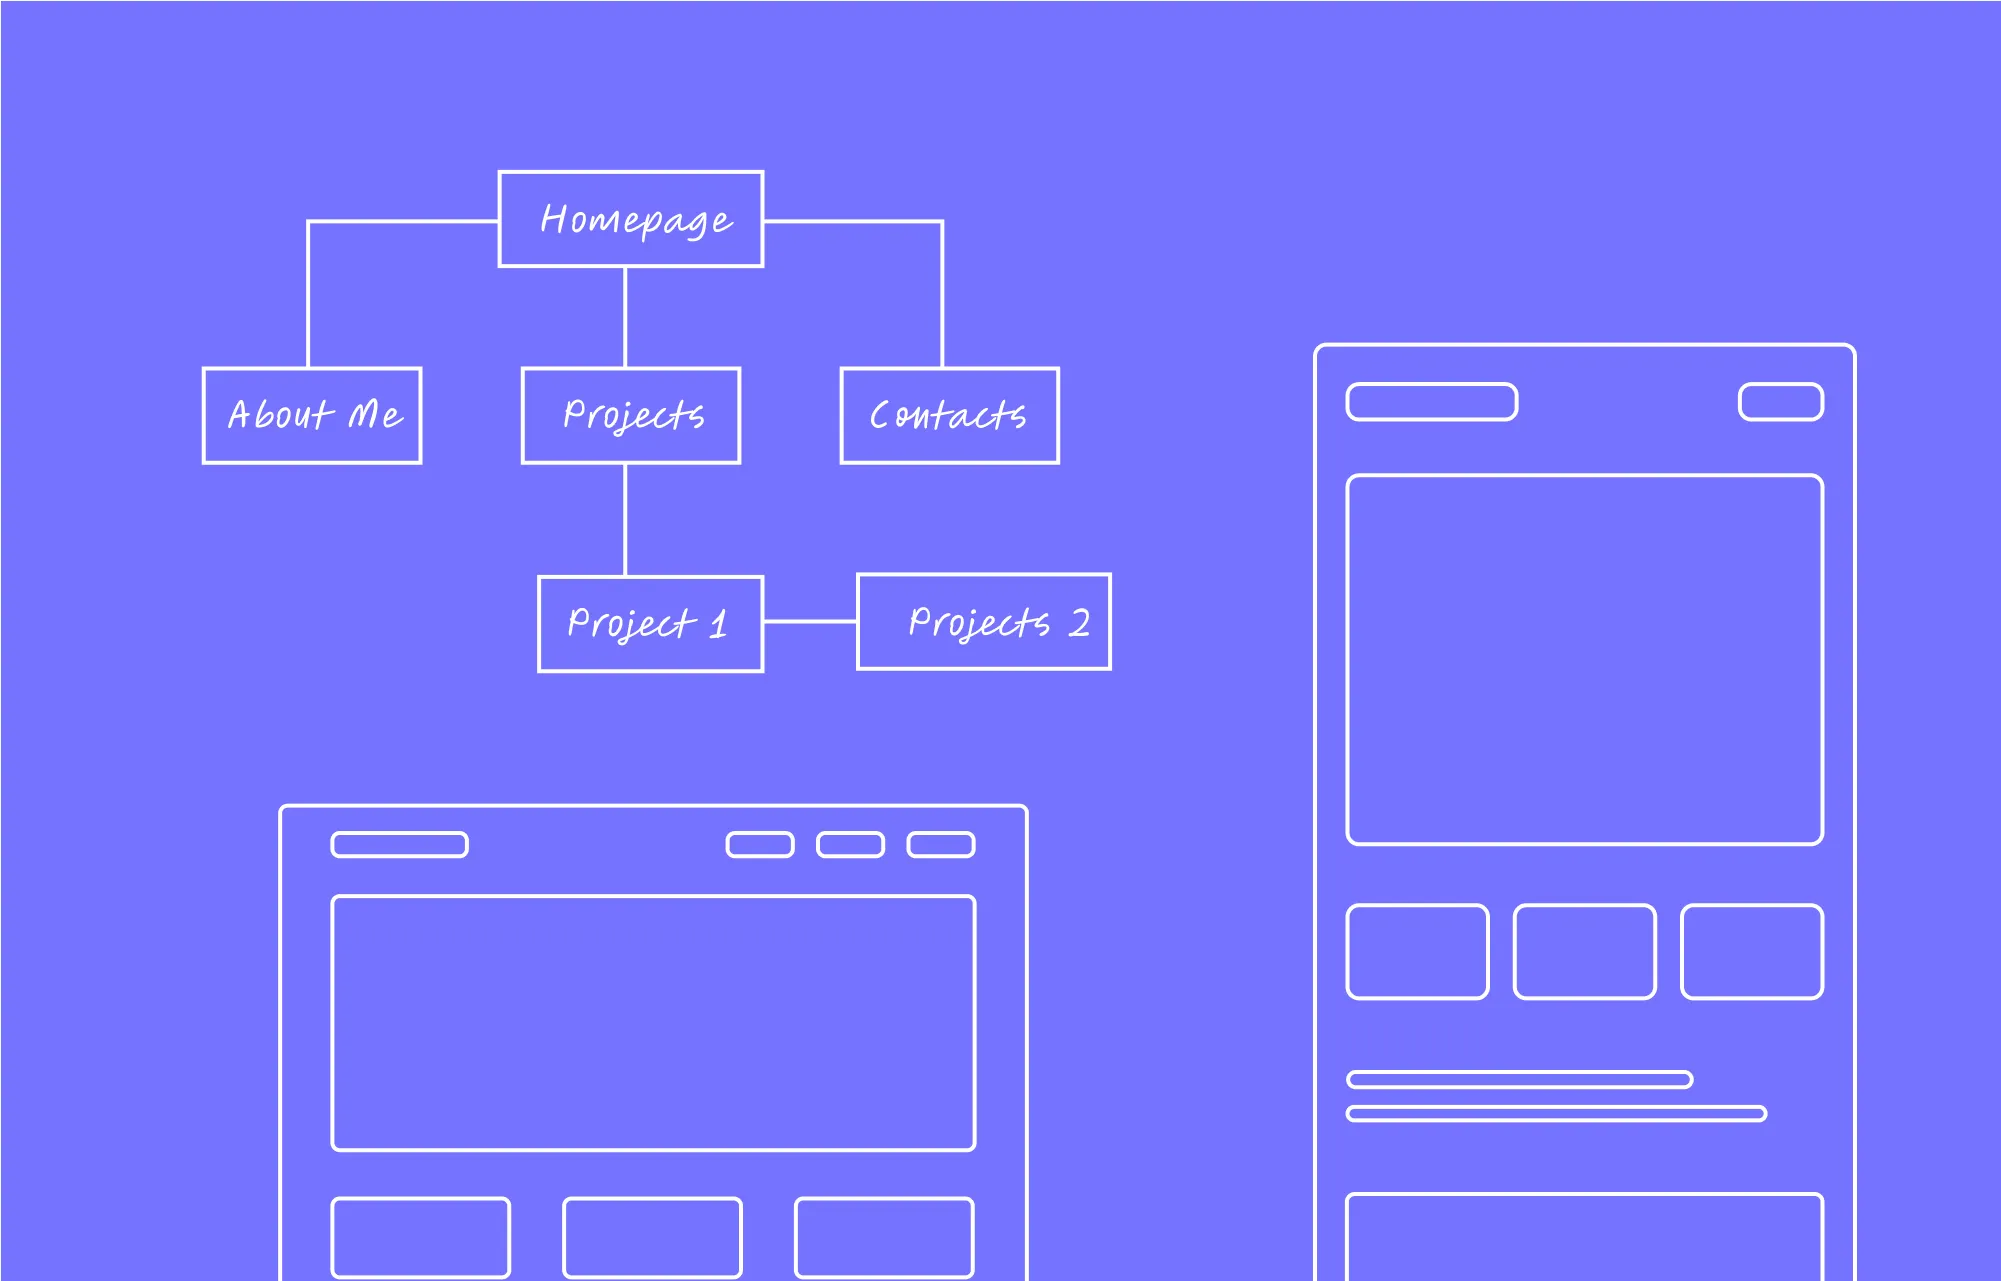
Create the Essential Pages of a WordPress Website
Once your global styles and reusable components are ready, it’s time to finally create your essential pages.
This will vary based on your site, but some common ones include:
- Homepage
- Pricing or Product Listing
- Services
- Projects
- About & Contact
- Legal (Privacy Policy, Terms & Conditions, etc.)
- Utility Pages (404, Registration, Login, etc.)
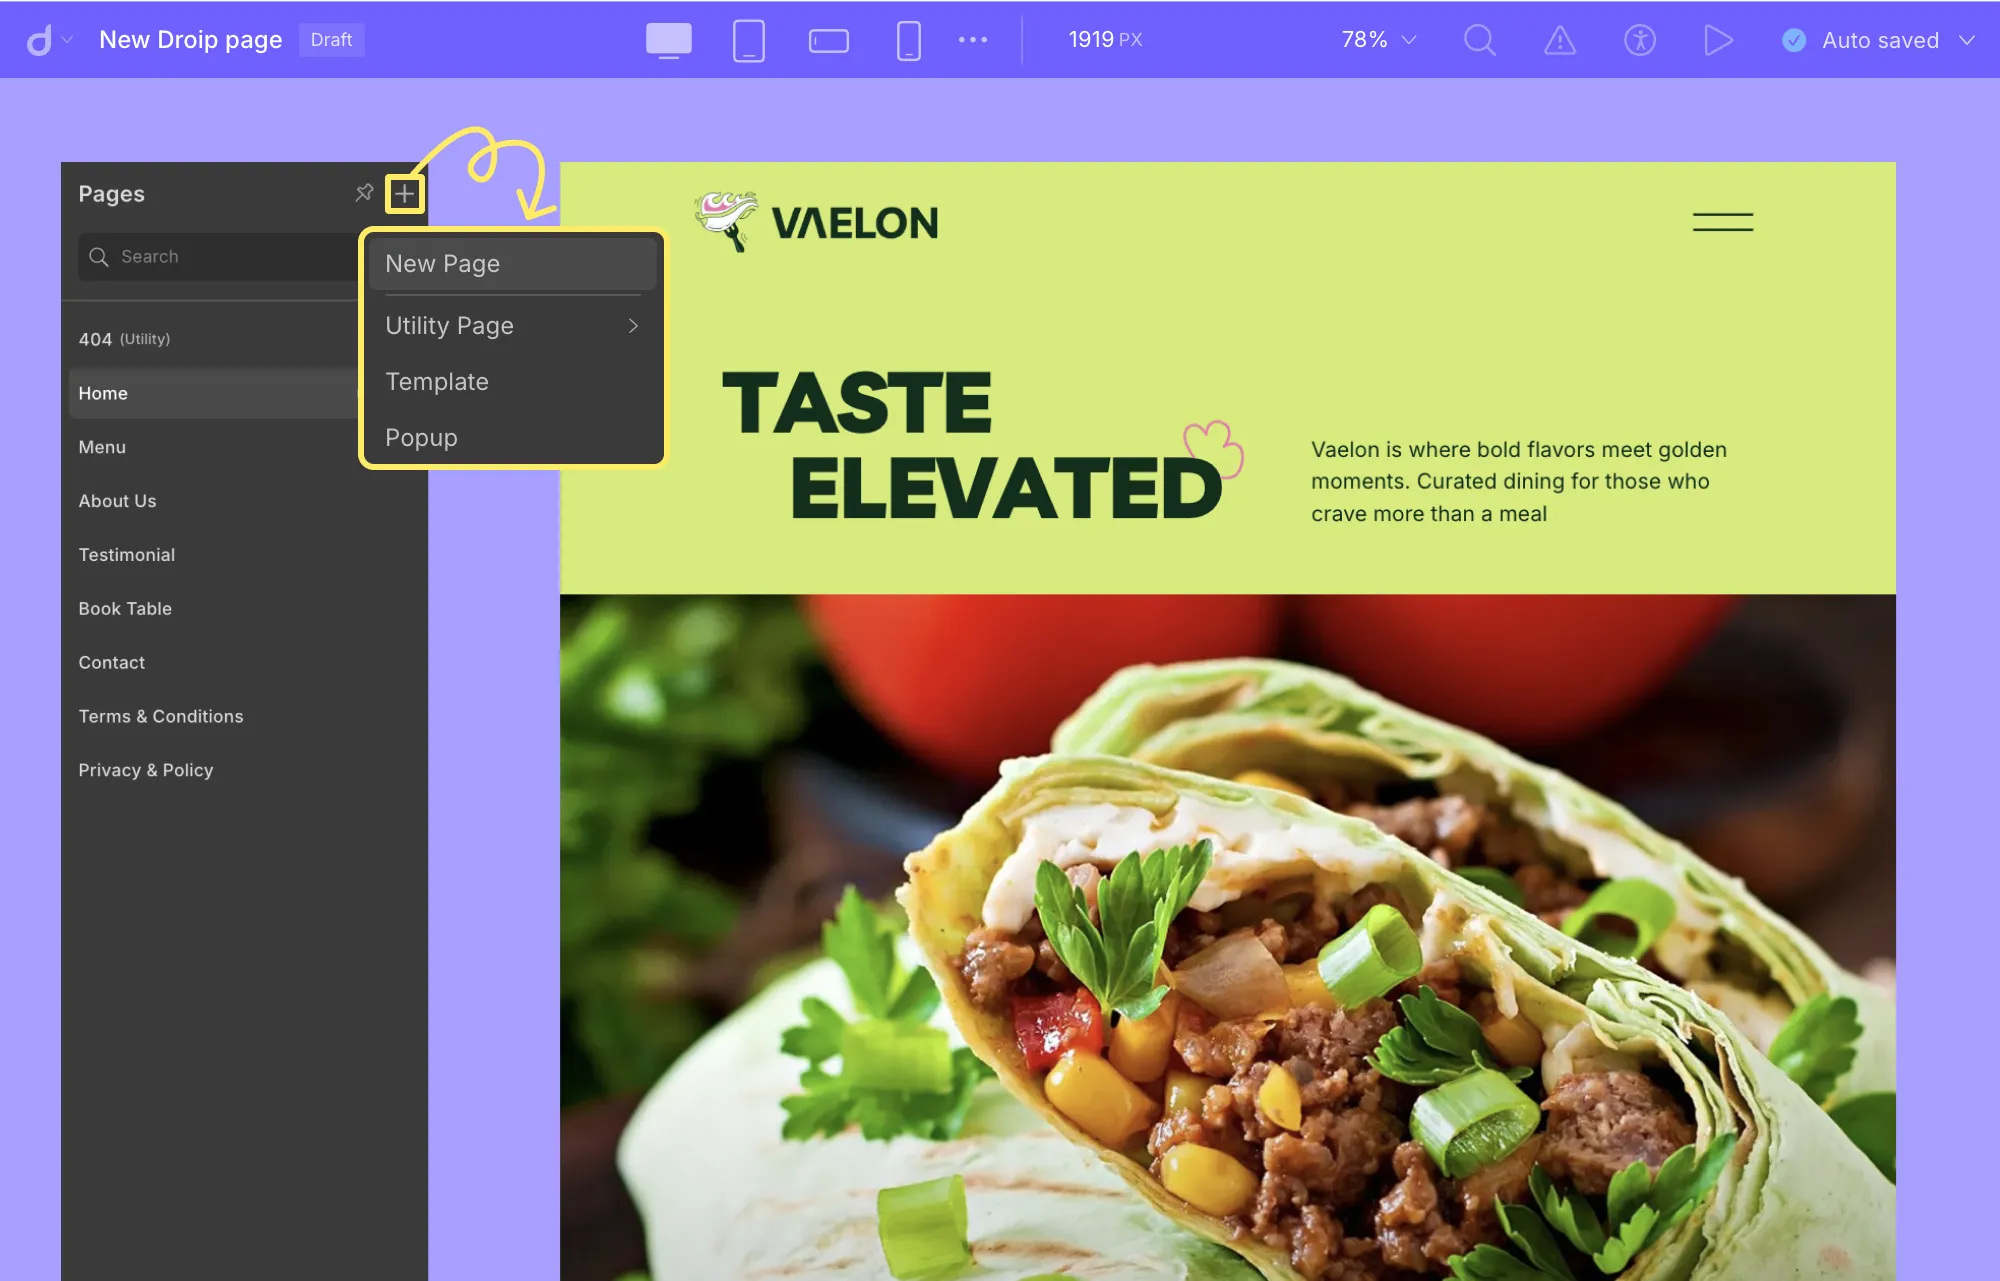
To create a new page in Droip:
- Step 1: Click on the Pages icon on the left sidebar.
- Step 2: Hit the plus icon and choose New Page. Once redirected, simply double-click on the page to rename it.
And your new page is ready to design! If you’ve added headers/footers as Symbols, they’ll appear automatically.
You can also add important Utility Pages like 404, Registration, Login, and more instantly in Droip:
- Step 1: Click on the Pages icon on the left sidebar.
- Step 2: Hit the plus icon, go to Utility Pages, and choose the one you want to add.
💡 Tip: Once you’ve created your pages, don’t forget to add their links to your Navbar menus to make your website navigation fully functional.
Define & Display Dynamic Custom Content Type in WordPress
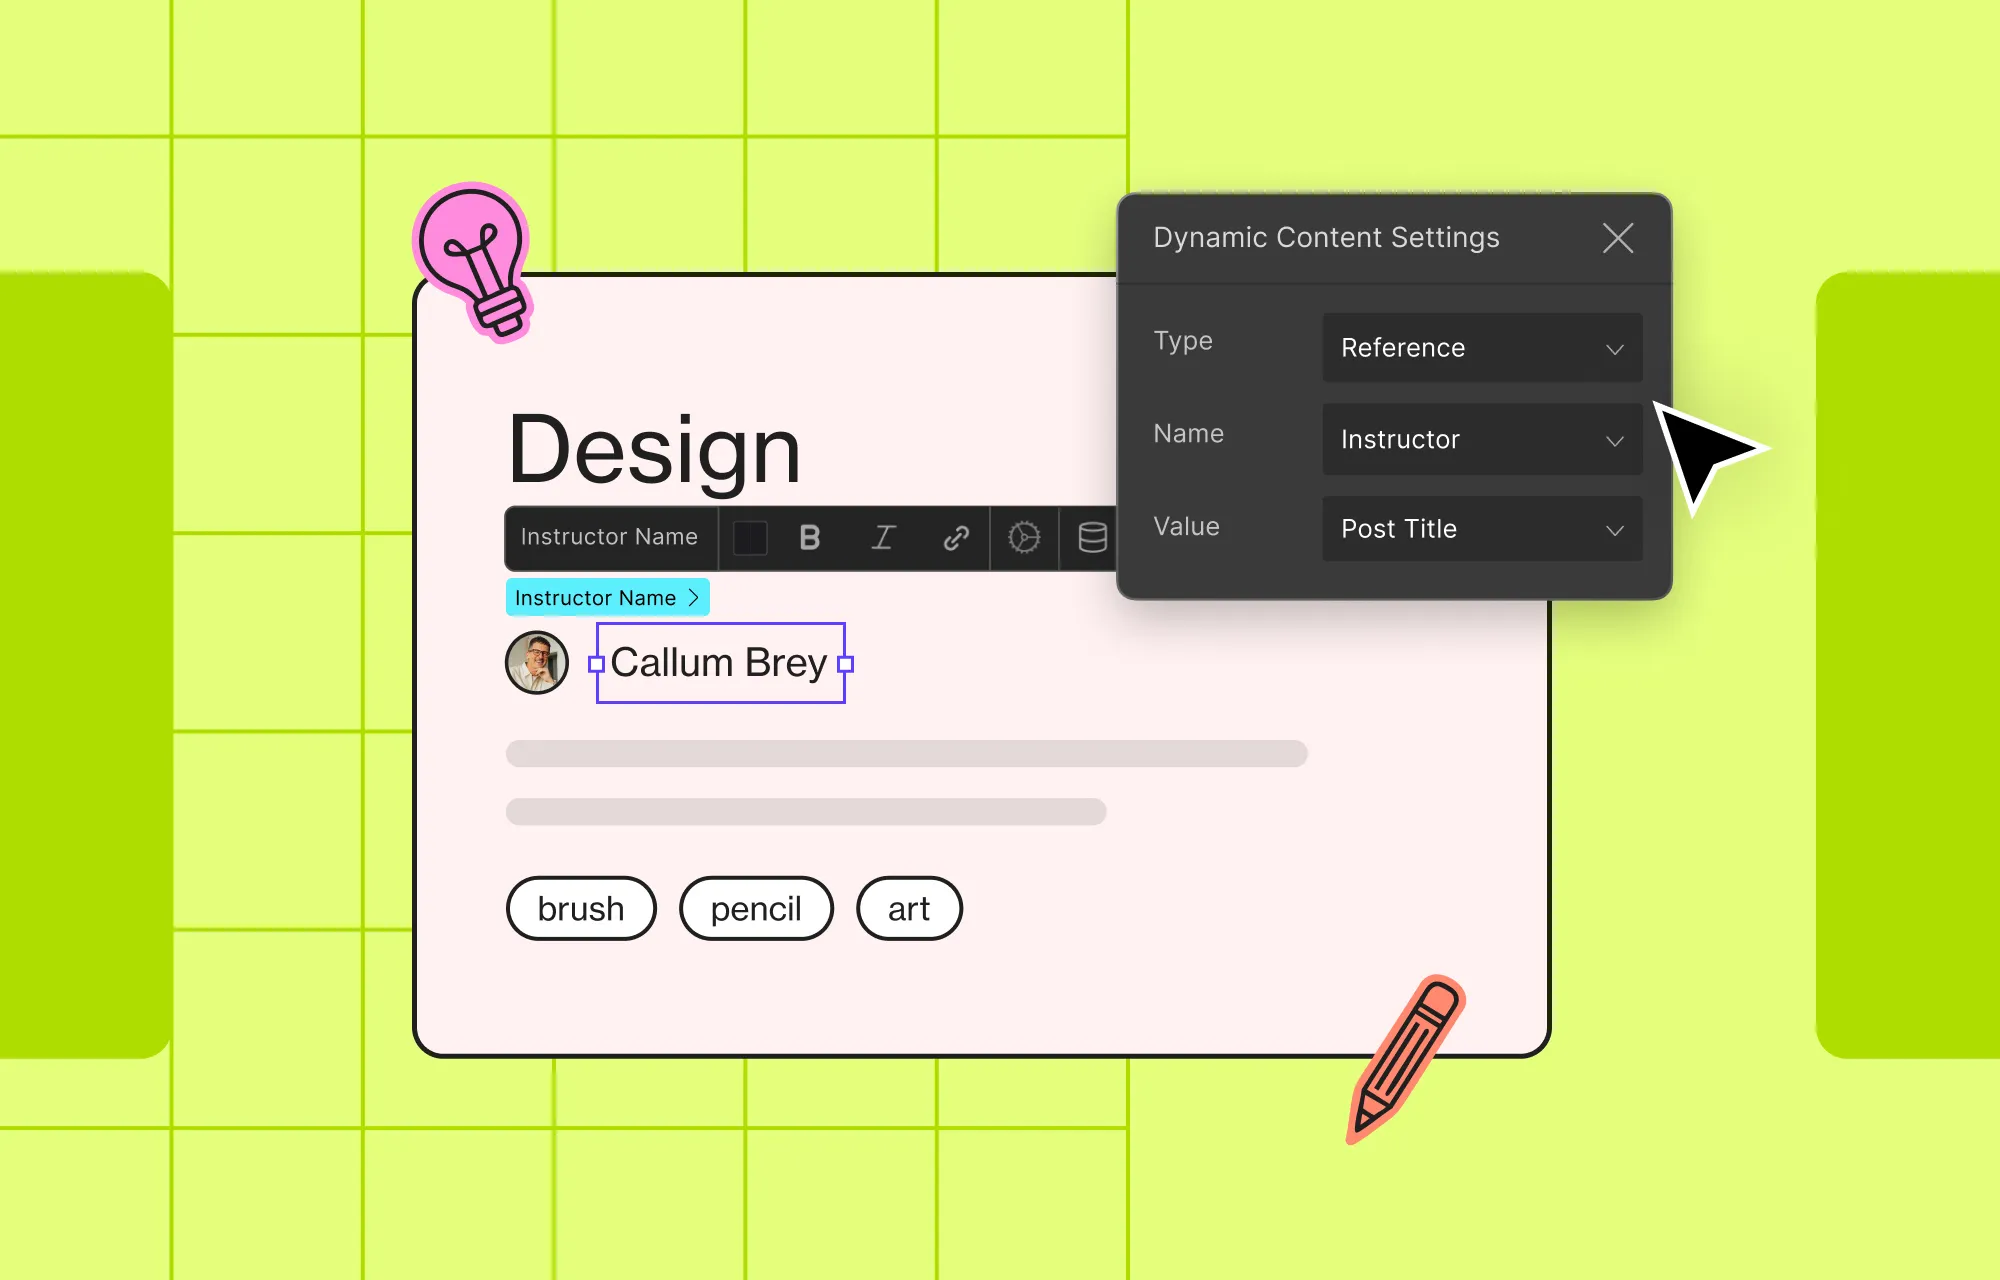
Some key pages like Services, Projects, Portfolio, etc, often showcase repeatable content. And for repeatable content that expands and evolves, dynamic display is the way to go.
With dynamic content, you update it once from a central hub, and it reflects everywhere. This saves time, reduces the hassle of manual edits, and improves scalability.
Luckily, Droip’s built-in Dynamic Content Manager lets you define custom content types in WordPress without the need for any extra plugins like ACF, input your data, and display it dynamically through lists and single-page templates with ease.
Explore our Dynamic Content Manager playlist to learn more!
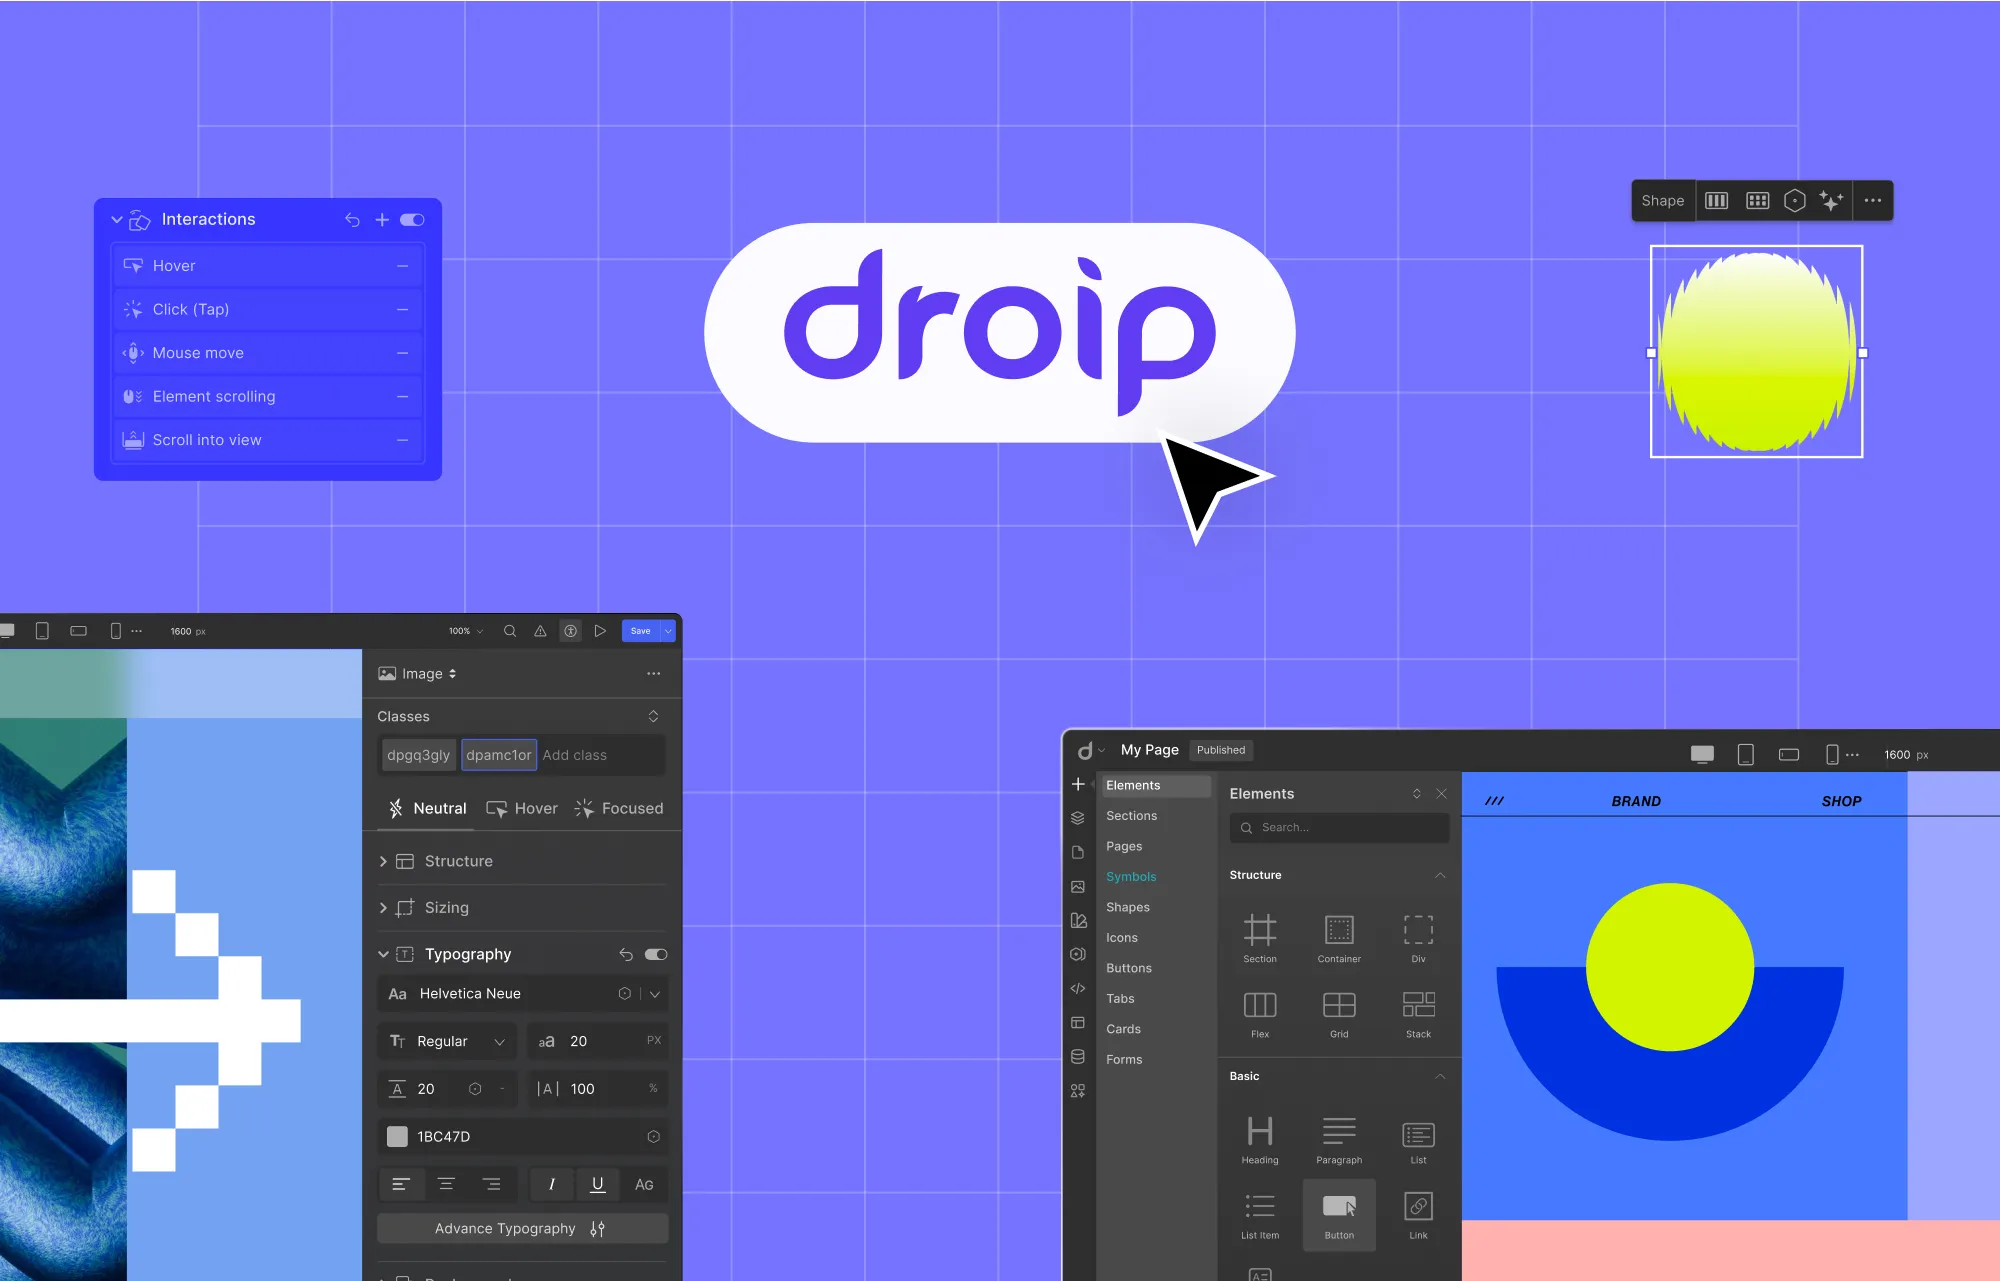
Visually Add Interactions and Animations
Next, it’s time to bring your website to life using Interactions and Animations.
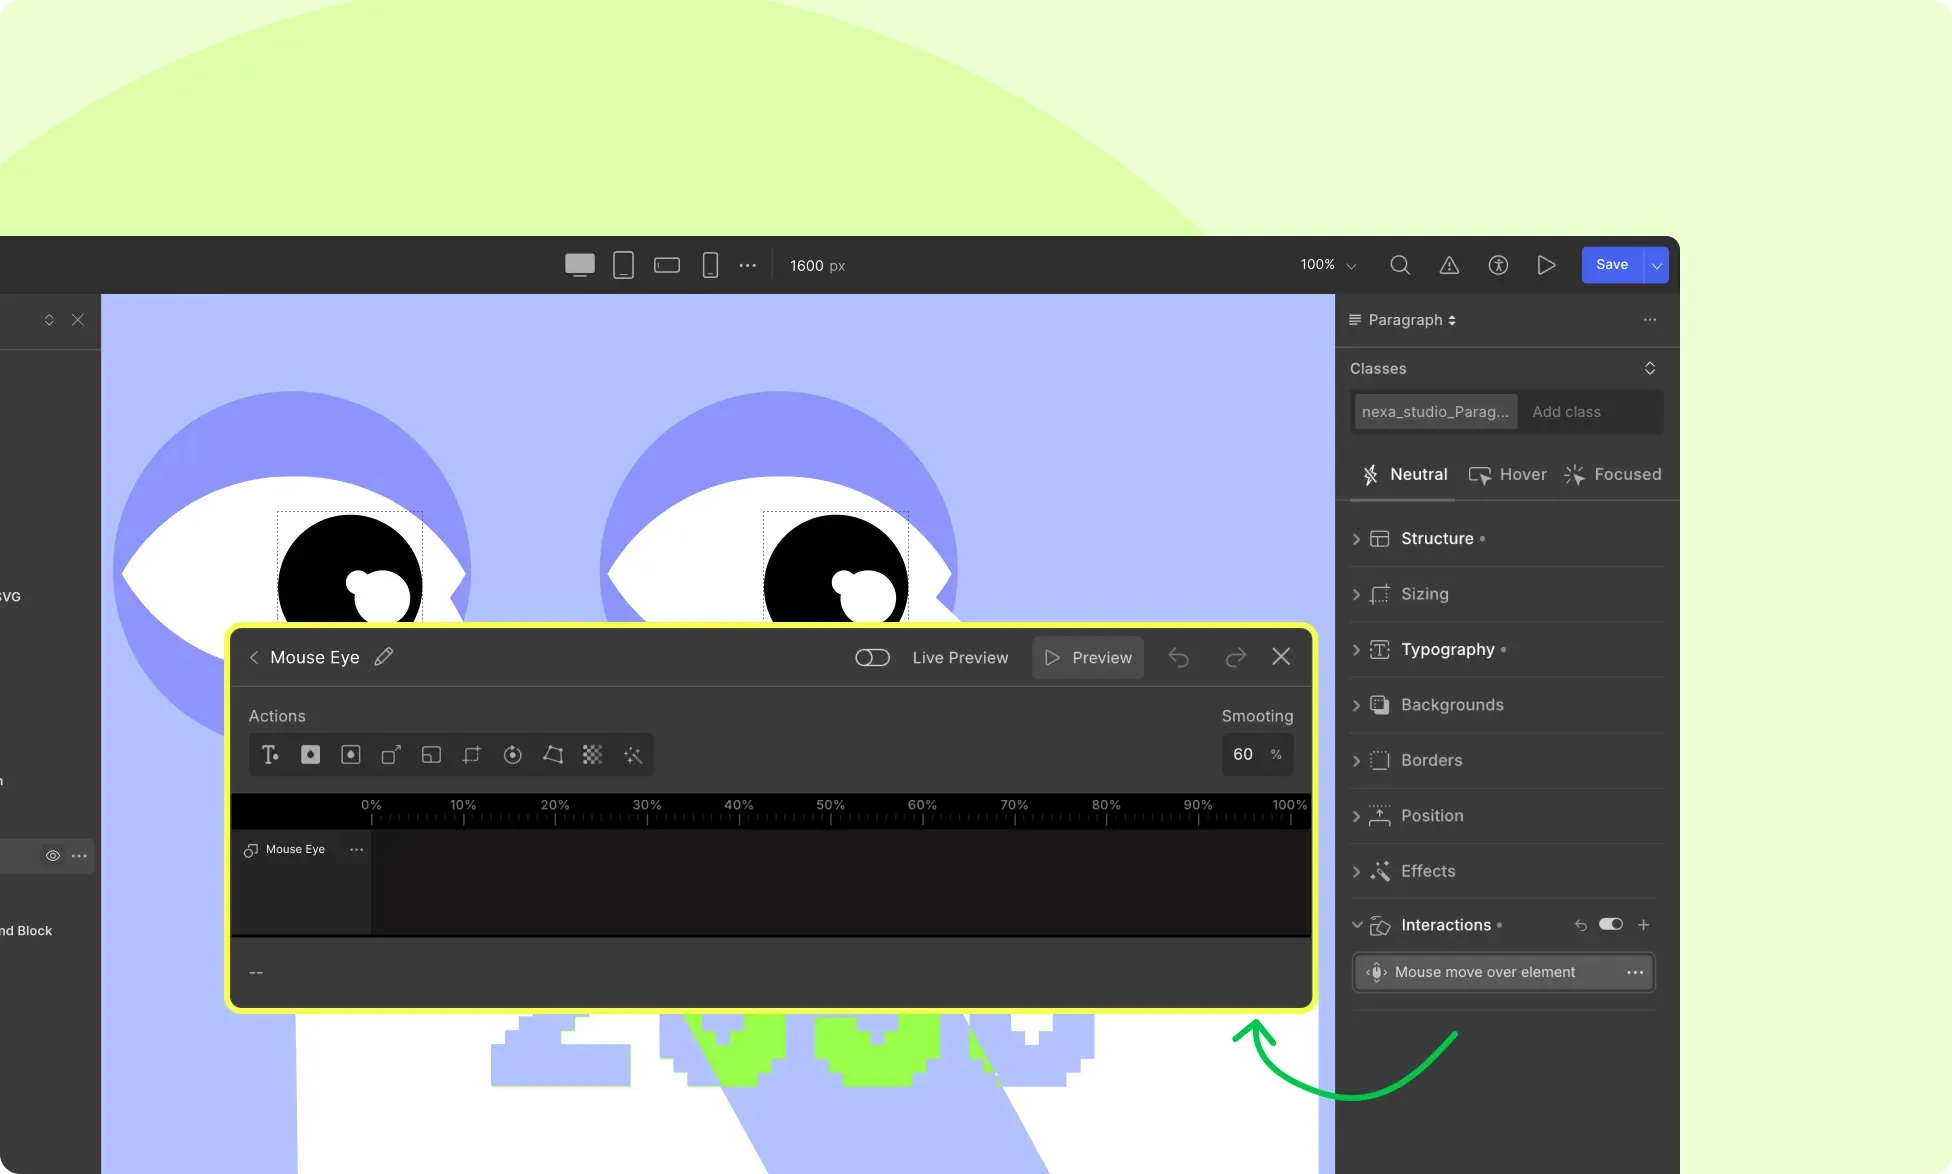
In Droip, you can apply interactions On Elements or On Page, based on which, the types of triggers available will differ.
Then, you can make your WordPress website interactive using the:
- Animation Library: Use the preset animations for quick effects.
- Custom Response Editor: Visually build advanced, layered interactions in WordPress without code.
- Text Animation: Instantly animate your text elements.
Add Preset Animation on Elements in Droip
- Step 1: Select your element and go to Style Panel > Interactions.
- Step 2: Click on the plus icon to pick your trigger type. Click on another plus icon and hover over Library to browse preset animations.
- Step 3: Choose the animation you want to apply and you’re done!
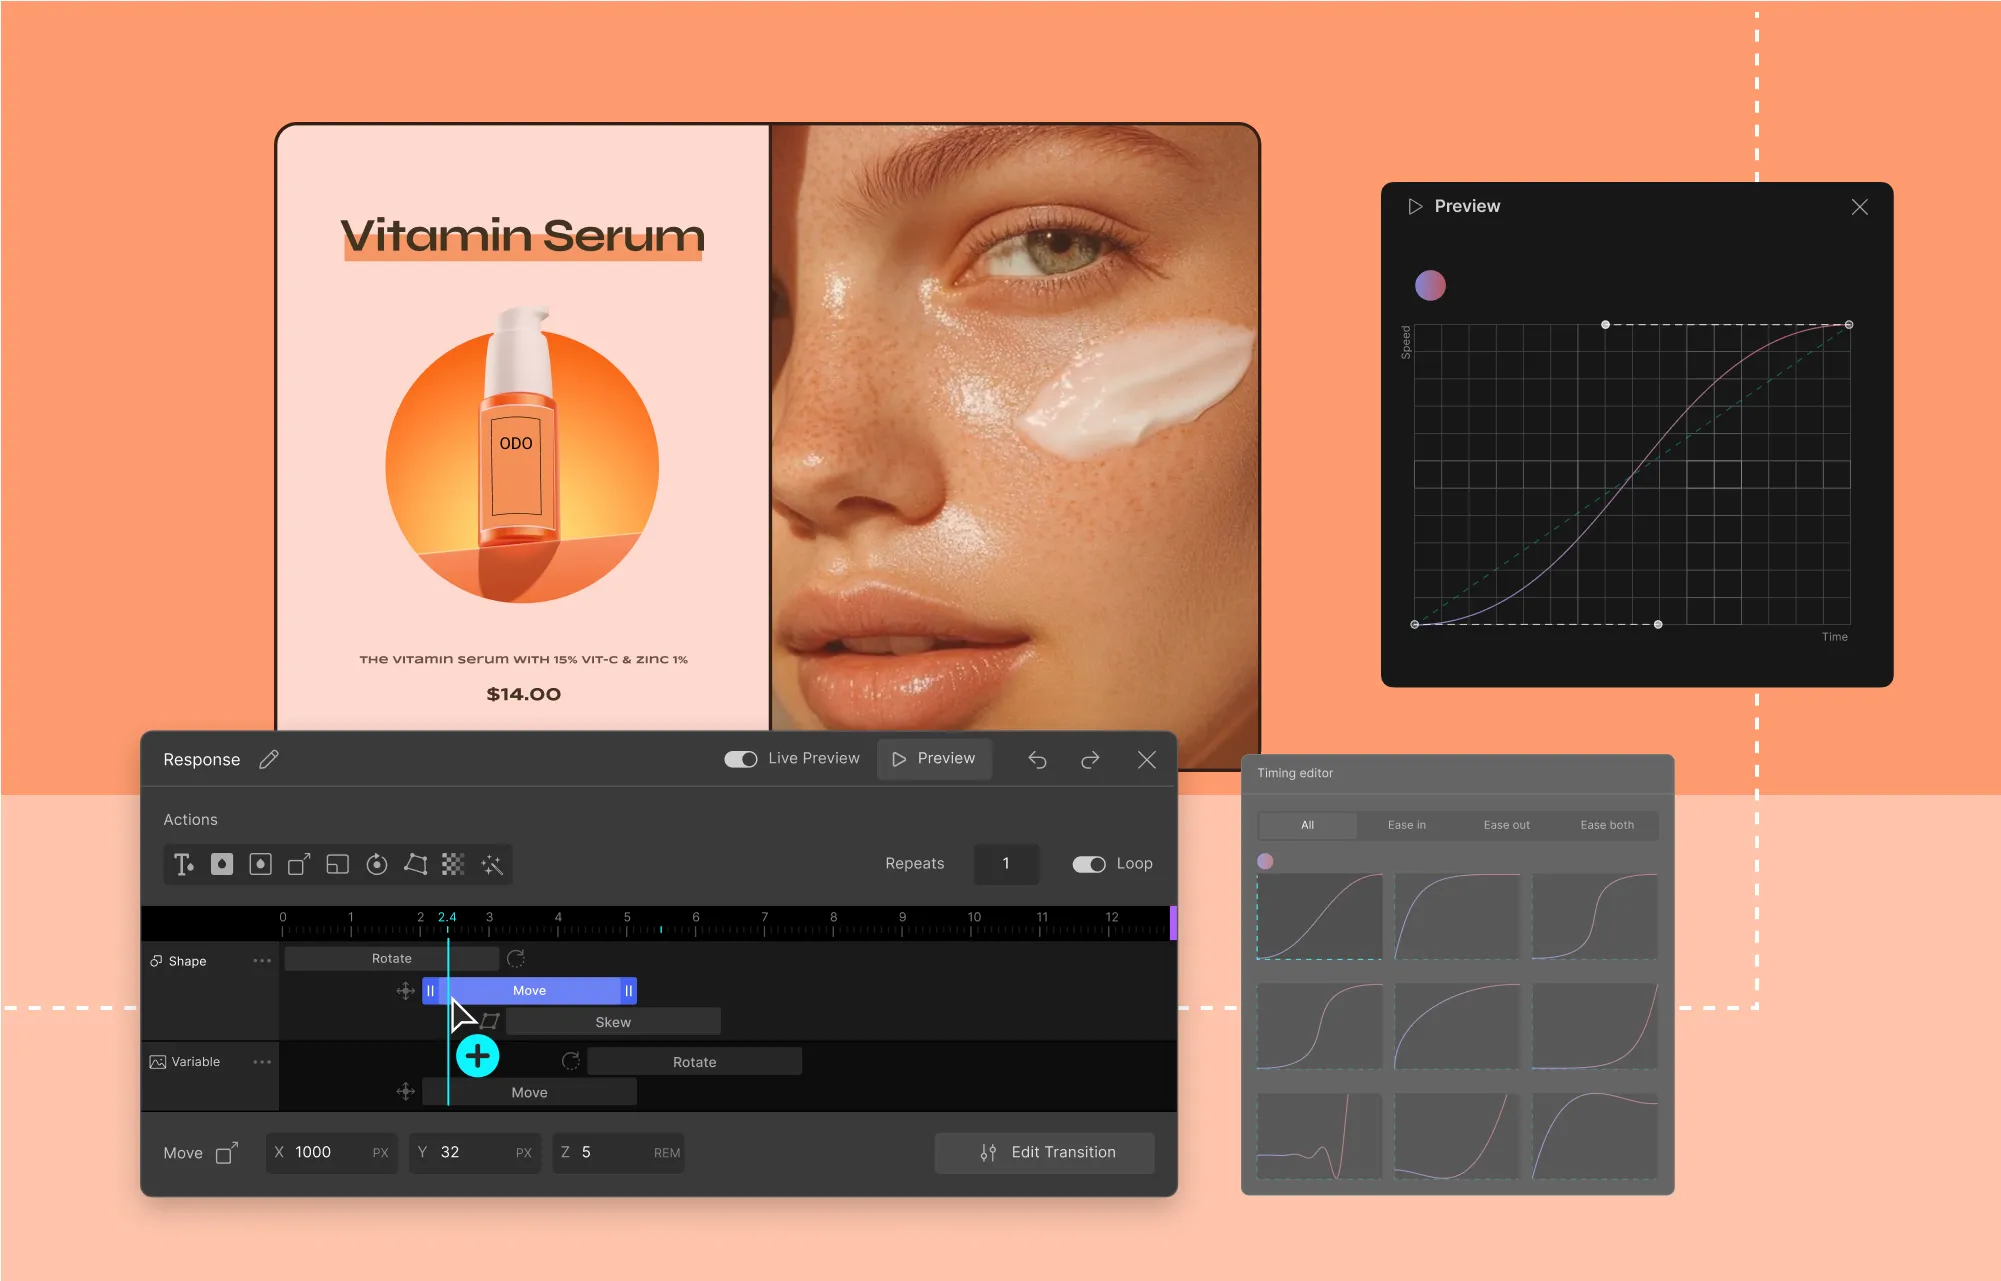
Create Custom Interaction on Elements in Droip
With Droip’s Custom Interaction Editor, you can visually alter the style properties of your target elements to give them an animated effect. You can even layer multiple responses for one or more target elements to create more advanced interactions in WordPress, all done visually:
- Step 1: Select your trigger element and go to Style Panel > Interactions.
- Step 2: Click on the plus icon and pick your trigger type. Click on another plus icon and select Set New to open the Custom Response Editor.
- Step 3: Once opened, click on any element on the canvas to set it as your target, then right-click on the timeline to add a property to manipulate.
- Step 4: Adjust the property’s values and click on Edit Transition (bottom-right) to fine-tune its progression in the Custom Timing Editor.
Add on Page Interaction in Droip
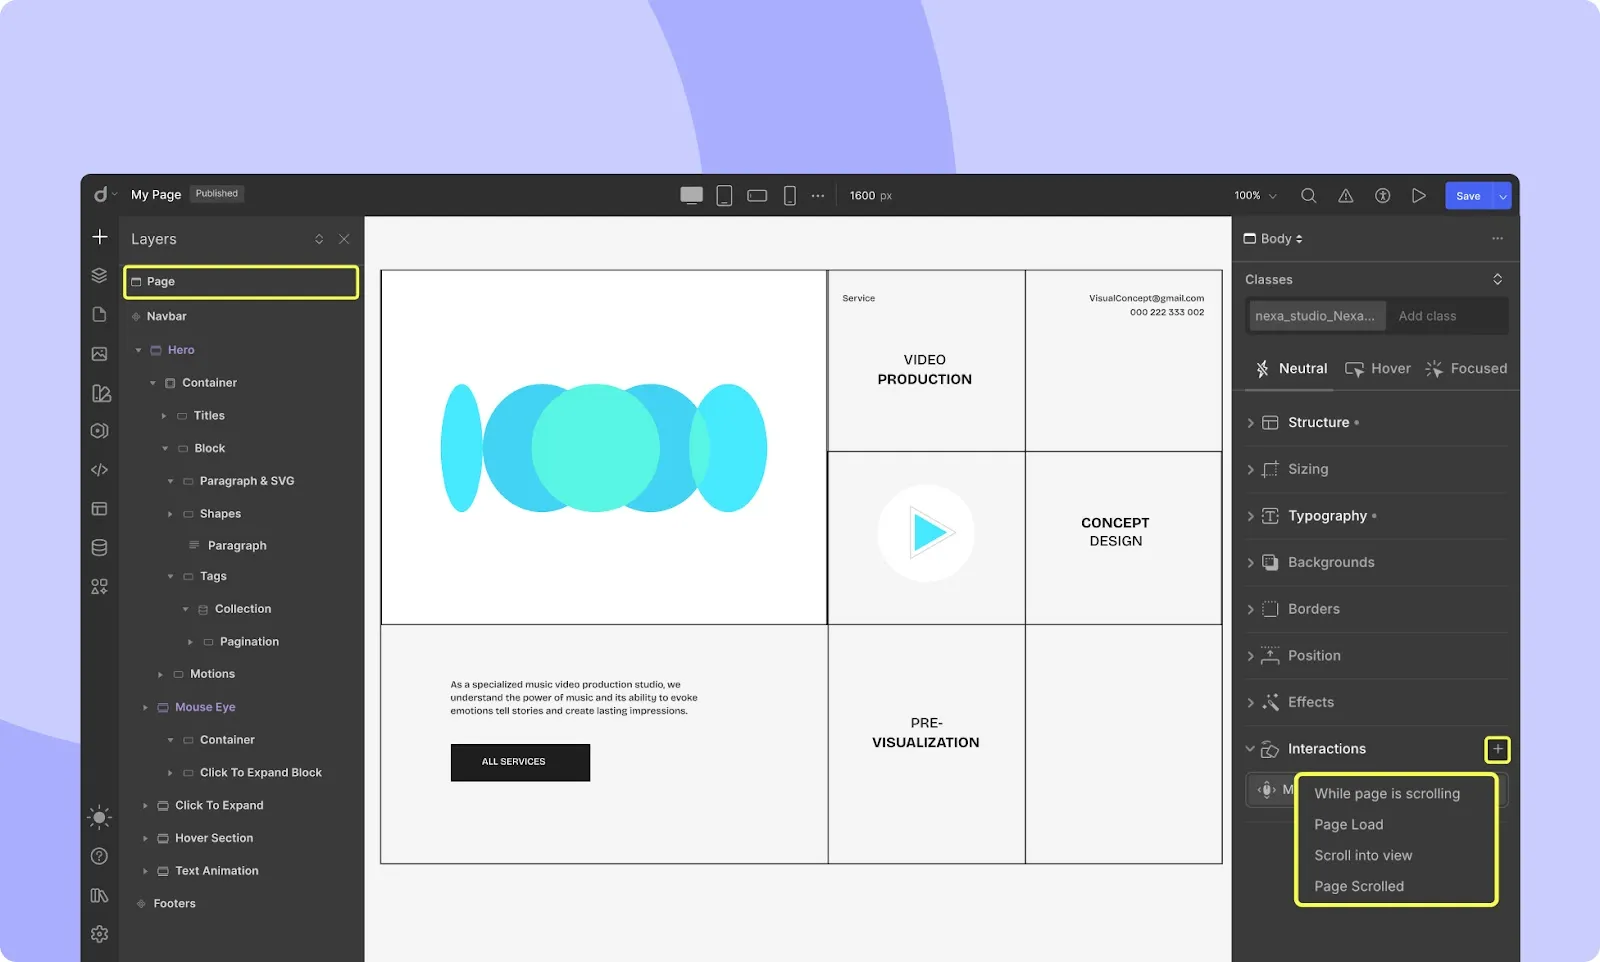
- Step 1: Select your entire page and go to Style Panel > Interactions.
- Step 2: Click on the plus icon and pick your trigger type.
- Step 3: Click on another plus icon and either choose a preset animation or create a new one using the Custom Response Editor as shown before.
Add Text Animations in Droip
- Step 1: Select your text element and go to Style Panel > Interactions.
- Step 2: Click on the plus icon and pick your trigger type. Click on another plus icon again, and this time, select Text Animation.
- Step 3: Finally, choose a premade animation and customize it using the Text Animation settings.
Need ideas? Explore our interactions and animations playlist for more guidance and inspiration!
Make Website Responsive Using Unlimited Breakpoints
With your layout and content set, it’s time to ensure your site looks great on all devices.
Unlike other website building solutions out there, Droip offers unlimited custom Breakpoints, letting you fine-tune your design visually for desktops, tablets, phones, and more.
Even better, its cascading system applies changes from larger to smaller screens automatically, reducing repetition, lowering mistakes, and speeding up responsive design.
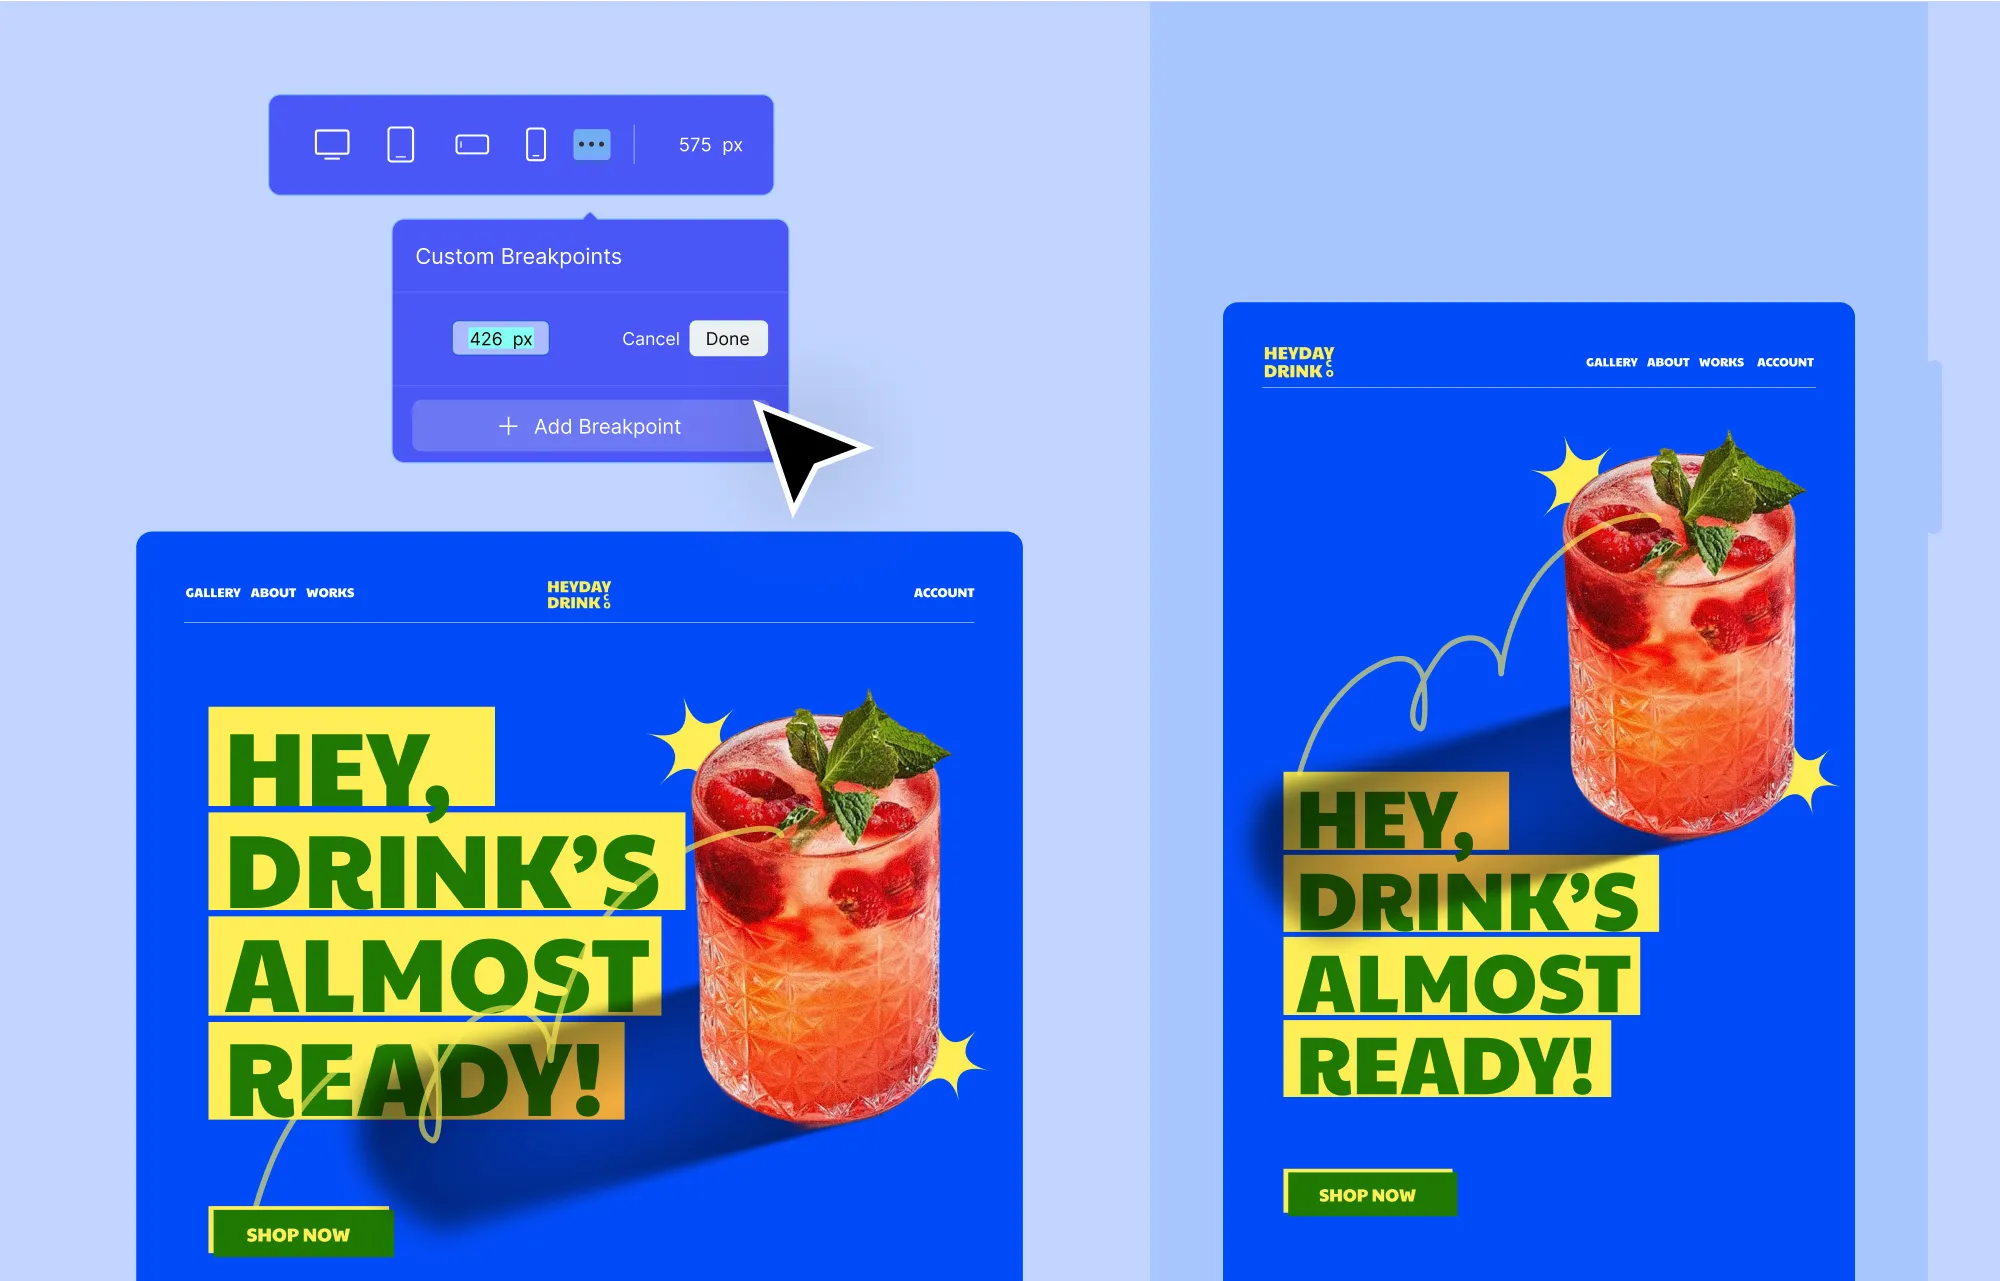
To use Breakpoints in Droip:
Step 1: From the Breakpoints panel on the Topbar:
- Select a Default Breakpoint or
- Add a Custom Breakpoint, i.e., click on the ellipsis icon, select Add Breakpoint, and set its value.
Step 2: Tweak your design to fit the selected breakpoint. Changes will cascade down to smaller screens but won’t affect larger ones or the default desktop breakpoint.
Step 3: Repeat the process for other breakpoints if needed. Once you’re done, switch back to the default desktop breakpoint.
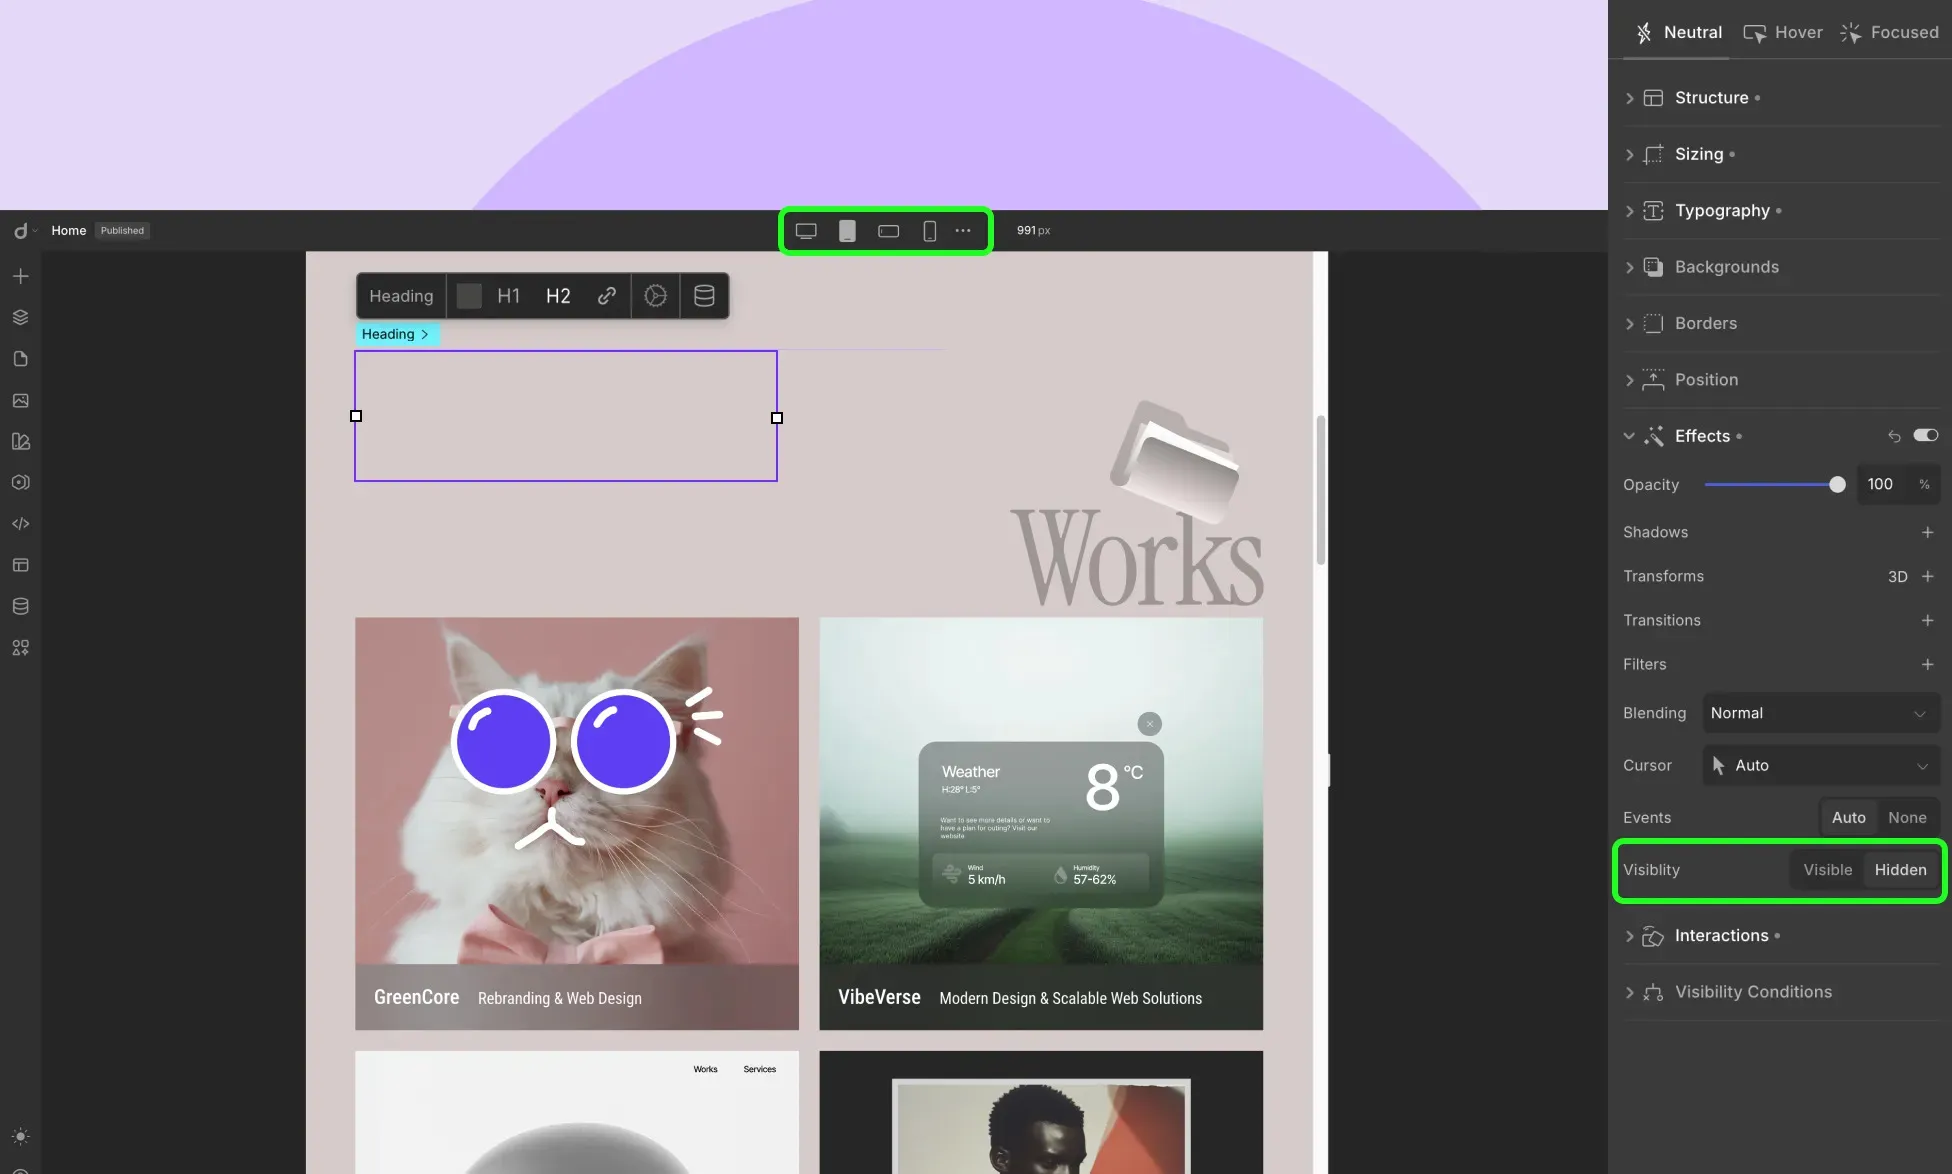
You can also show/hide elements for specific breakpoints:
Step 1: Switch to a Breakpoint.
Step 2: Select an element and from the Style Panel > Effects, set Visibility to Visible or Hidden.
This is useful for sections designed specifically for mobile or smaller screens that you’d prefer to hide for larger displays and vice versa.
For a deeper dive, you can also take a look at the Breakpoints documentation.
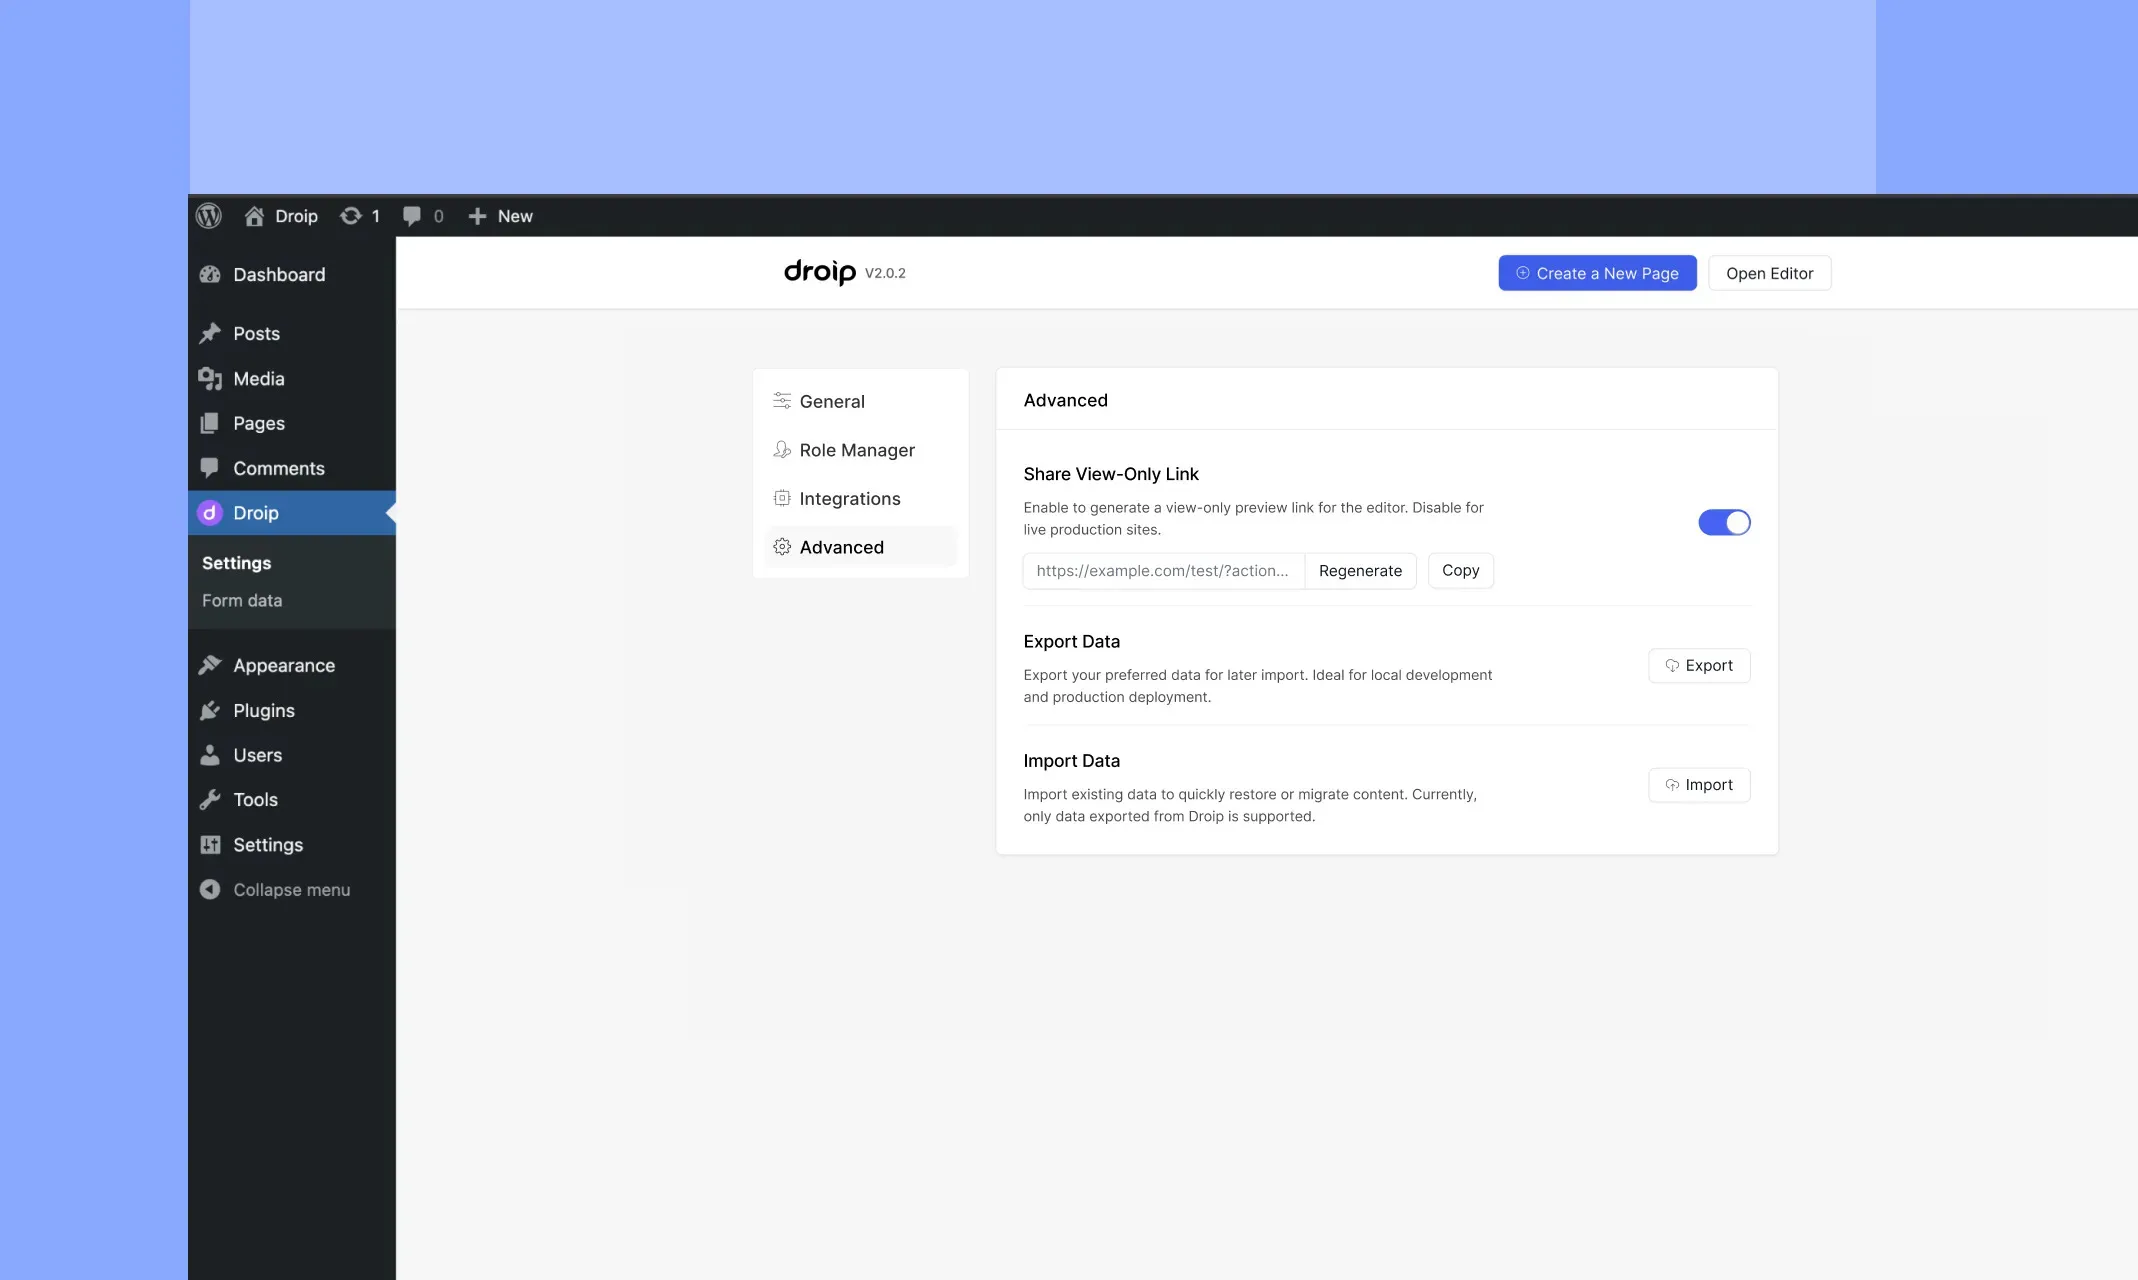
Optimize Website SEO
With Droip, you’re not just building a website, you’re setting it up for success. And a key part of that is using Droip’s built-in and dynamic SEO.
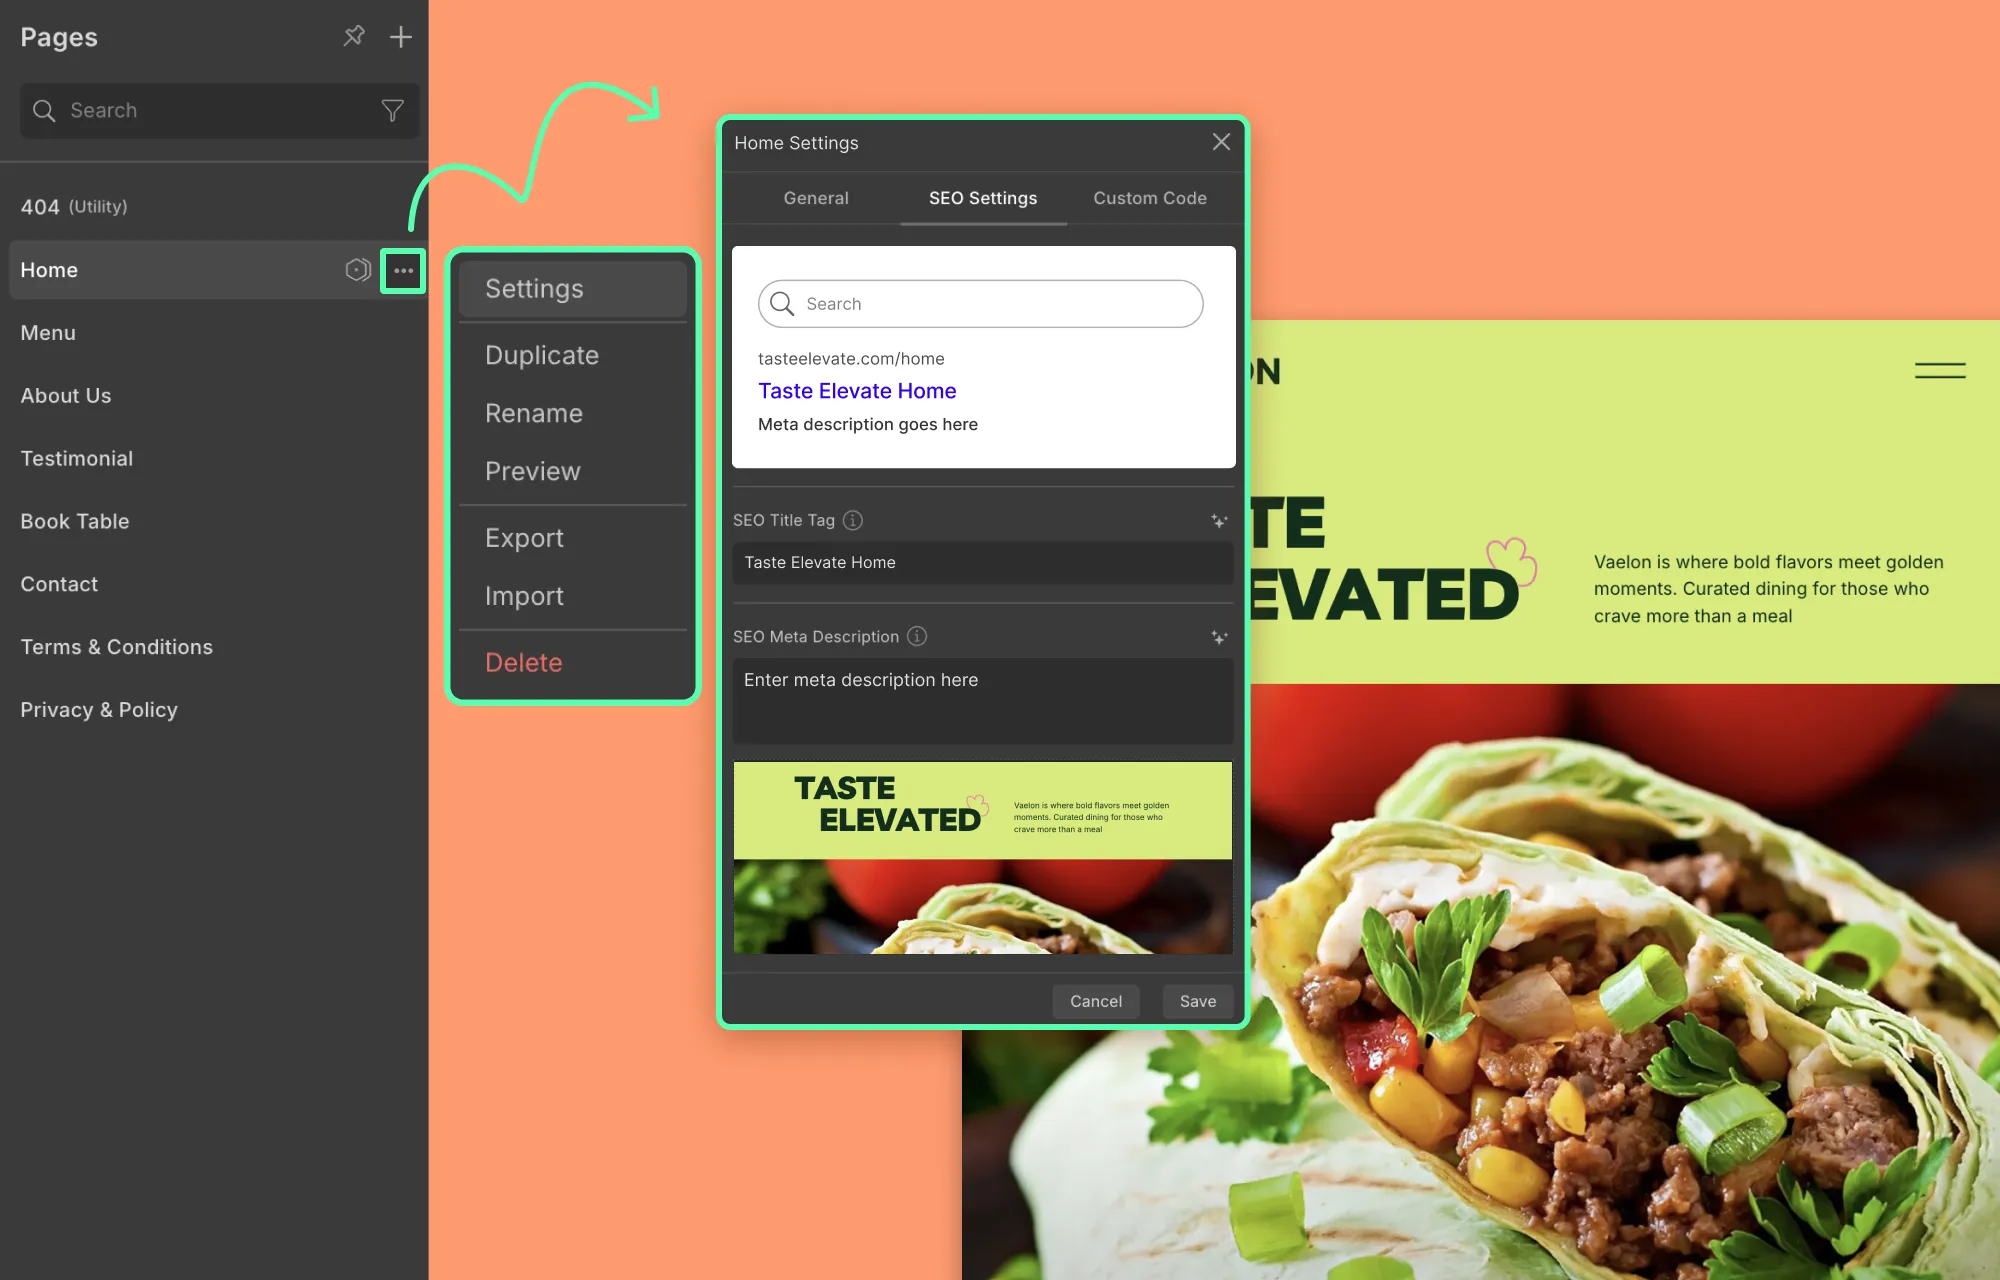
To optimize website SEO in Droip:
- Step 1: Click on the Pages icon on the left sidebar.
- Step 2: Then, click on the ellipsis icon next to a page and select Settings.
- Step 3: Switch to the SEO Settings tab and add your Title, Description, Cover Image, and Open Graph Info. Once you’re done, hit Save.
💡 Tip: Don’t forget to optimize your page’s URL from the General settings > Slug to further improve website SEO.
In Droip, you can even integrate with AI and then use the sparkle icon next to any text field to generate SEO content automatically!
For Dynamic Templates, Droip lets you set Dynamic SEO so each item’s details page gets unique SEO content.
Design Forms and Pop-ups To Capture Leads
Lastly, no website is complete without high-converting Forms and Pop-ups.
With Droip’s built-in Form Builder and Pop-up Builder, you can easily collect leads, gather data, streamline communication, and more.
The Droip Form Builder
Quickly create Login Forms, Contact Forms, Booking Forms, and more with the Droip Form Builder, visually.
Then, easily secure them with reCAPTCHA, limited entries, and restricted responses from the same IP. Elevate forms further by integrating with email automation tools for efficient follow-ups.
What’s more, all form data is stored automatically in Droip’s built-in Form Manager, where you can easily view, sort, and manage your data.
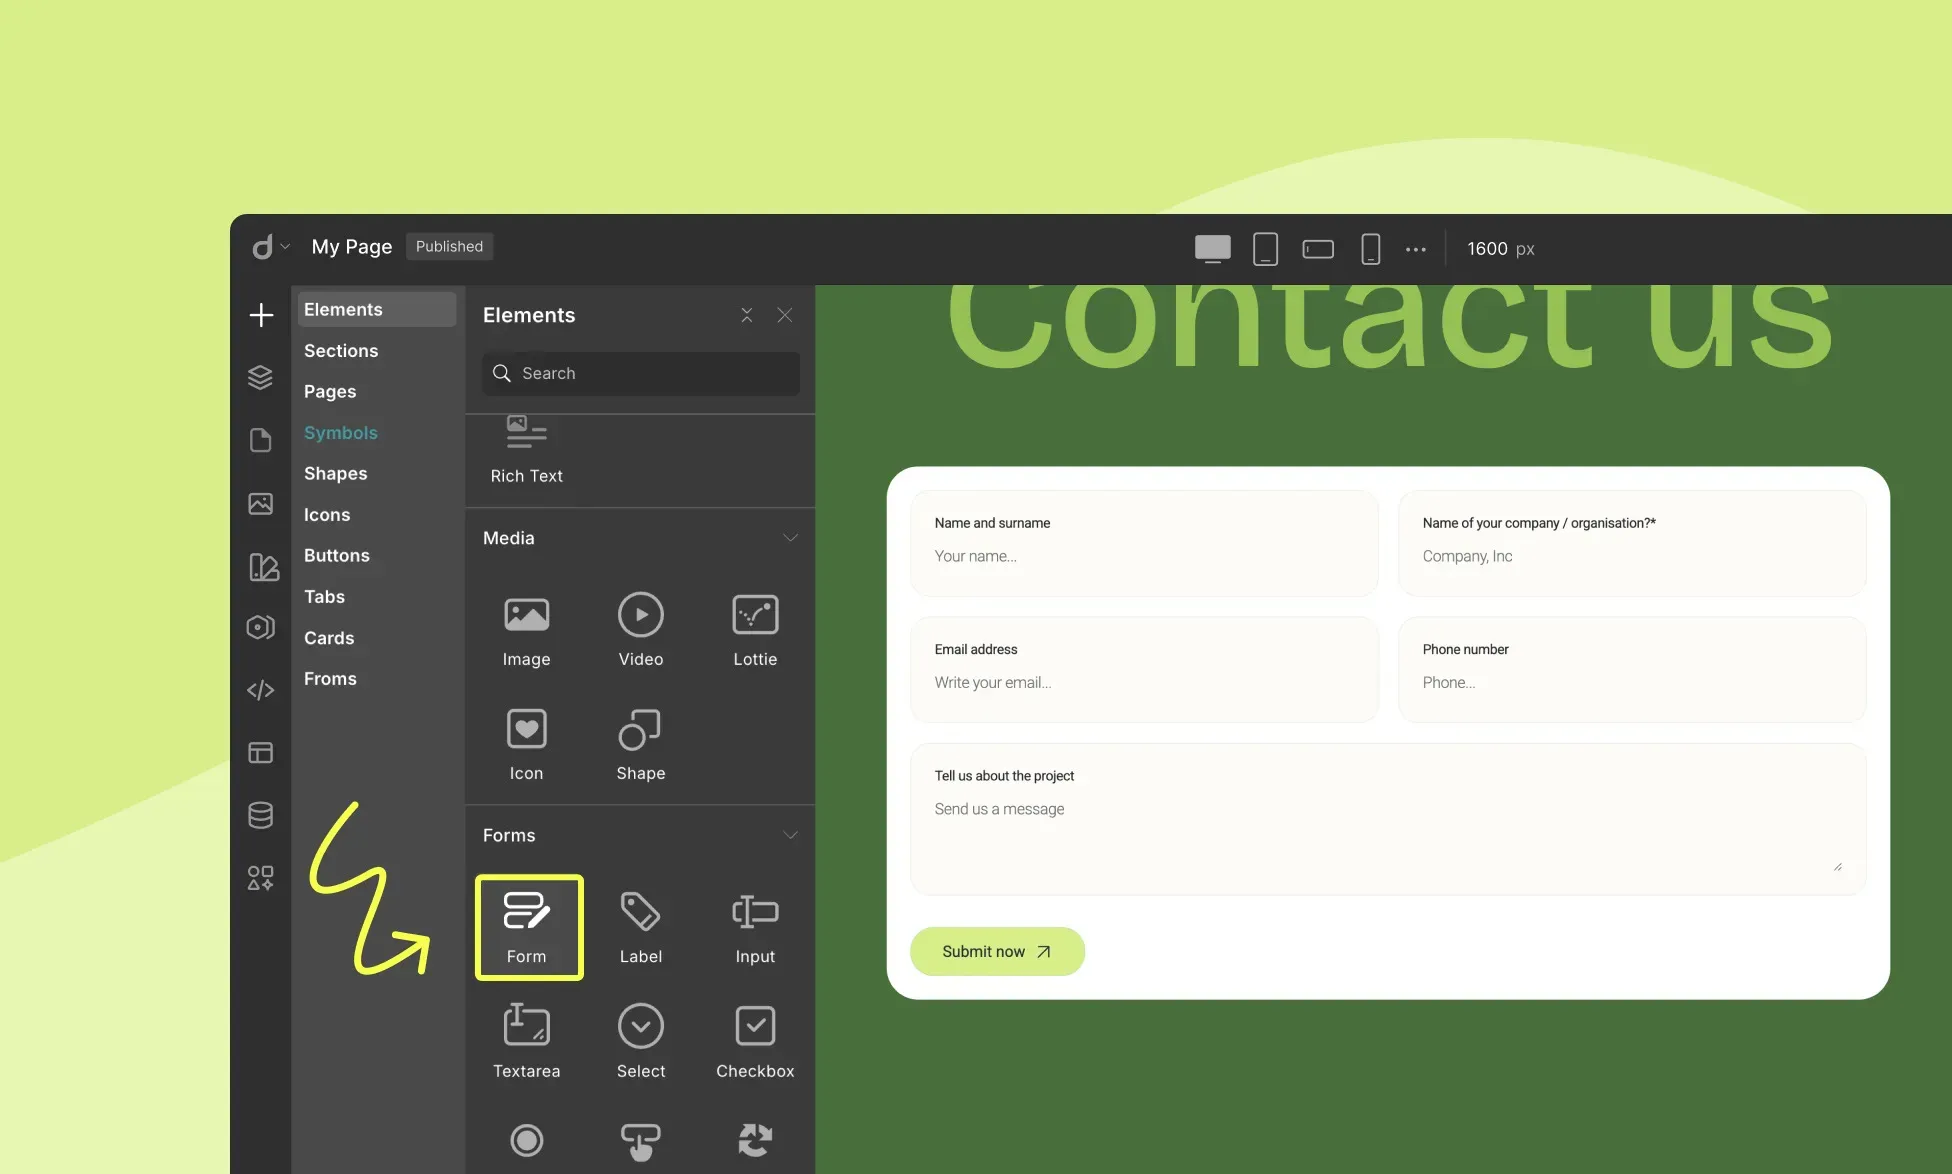
To build a Form in Droip:
- Step 1: Click on the plus icon on the left sidebar.
- Step 2: From the Elements panel, add the Form element to your canvas and click on the Settings icon in the inline editor to configure it.
- Step 3: Then, add the necessary elements like Label, Input, Submit Button, etc. Configure their settings in the same way as the form.
- Step 4: Finally, style the form as needed via the Style Panel.
💡 Tip: Save time by using a premade form — just click the plus icon and head to Forms to pick one!
Dive deeper, through the Form Builder documentation.
The Droip Pop-up Builder
Just like Forms, Droip’s Pop-up Builder means business.
Design pop-ups visually like any other page, then control when, where, and who sees them using settings like triggers, delays, and visibility conditions for maximum impact.
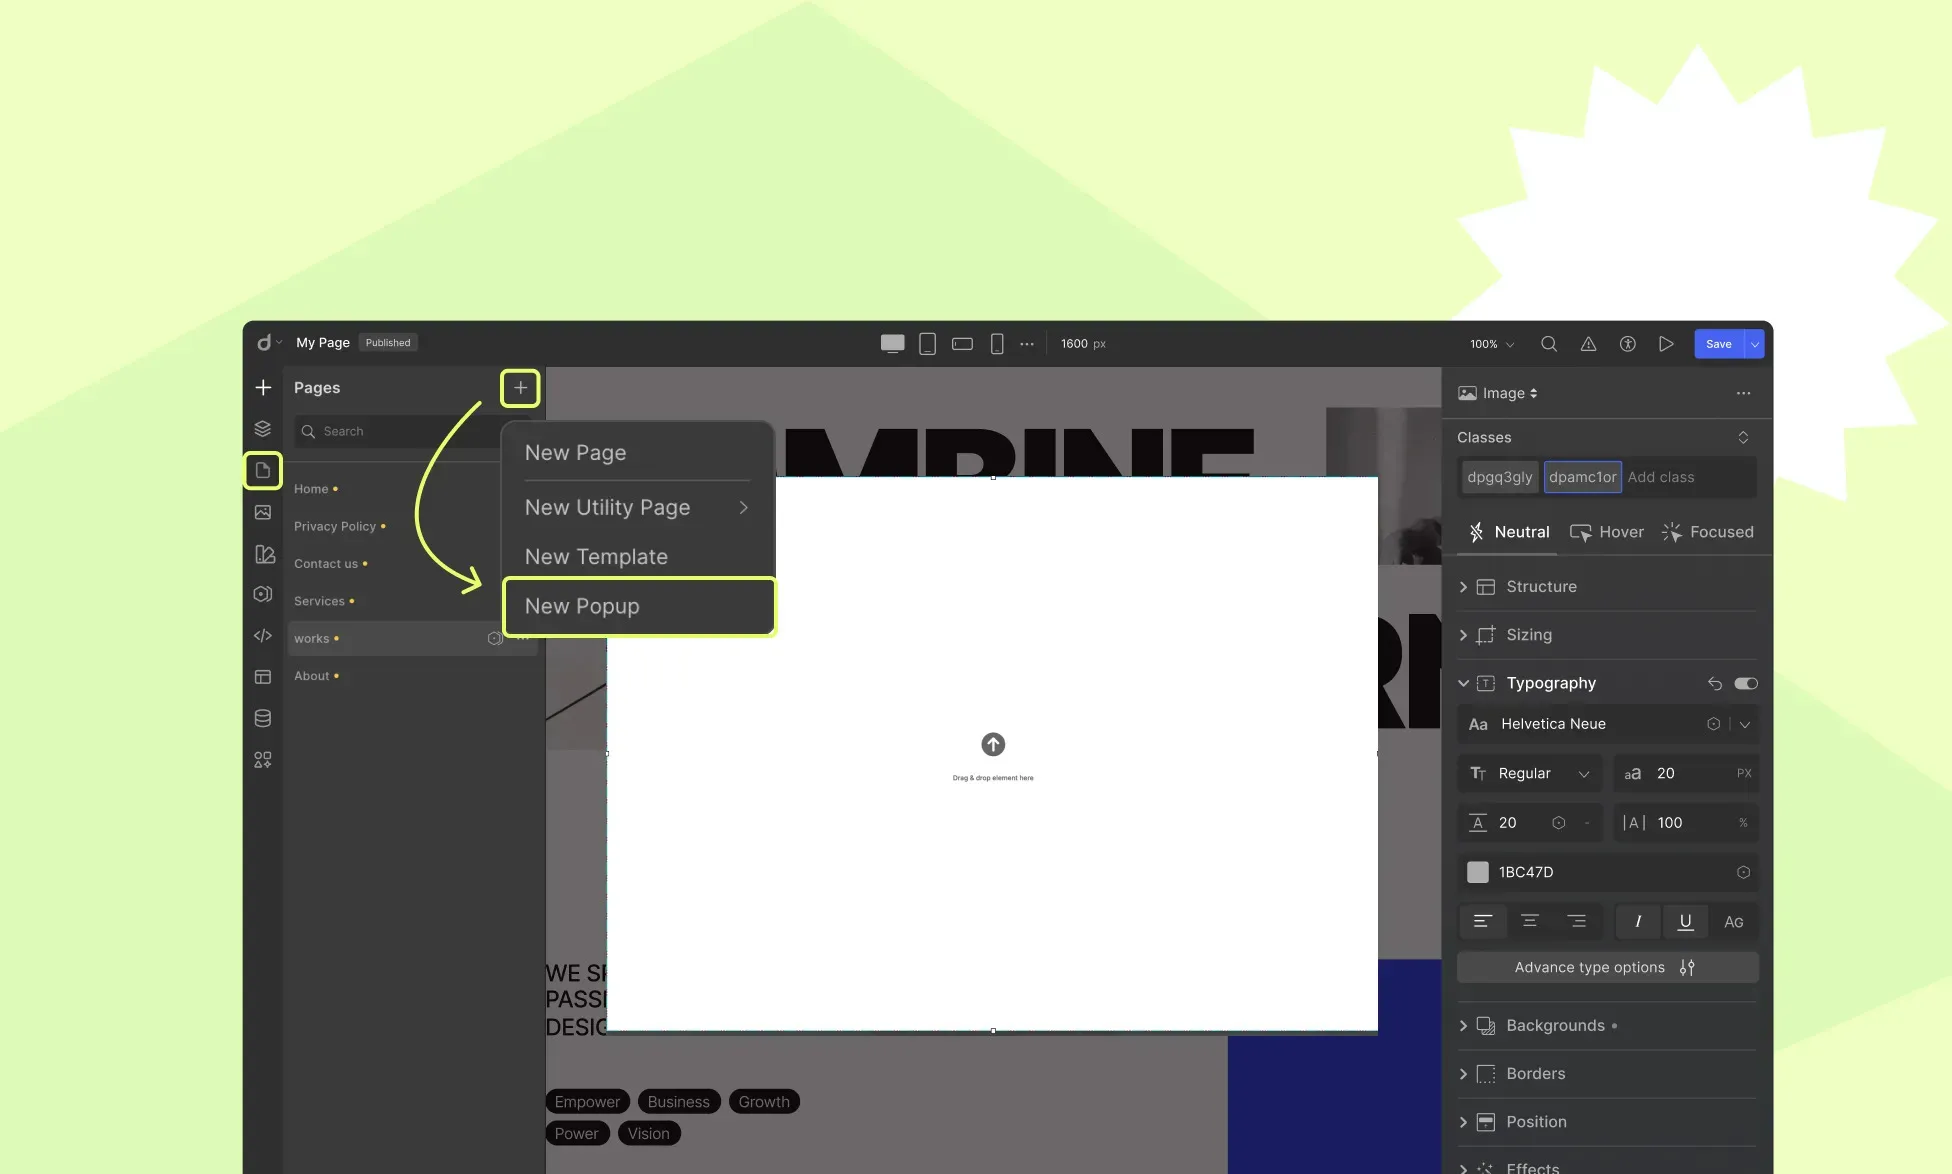
To create a Pop-up in Droip:
- Step 1: Click on the Pages icon on the left sidebar.
- Step 2: Hit the plus icon and choose Pop-up. It’ll appear on the Pages panel.
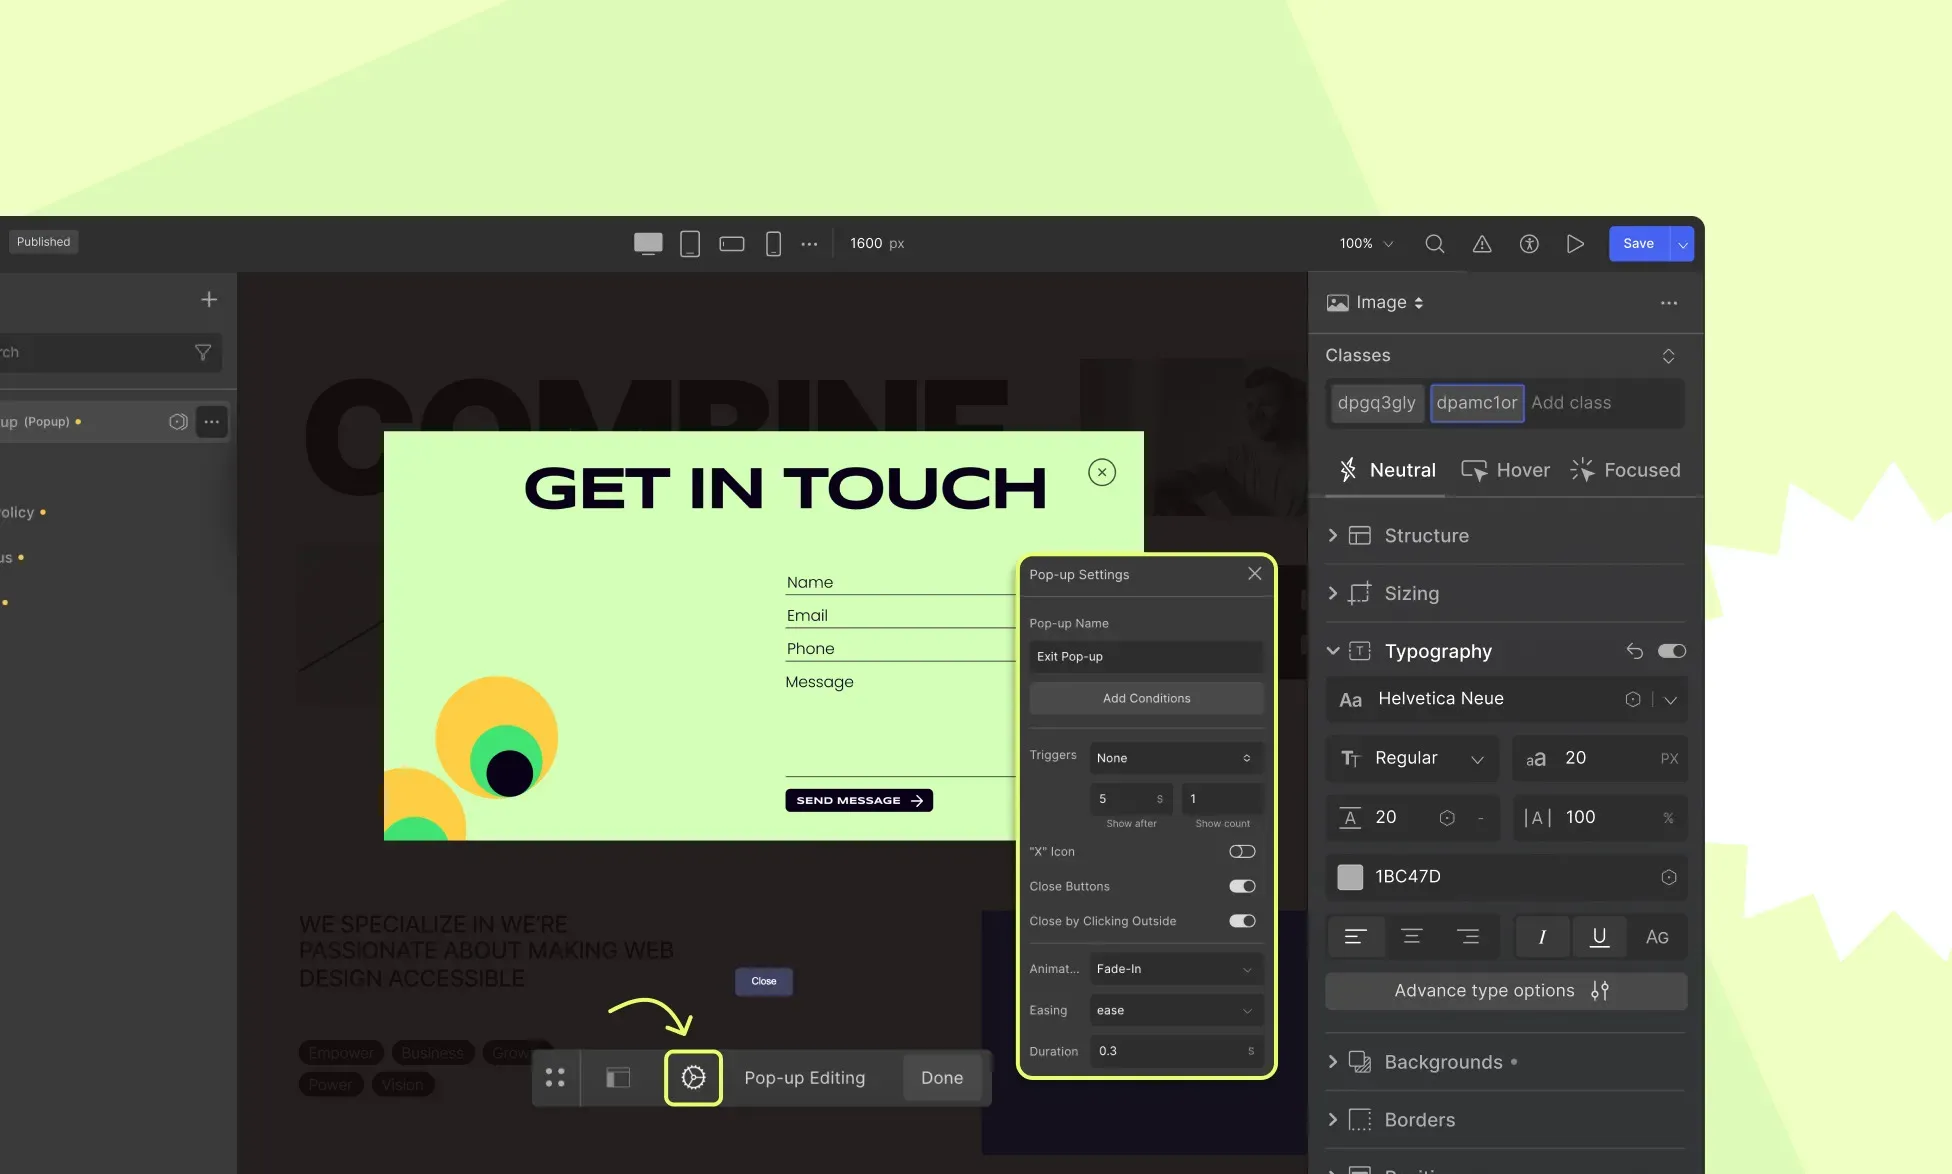
- Step 3: Select it, then adjust its position by clicking on the Layout icon. Then, set its Name, Triggers, Visibility Conditions, and more by clicking on the Settings icon next to it.
- Step 4: Next, design your pop-up visually. Add elements, drop in premade components, and style everything with ease using the Style Panel. Finally, hit Done to exit.
And that’s it, your pop-up is ready! For more, check out our Pop-up documentation.
Bonus: Make Your Website Multilingual
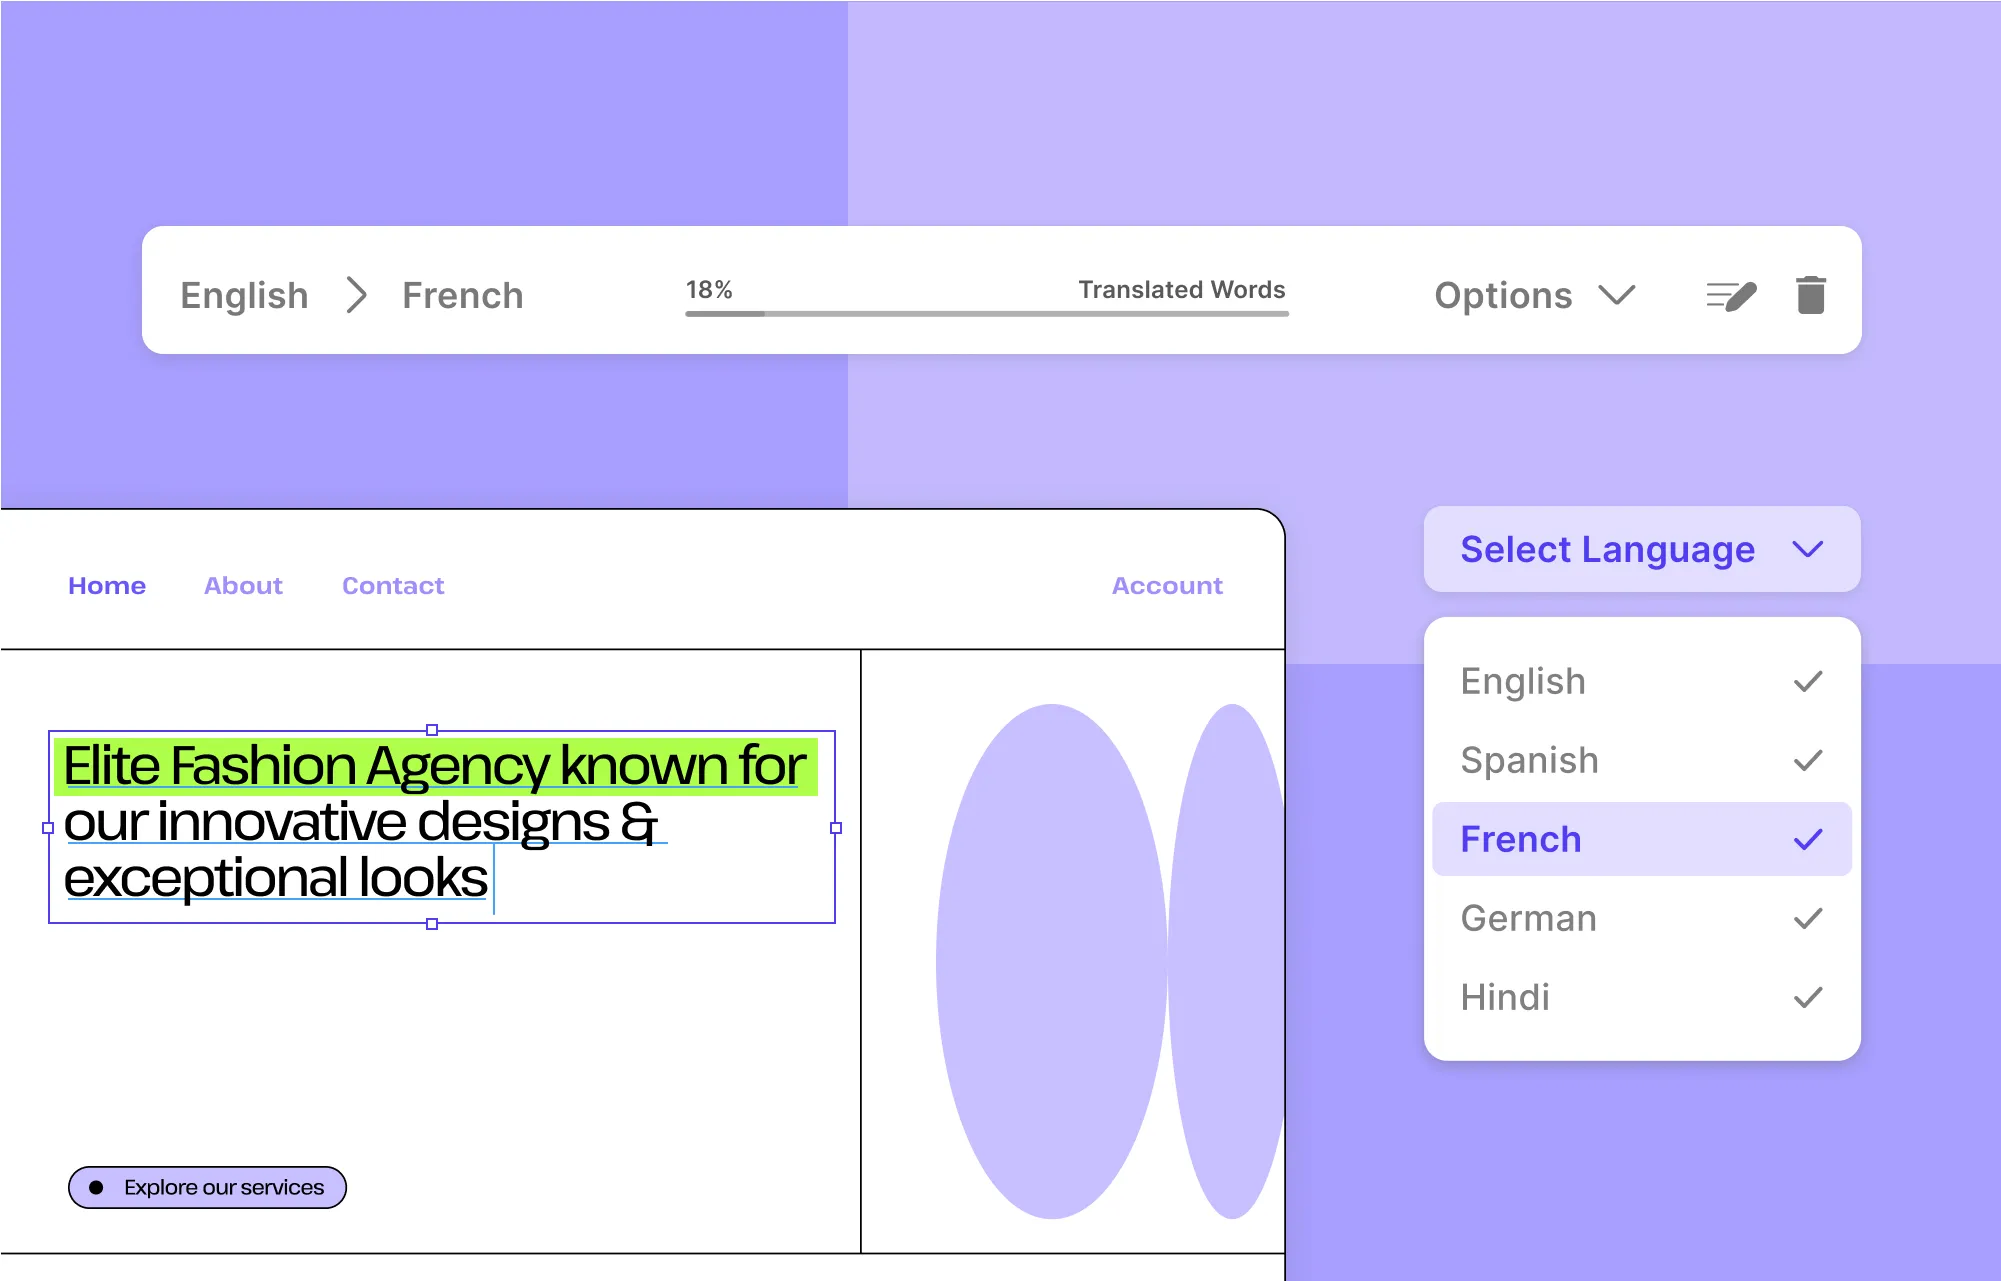
Alrighty! We’re nearly at the finish line, but there’s one more powerful addition worth exploring: making your website multilingual to reach a broader, global audience.
This is a great idea, whether you’re targeting more regions or simply want to offer a more inclusive user experience.
And the best part is that Droip websites can be translated easily using Weglot, a popular multilingual solution that integrates seamlessly with Droip and WordPress.
For more detailed instructions, check out our documentation on How to Translate a Droip Website With Weglot.
Testing Your Website for Quality
Before going live, test and tweak your website for peak performance.
Run Website Audit
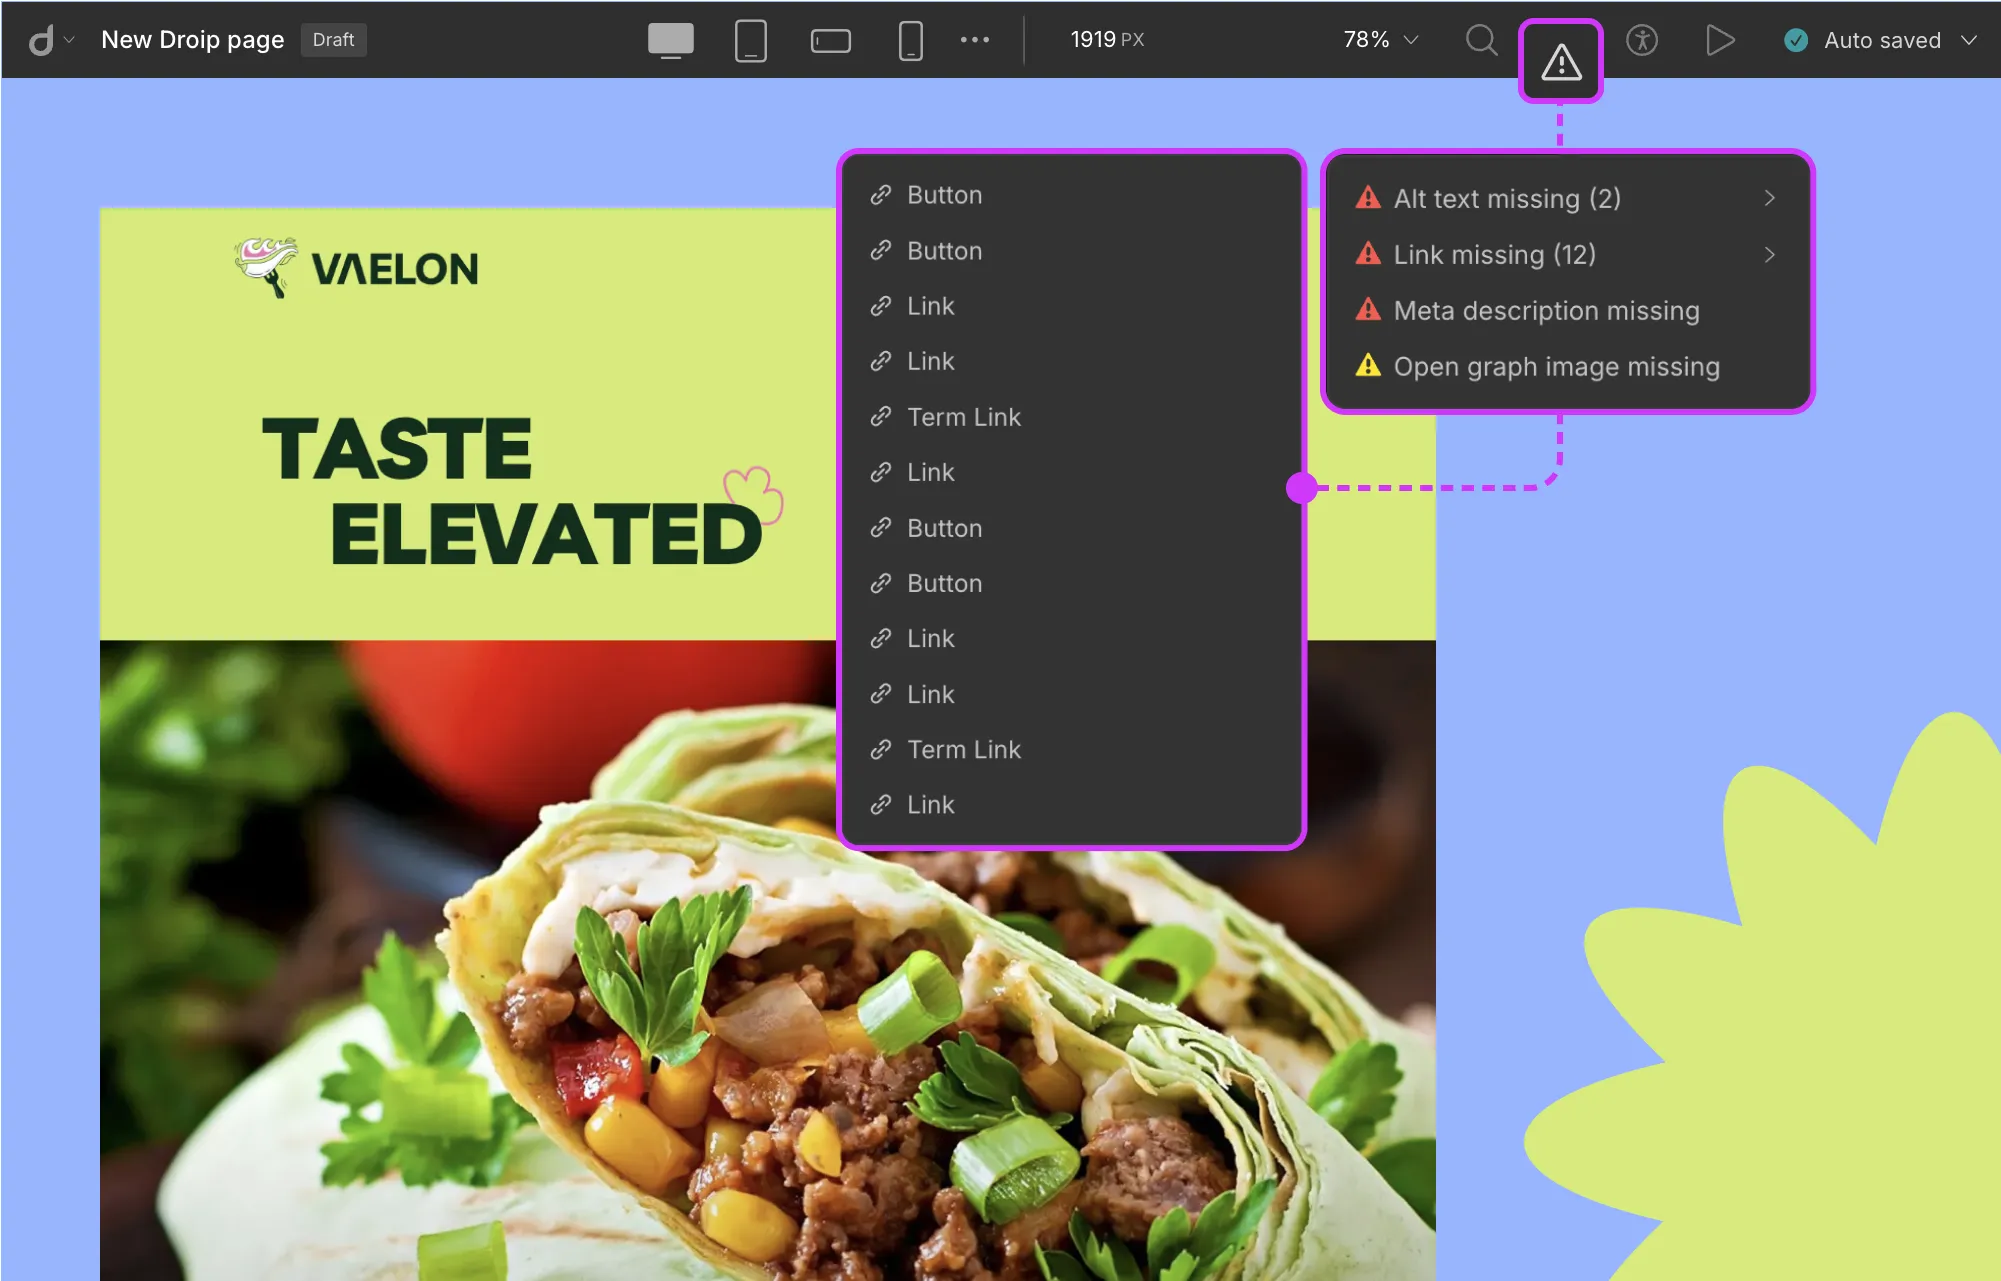
Use Droip’s built-in Audit tool to automatically spot things like missing Alt Text, Links, Open Graph Images, and more.
To run an Audit in Droip:
- Step 1: Click on the Audit icon on the Topbar.
- Step 2: Click on any listed issues to jump to that section and fix them instantly.
Enhance Website Performance
When it comes to performance, the Droip does half the work for you as it’s built for speed with:
- No reliance on third-party plugins
- Clean, bloat-free code
- No dependency on external JavaScript Libraries
- Automatic compression of all CSS and JS
- Only loading the fonts actually used on your site
Boost performance further by enabling:
- Image Optimization to convert images to WebP (smaller file size, superior compression).
- Lazy Loading For Videos to load only when needed.
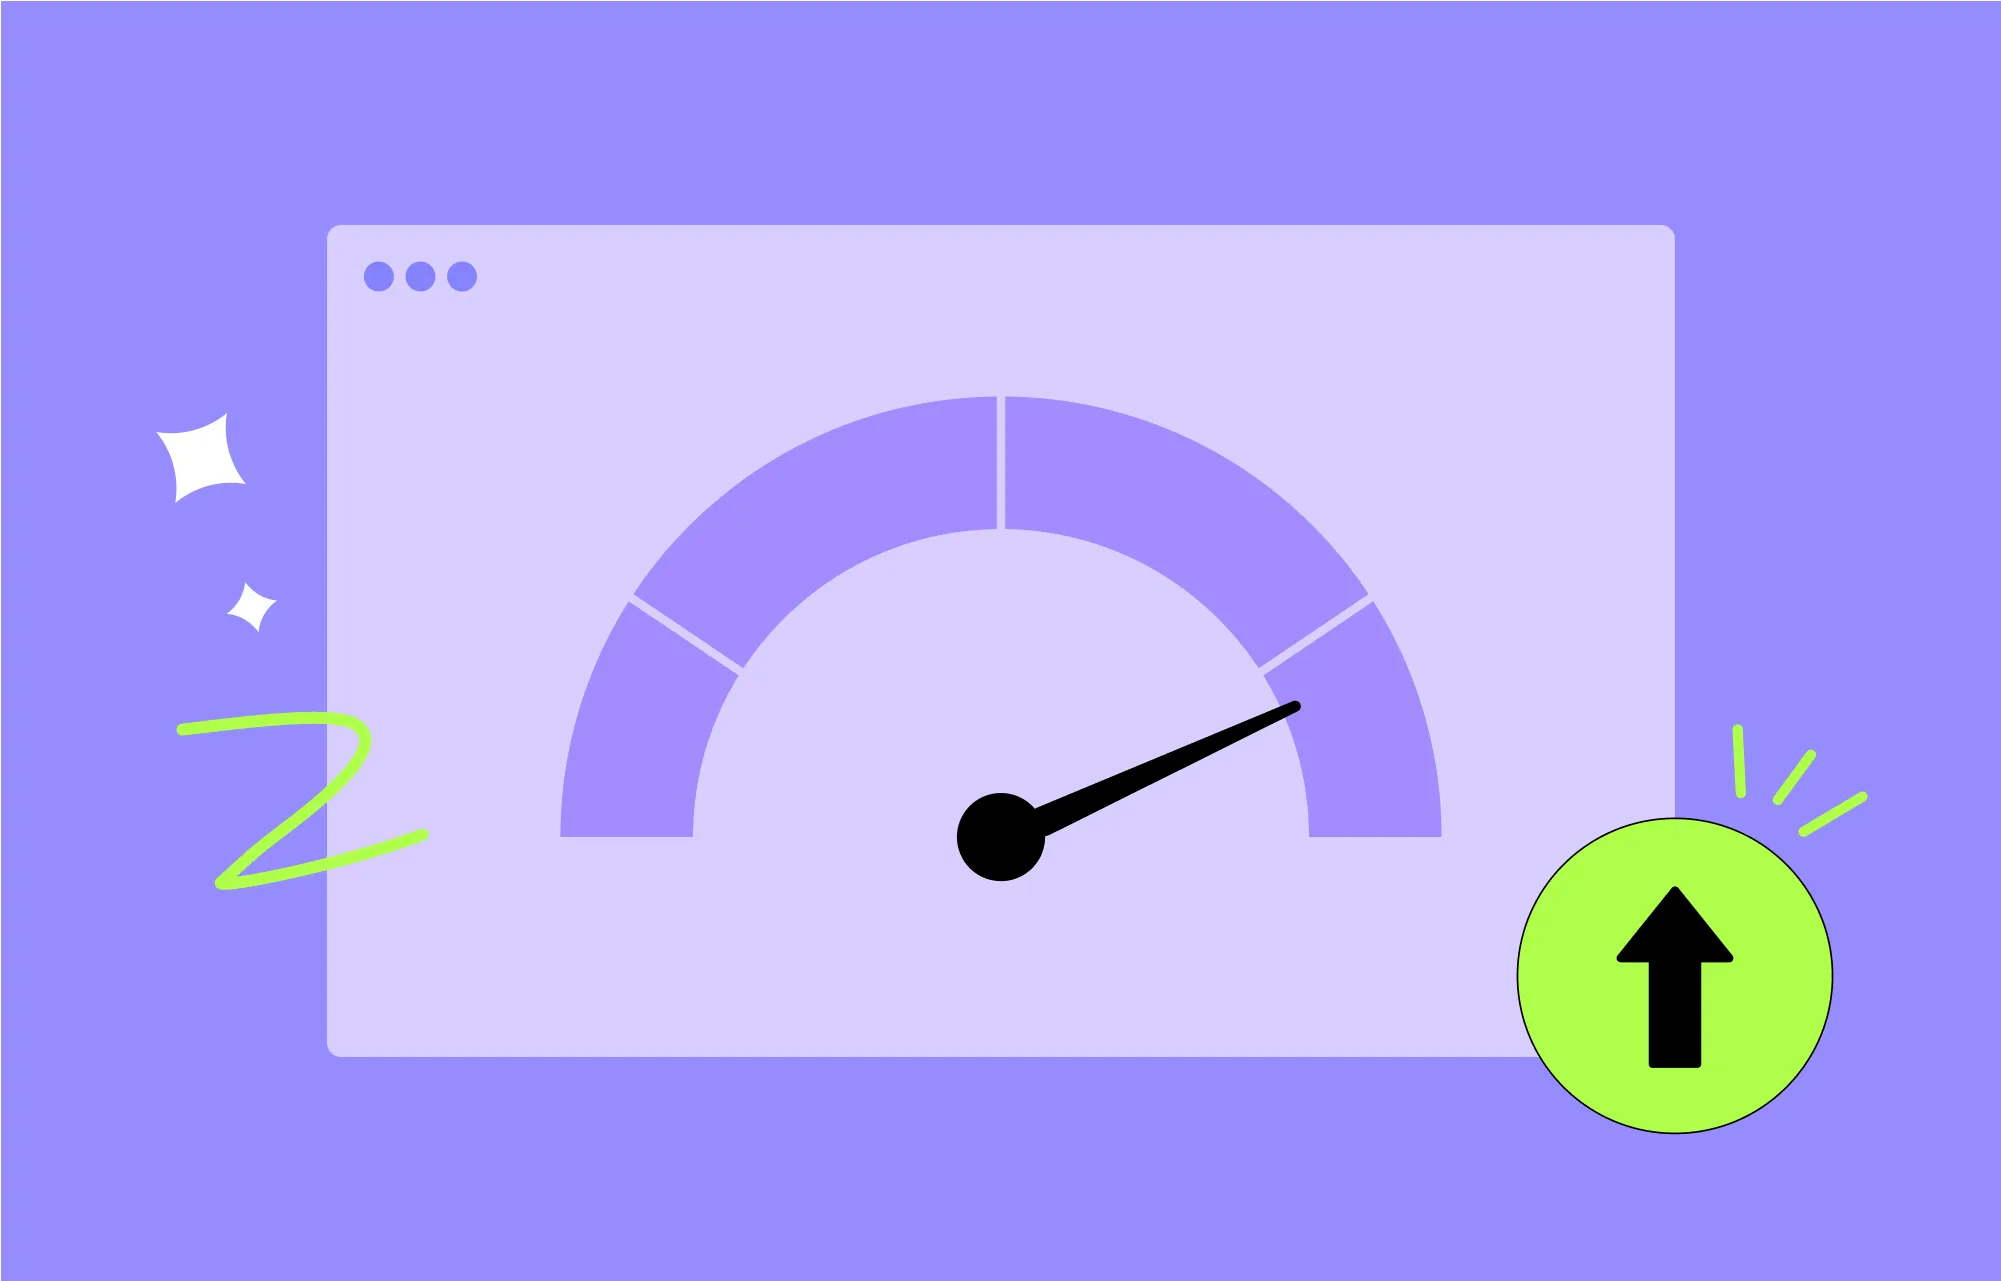
Test Speed and Responsiveness
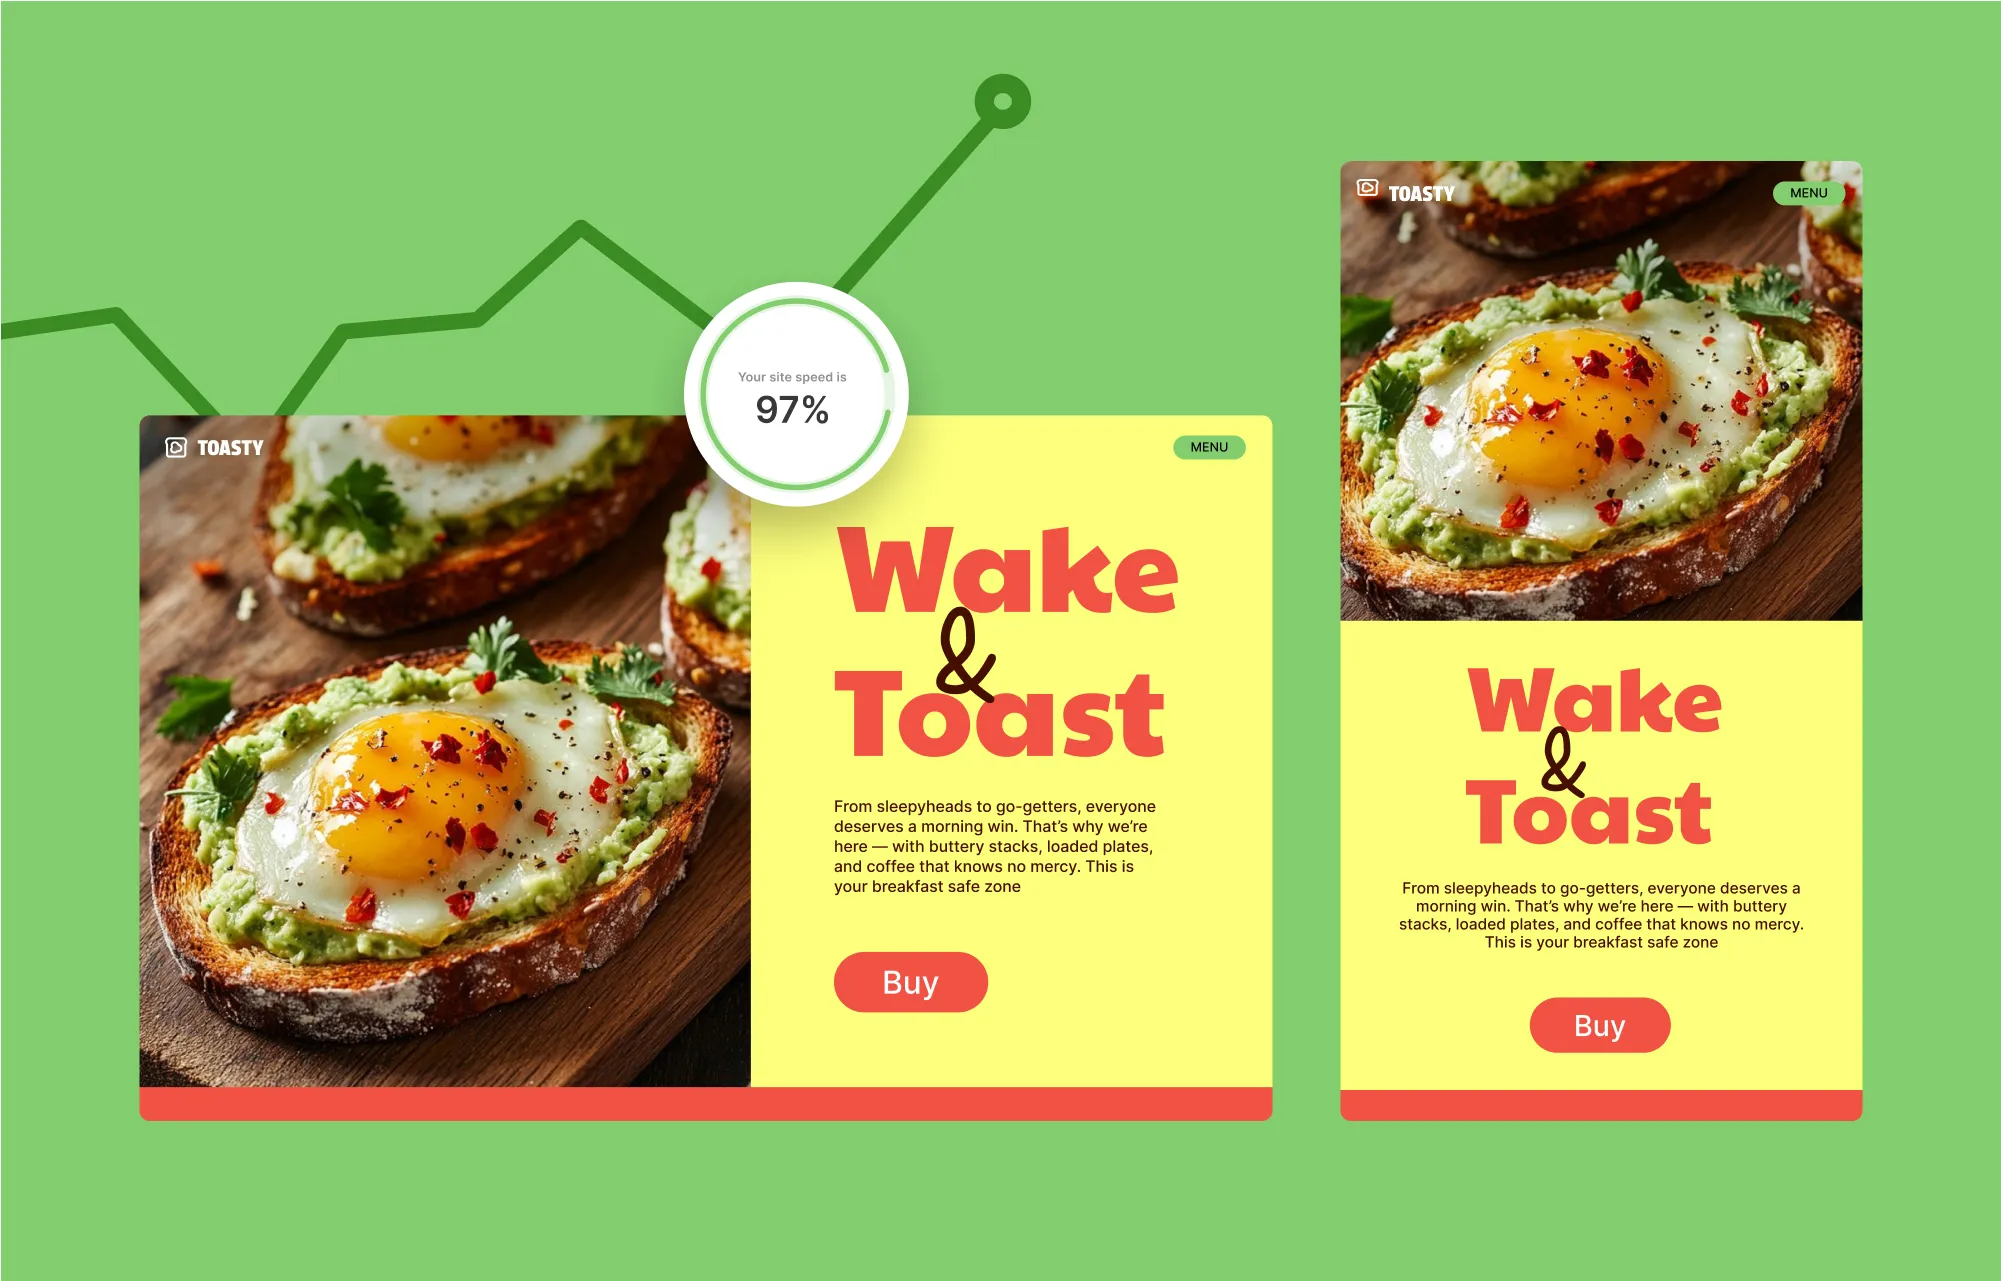
After optimization, test your website’s speed and responsiveness using tools like Google PageSpeed Insights, Pingdom, and others to get detailed reports and spot areas for improvement.
Instantly Go From Staging to Live Site
You’ve likely built your WordPress website on staging and now, it’s time to go live. But moving can be tricky without the right tools.
Fortunately, you do have the right tools, i.e., Droip.
With its Project Export & Import feature, you can transfer your site instantly with no complex steps, extra plugins, or additional costs.
Check out our guide on how to move a WordPress site from staging to live with Droip for more info.
Once live, make final tweaks, and publish each page via Pages > Settings on the left sidebar. Don’t forget to do the same for all pop-ups using the ellipsis icon beside each to access its settings.
Build a WordPress Website With Droip
And that wraps up our in-depth beginner’s guide on how to create a website in WordPress with Droip.
From planning your WordPress website to seamlessly moving from staging to live site, we’ve covered everything you need to know to get started.
So, are you ready to build your dream website? Jump in and start creating with no code!

