Whether you’re a beginner looking for a quick setup or an experienced designer seeking complete creative freedom, Droip offers flexible ways to build your website. This guide will help you get started with Droip and walk you through the available options.
How to Start Building with Droip
Droip offers four flexible ways to create your website. Choose the one that fits your needs:
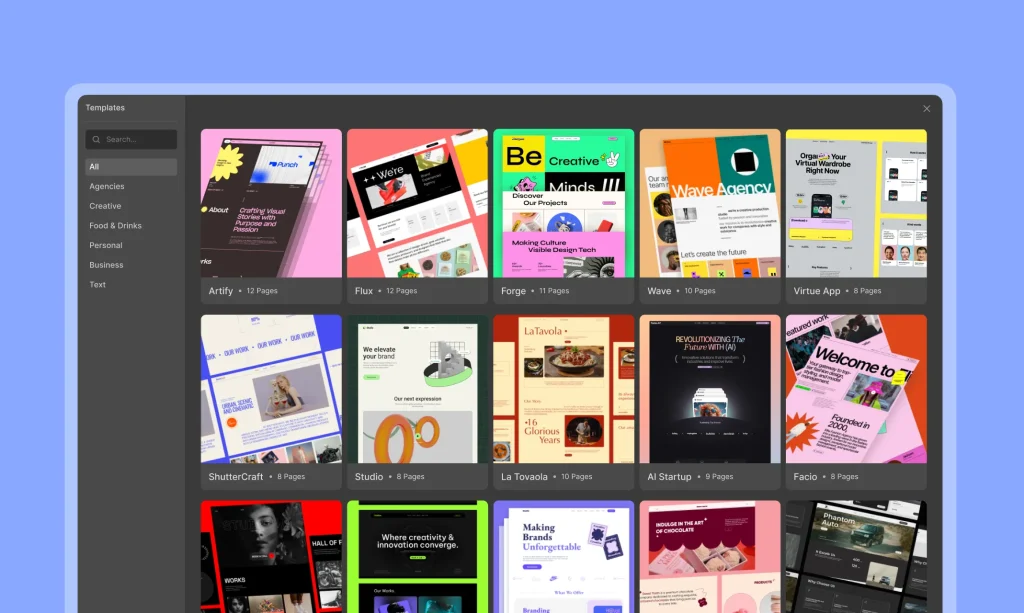
1. Using a Template Kit (Fastest)
Droip provides a growing library of ready-made templates that help users quickly build professional websites without starting from scratch. A Template Kit is a ready-made package with all the essential pages such as Home, About, Services, and Contact. It’s the quickest way to get your site online with minimal customization.
How to Use a Template Kit:
After installation, Go to Templates from the editor.
Choose a template that fits your needs.
Customize the text, colors, and images to suit your brand.
Launch your site quickly!
2. Using Pre-Designed Pages
Pre-designed pages offer individual templates like landing pages, service pages, and more. You can mix and match pages to create a unique site.
How to Use Pre-Designed Pages:
From the editor, go to Insert panel and select Pages.
Browse through the collection and pick the pages you want.
Customize the selected pages to match your brand.
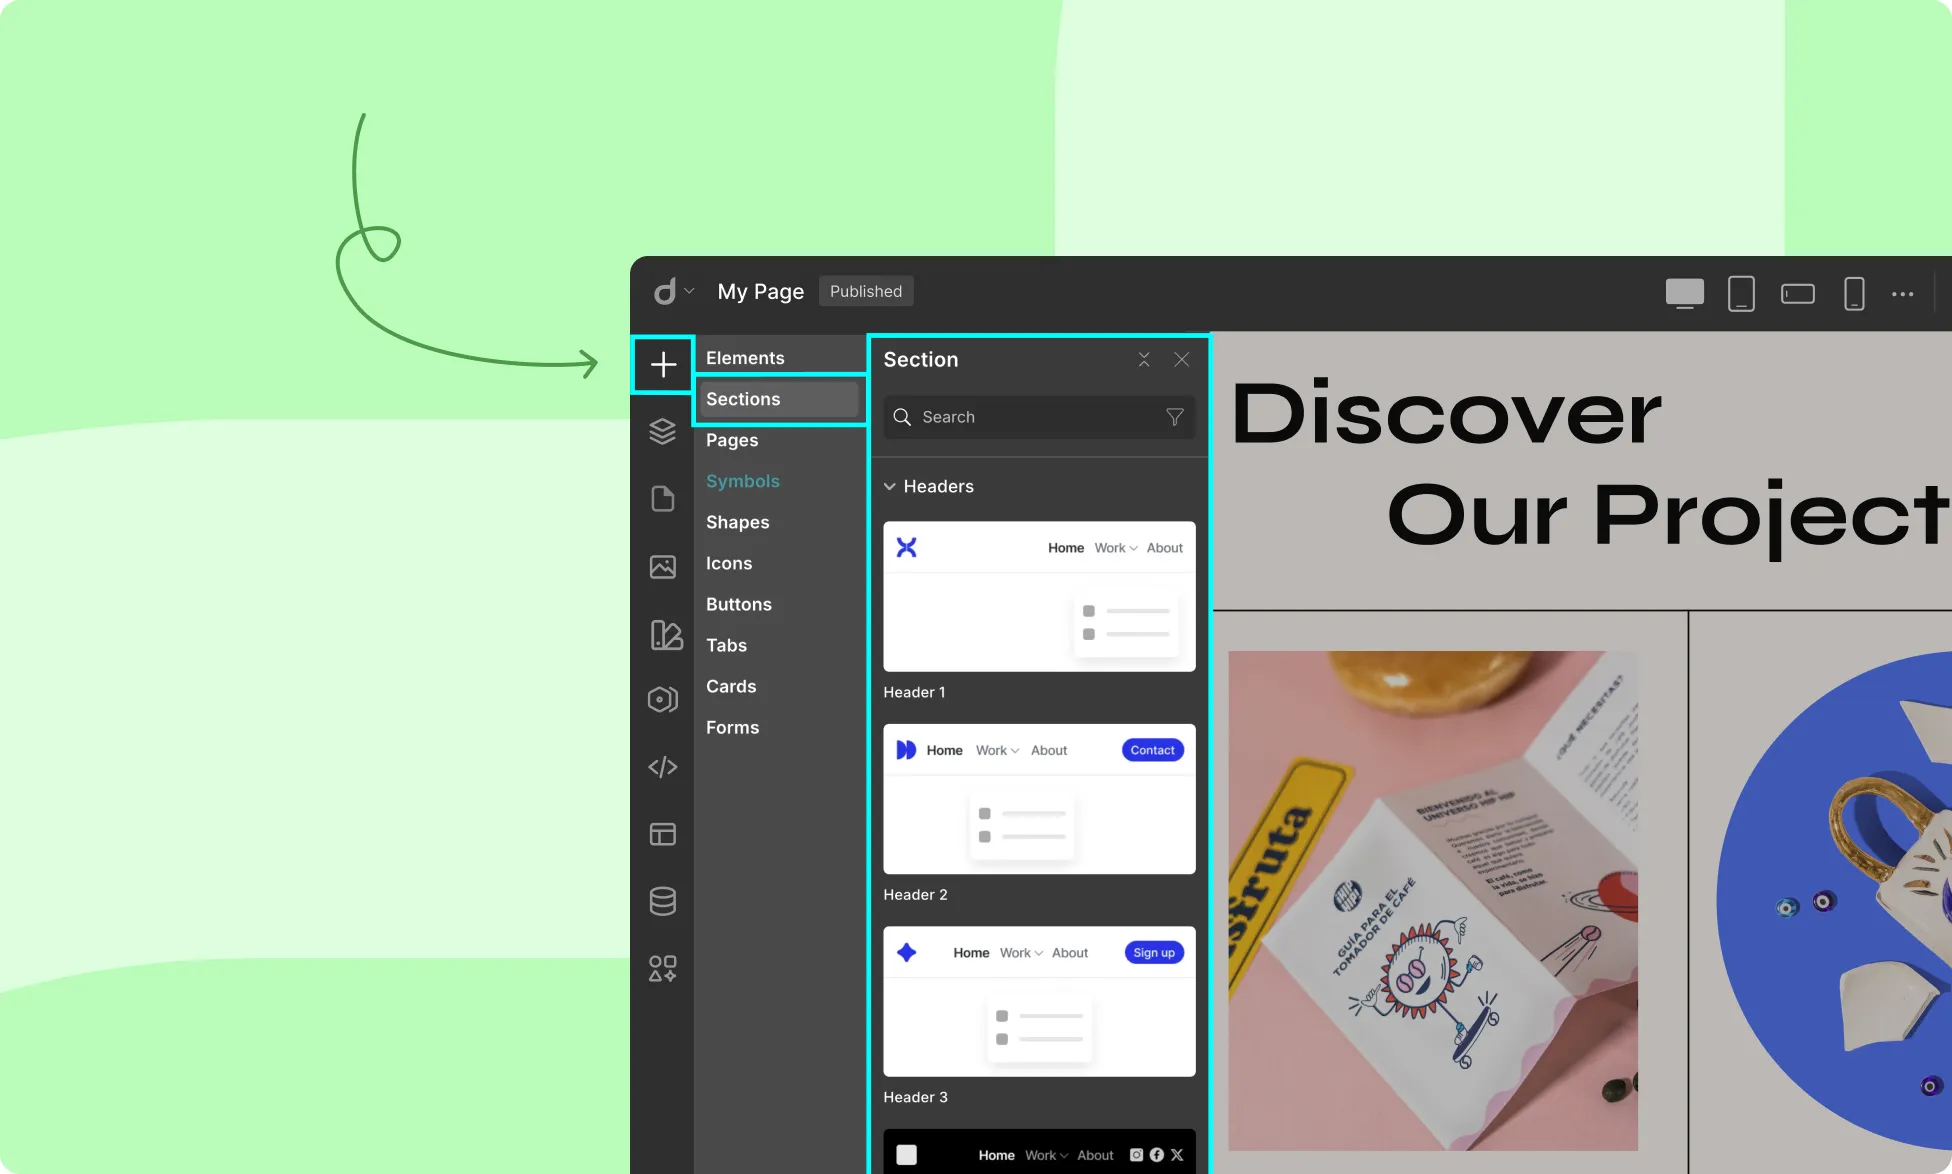
3. Using Pre-Made Sections
Pre-made sections are pre-designed content blocks such as headers, about sections, testimonials, and more. Combine these sections to create a custom webpage.
How to Use Pre-Made Sections:
From the editor, go to Insert panel and select Sections.
Browse and select sections like Hero, About, Testimonials, etc.
Drag and drop sections to build your page.
Customize each section as needed.
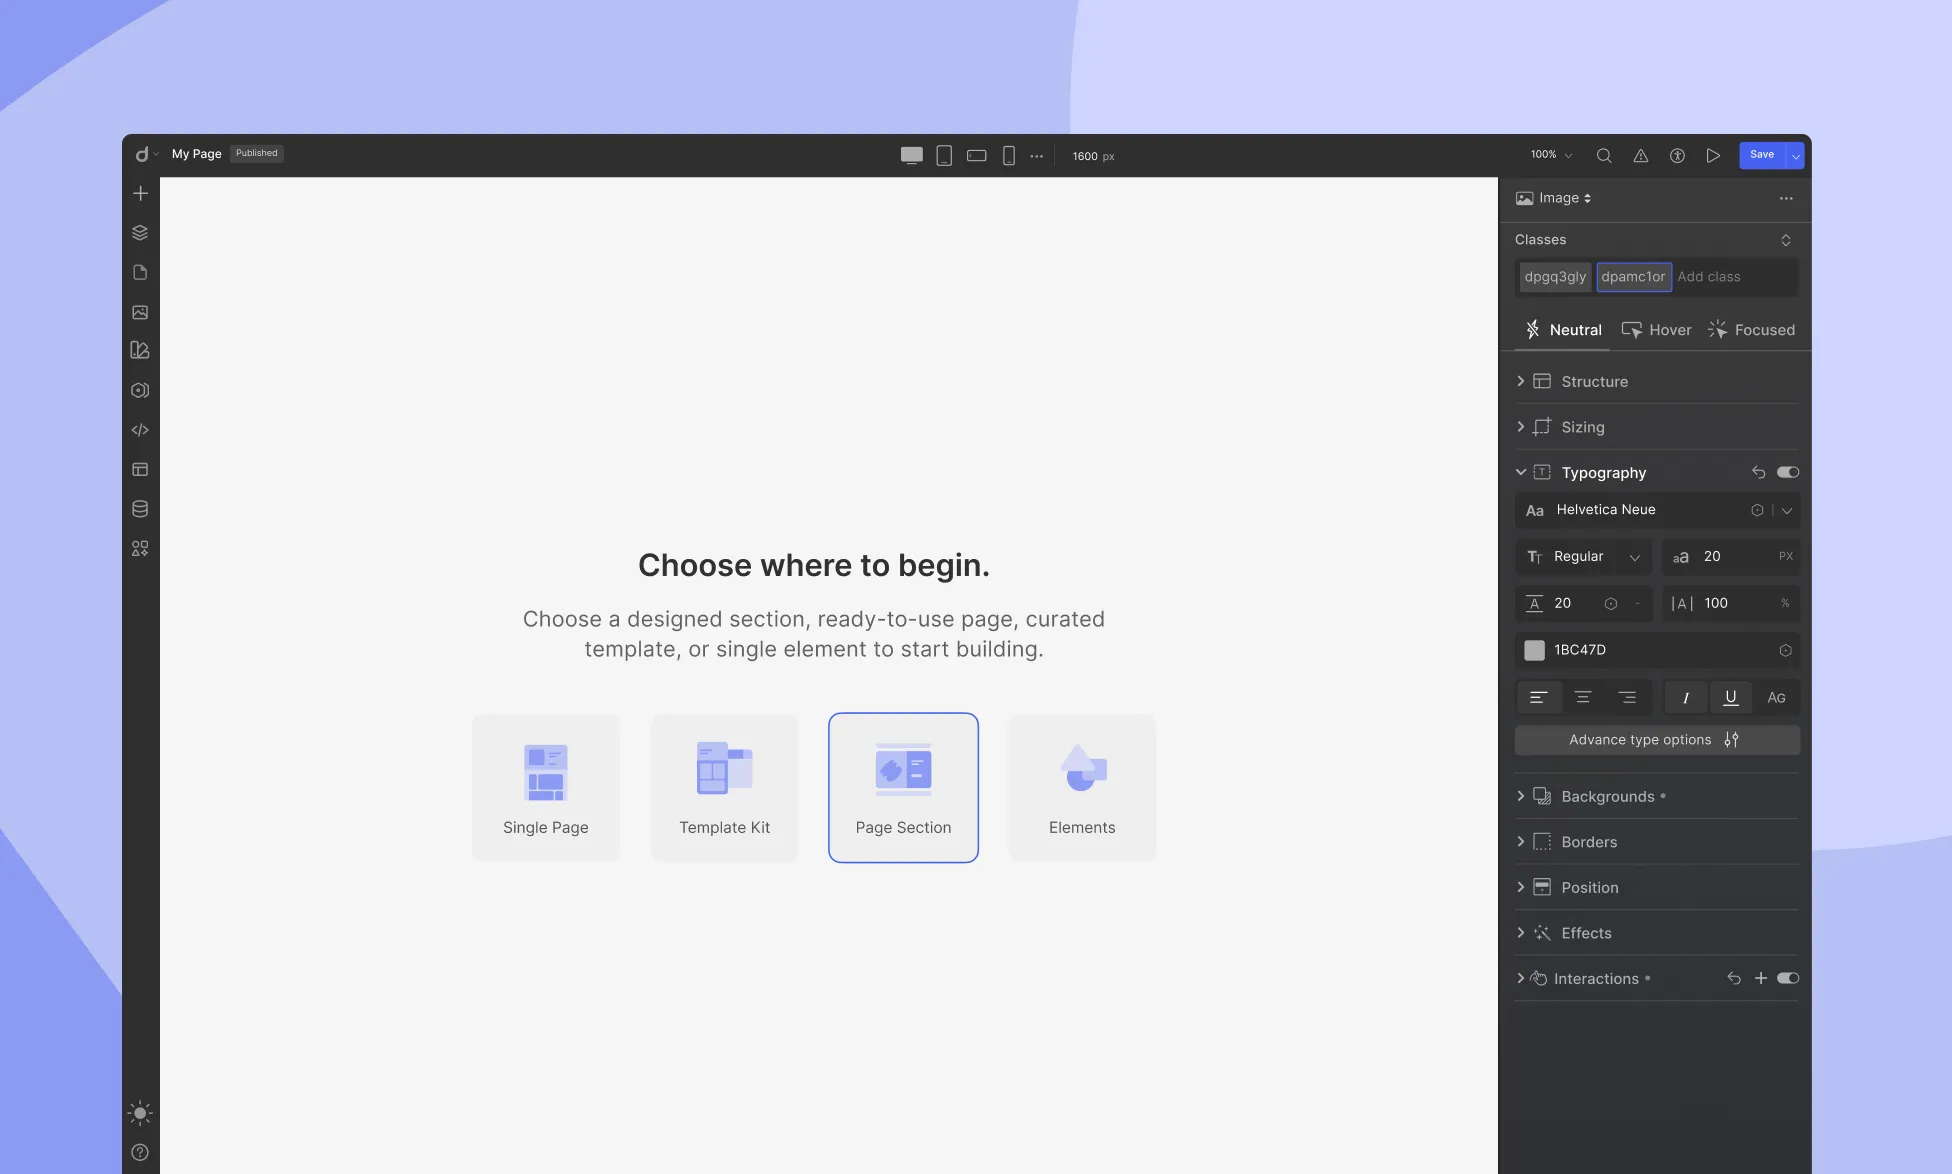
4. Creating from Scratch (Most Flexible)
This option gives you complete creative control. You can either copy and paste from Figma or build your site using Droip’s drag-and-drop elements.
Method 1: Figma to Droip (Copy & Paste)
Design your site in Figma.
Copy your Figma design elements.
Paste them into Droip using the Figma to Droip Copy & Paste feature.
Make any necessary adjustments to match your branding.
From the editor, go to Insert panel and select Elements.
Drag and drop elements like text, images, buttons, and more from Droip’s library.
Customize the layout to create a completely unique design.
Support and Resources
If you need help, Droip offers a variety of support channels:
Documentation: Check out the full documentation for in-depth guides and tutorials.
Community Forum: Join the Facebook Community to ask questions and share your experiences.
Contact Support: Reach out to our support team directly for technical assistance.
Video Tutorials: Browse through our official YouTube channel to learn with step-by-step instructional videos.
To make the most of your design and layout options in Droip, ensure you enable the following controls in the Droip WordPress dashboard:
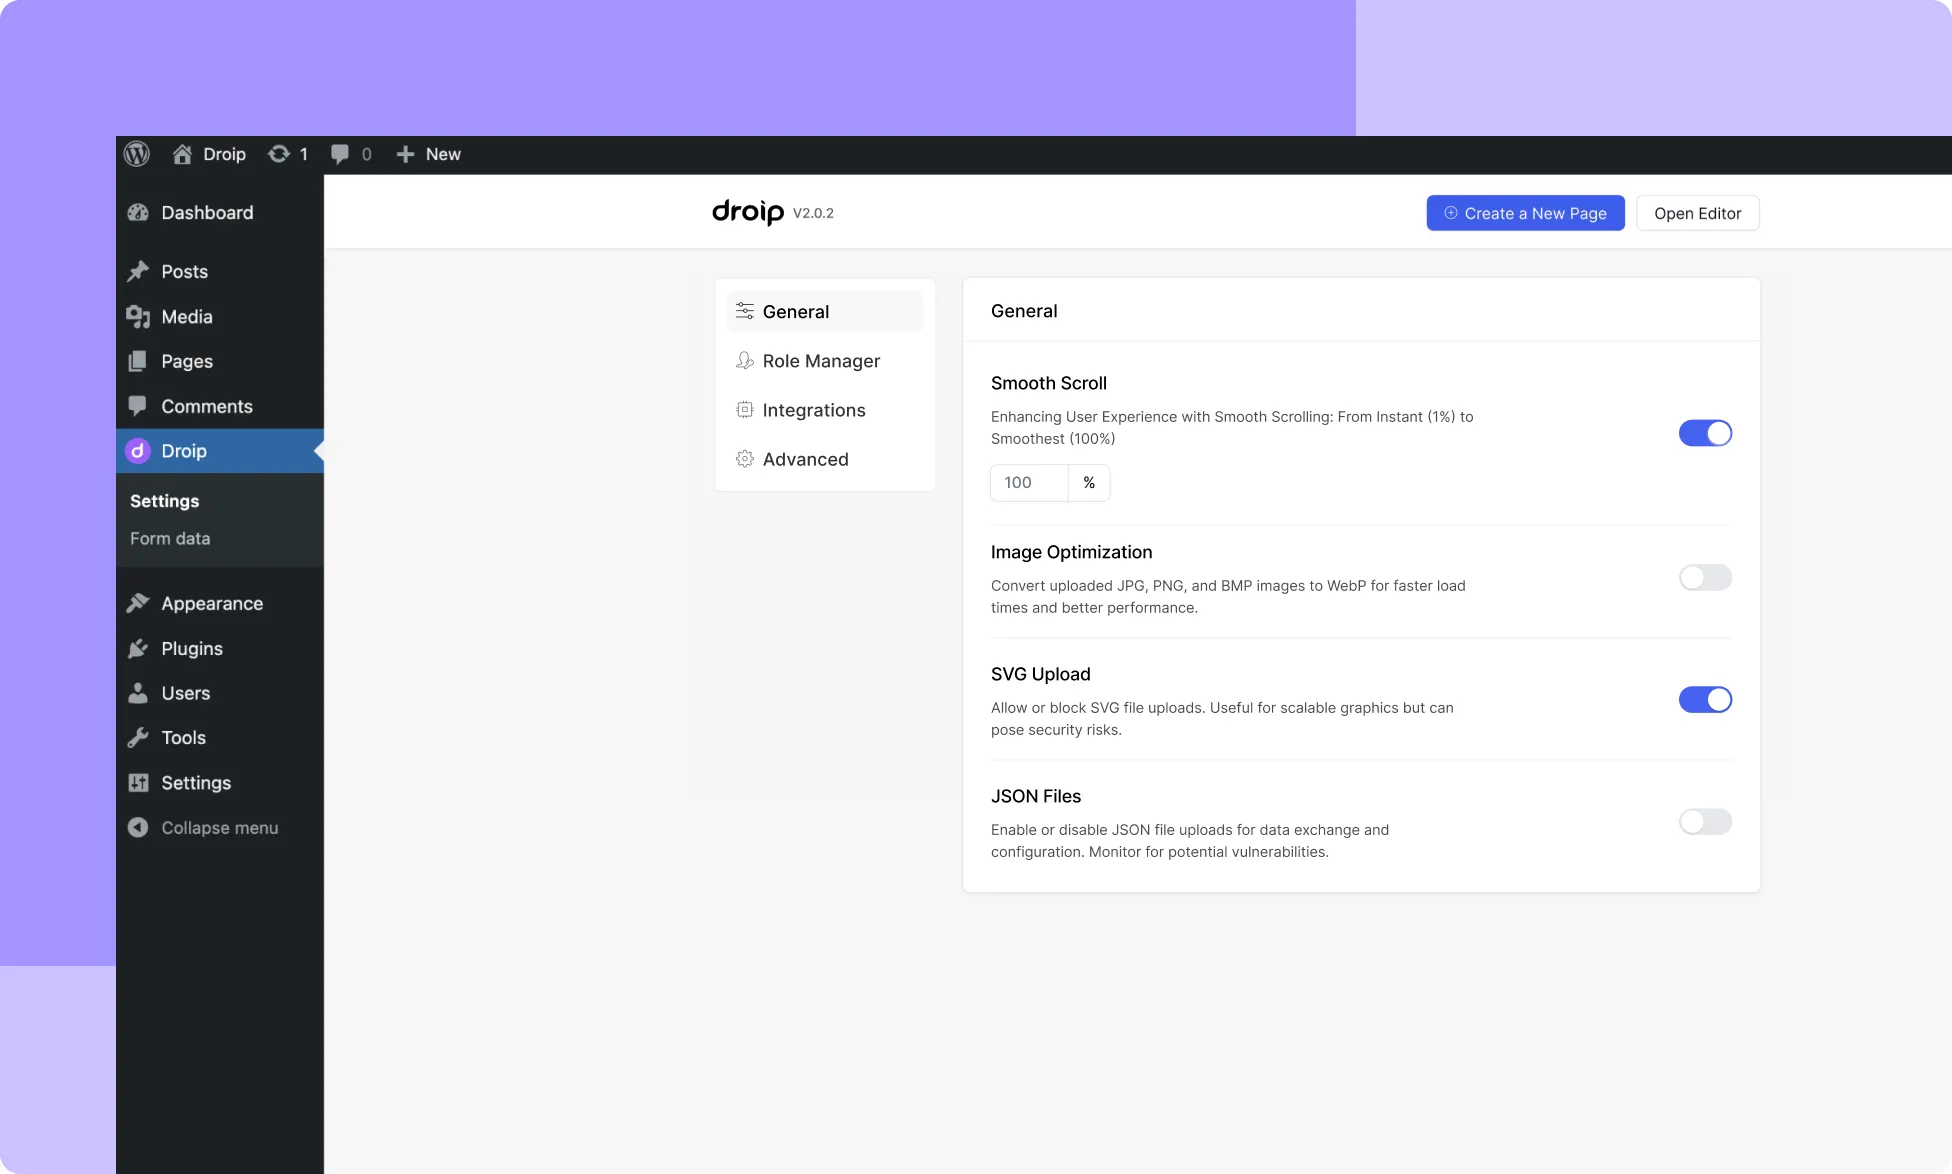
Smooth Scroll
The Smooth Scroll feature enhances scrolling by adding a gradual transition effect. Users can toggle it on or off and adjust the smoothness level.
Go to Droip WordPress Backend > Settings > General.
Find Smooth Scroll.
Use the toggle switch:
Enabled: The page scrolls with a smooth transition effect.
Disabled: The page scrolls instantly without any easing.
Adjusting Smoothness Level
When enabled, smoothness can be set between 1% (Instant) and 100% (Smoothest):
1%: No transition, abrupt movement.
50%: Moderate smooth effect.
100%: Most fluid scrolling.
To adjust, enter a value between 1% and 100%. Changes apply instantly.
Image Optimization
Optimize uploaded images by converting JPG, PNG, and BMP files to WebP format for faster load times and improved performance.
Once enabled, uploaded images will be optimized without additional action.
SVG Upload
By enabling the SVG Upload option, you can effortlessly upload SVG files and incorporate them into your designs.
JSON Files
To leverage .json files in your projects, activate the JSON Files option. This allows uploading and management of .json files from your Media Manager.
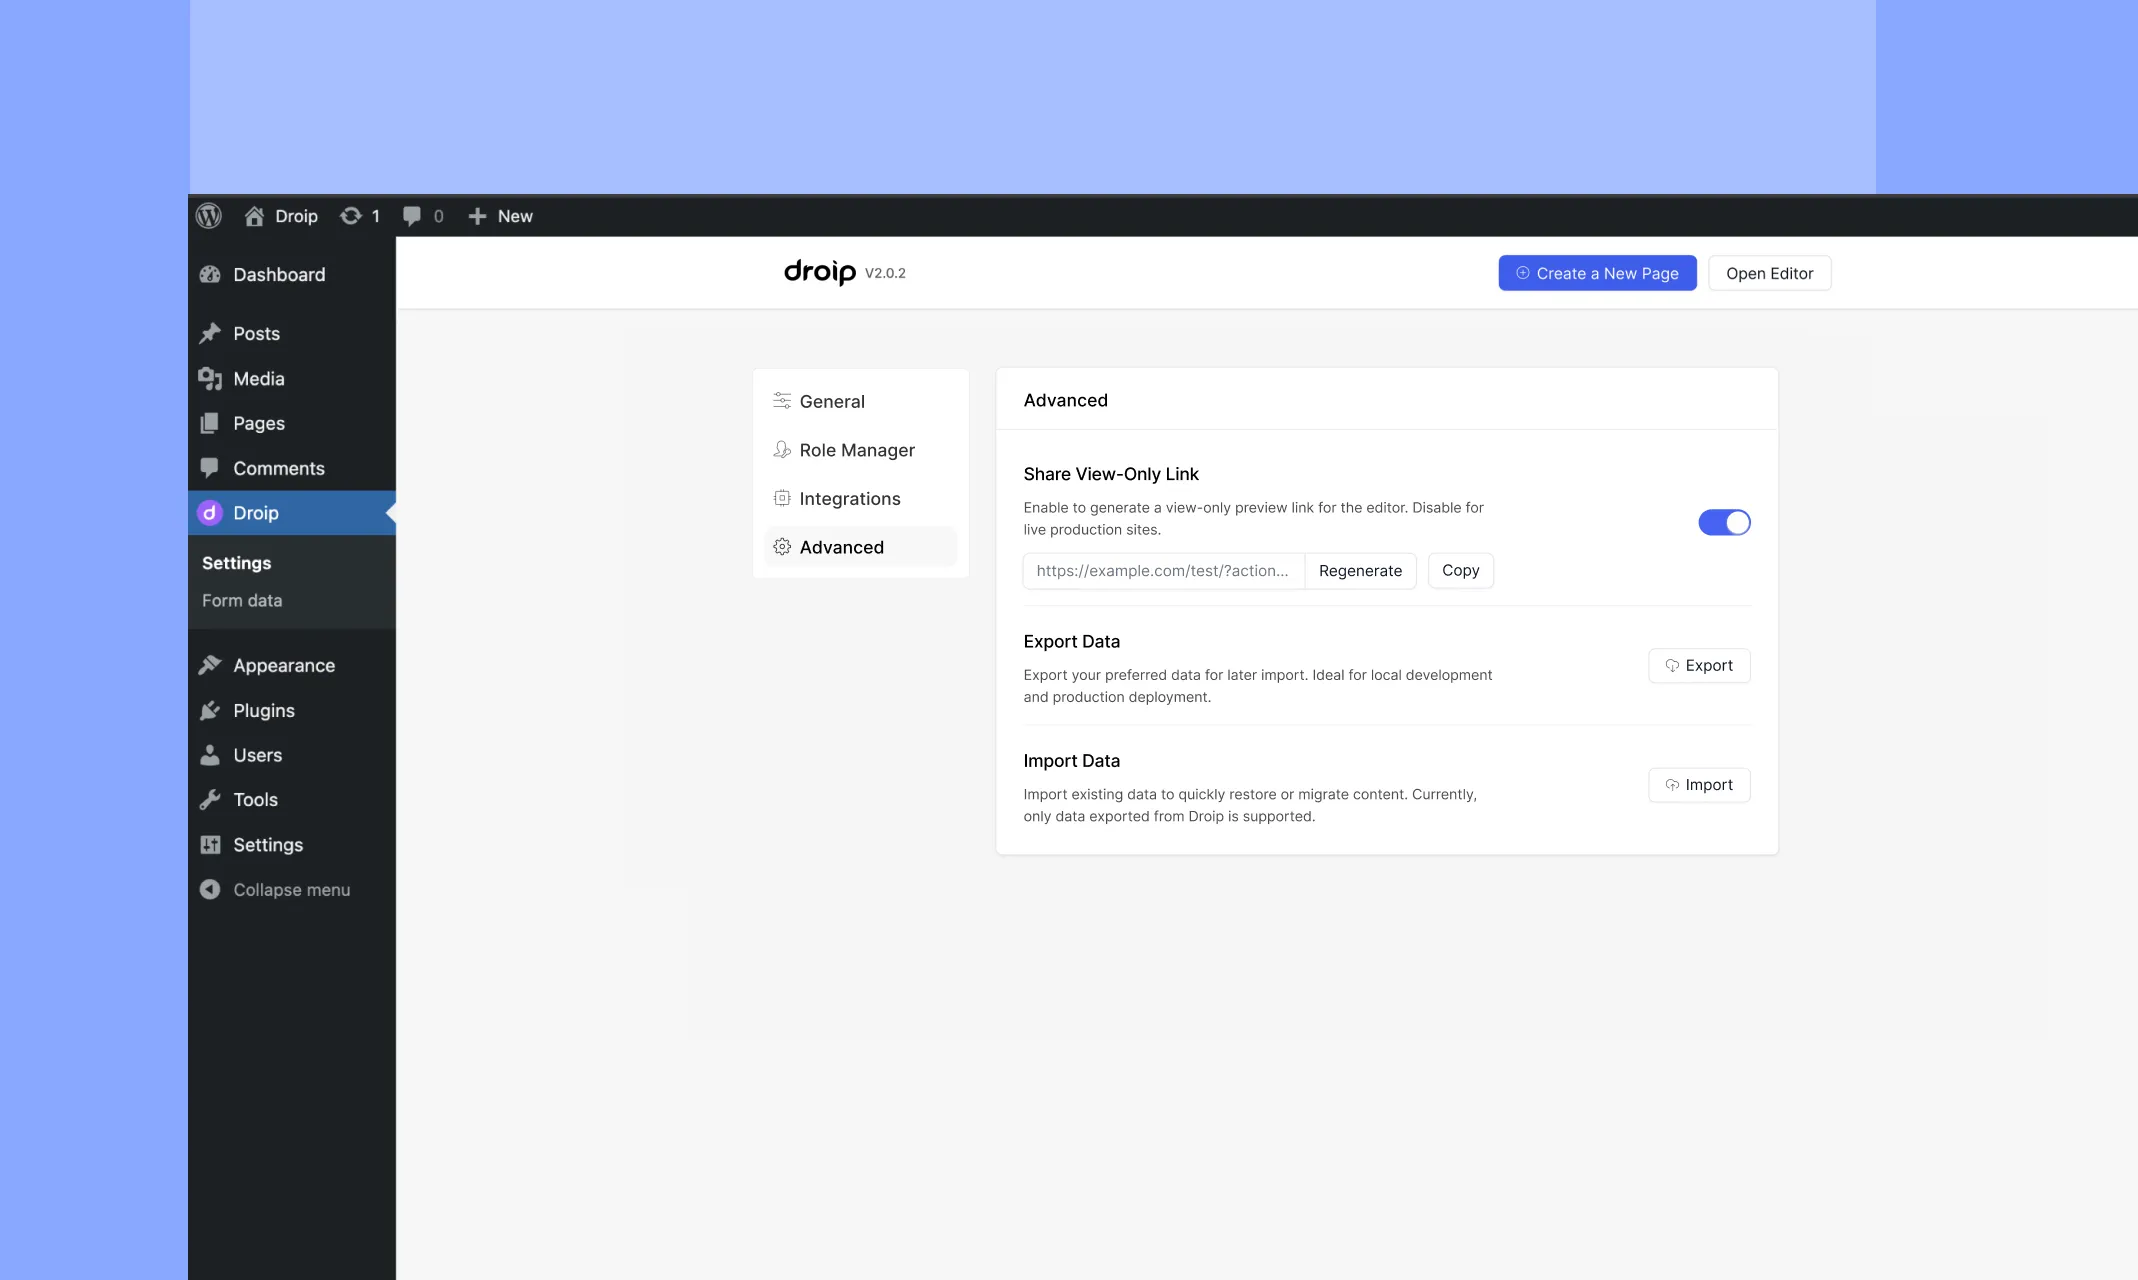
Share View-Only Link
This feature allows you to generate a shareable, view-only link for the editor. It’s useful for sharing progress or drafts with clients without granting them editing access.
Use the Share View-Only Link to get feedback without risking changes to your project.
How to Use:
Navigate to Settings>Advanced in the Droip interface.
Locate the Share View-Only Link section.
Toggle the switch to enable this feature.
Click Regenerate to create a new preview link.
Use the Copy button to share the link with collaborators.
📝 Note: This feature is disabled for live production sites to maintain security and control over your project.
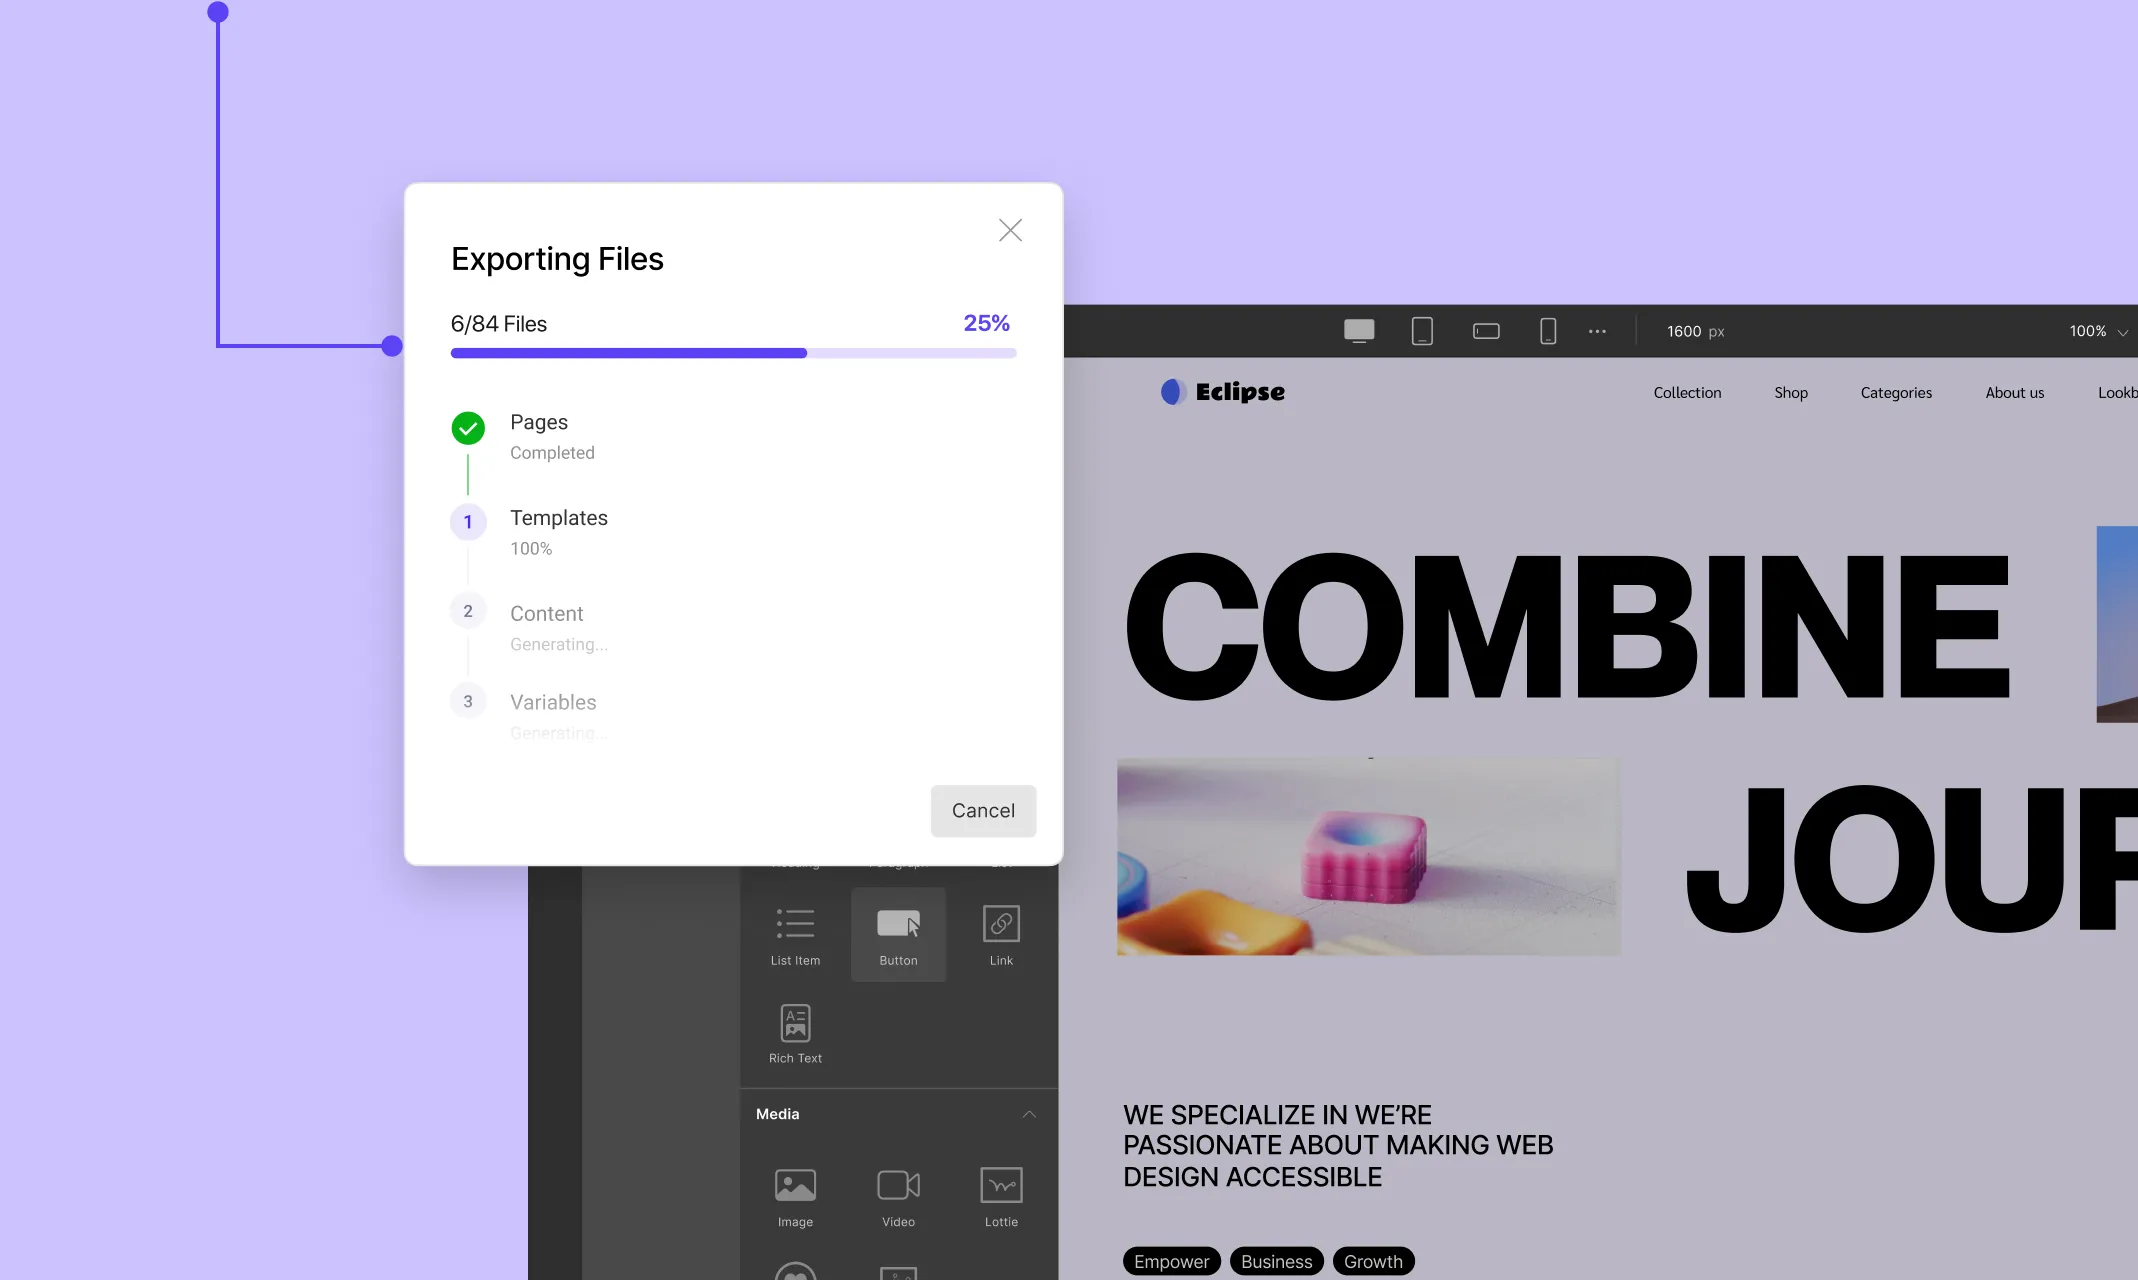
Export Data
The Export Data feature enables you to save your current project setup, including pages, templates, styles, and other site information, for local backups or production deployment.
What’s Included in the Export:
Pages and Templates: All the pages and templates used in your project.
View Ports and Fonts: Settings related to responsive design and typography.
Styles and Variables: Global CSS variables and design settings.
Content Manager: Data related to dynamic content.
Assets and Site Info: Uploaded assets and site metadata.
How to Export:
Navigate to Settings > Advanced.
Click the Export button under the Export Data section.
A progress modal will appear, showing the status of the export process.
Once completed, click Download to save the exported file to your device.
💡 Tip: Exported data is ideal for migrating your content between environments, such as from a staging server to production.
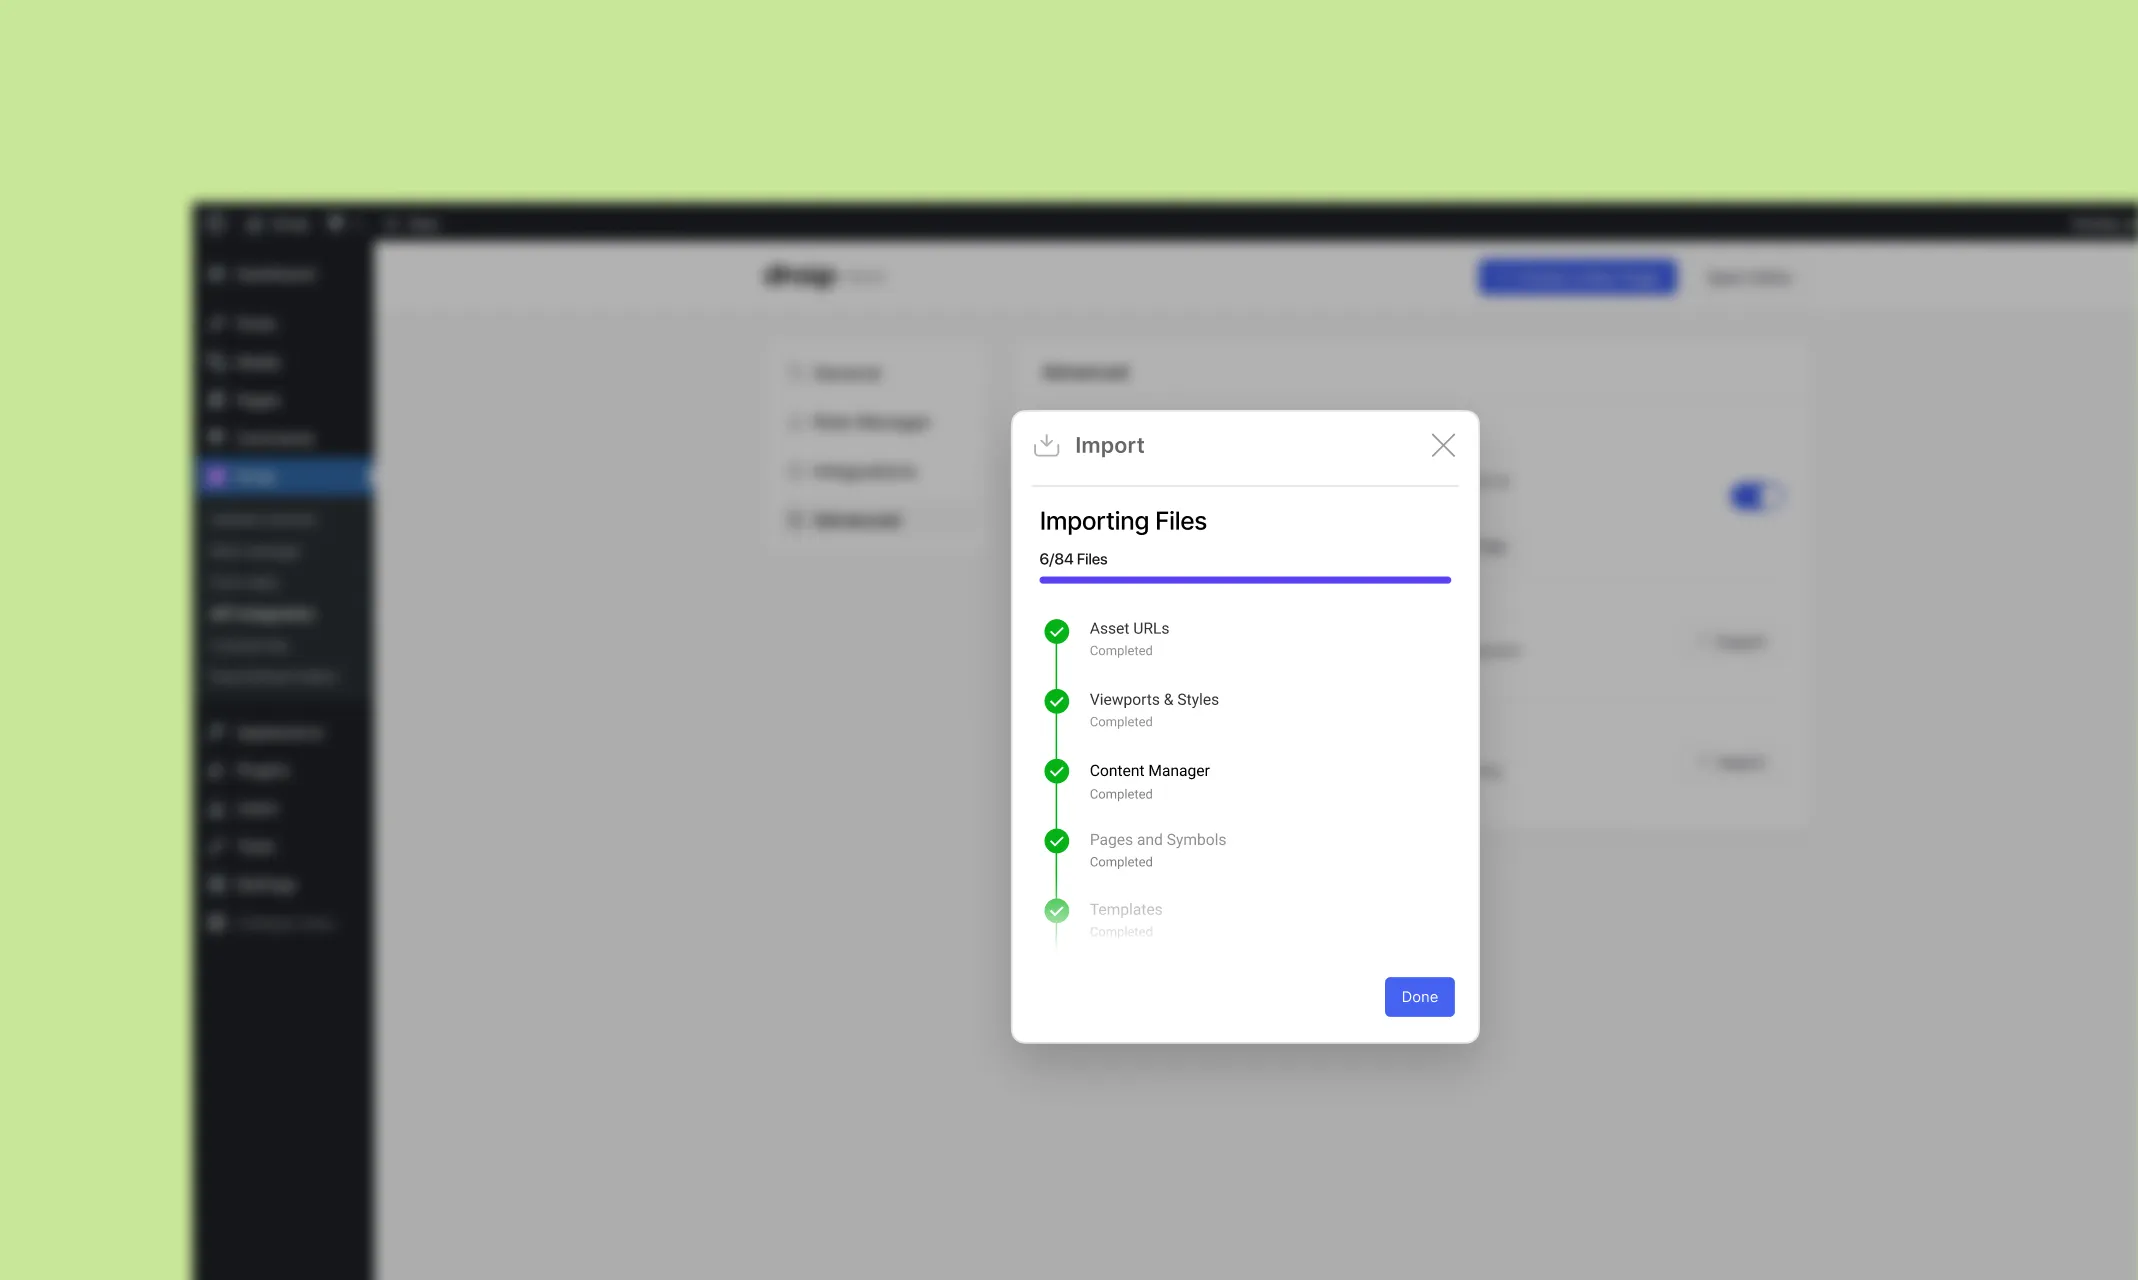
Import Data
The Import Data feature lets you restore or migrate content by uploading previously exported Droip data files.
How to Import:
Navigate to Settings > Advanced.
Click the Import button under the Import Data section.
Select the exported file from your device.
The system will process the import, restoring the content and settings.
📝 Note: Only data exported from Droip is supported for import. Ensure the exported file is from a compatible Droip version.
In this document, you’ll find a step-by-step guideline on installing Droip as well as activating its license.
Installing Droip
To install Droip, visit the Droip Website and create an account. Then, from the Pricing Page, choose the plan best suited for you and make your purchase.
Once your purchase is complete, you’ll find it listed on your Subscriptions page. To save the plugin to your local device, head to Downloads and click on the Download button.
Then, to install it, do the following:
Visit your WordPress Site’s Backend Dashboard.
Then go to Plugins > Add New and click on the Upload Plugin button.
Once on this page, click on the Choose File button, and select your plugin zip file.
Finally, once the file is uploaded, click on Install Now.
After it’s successfully installed, Activate your plugin.
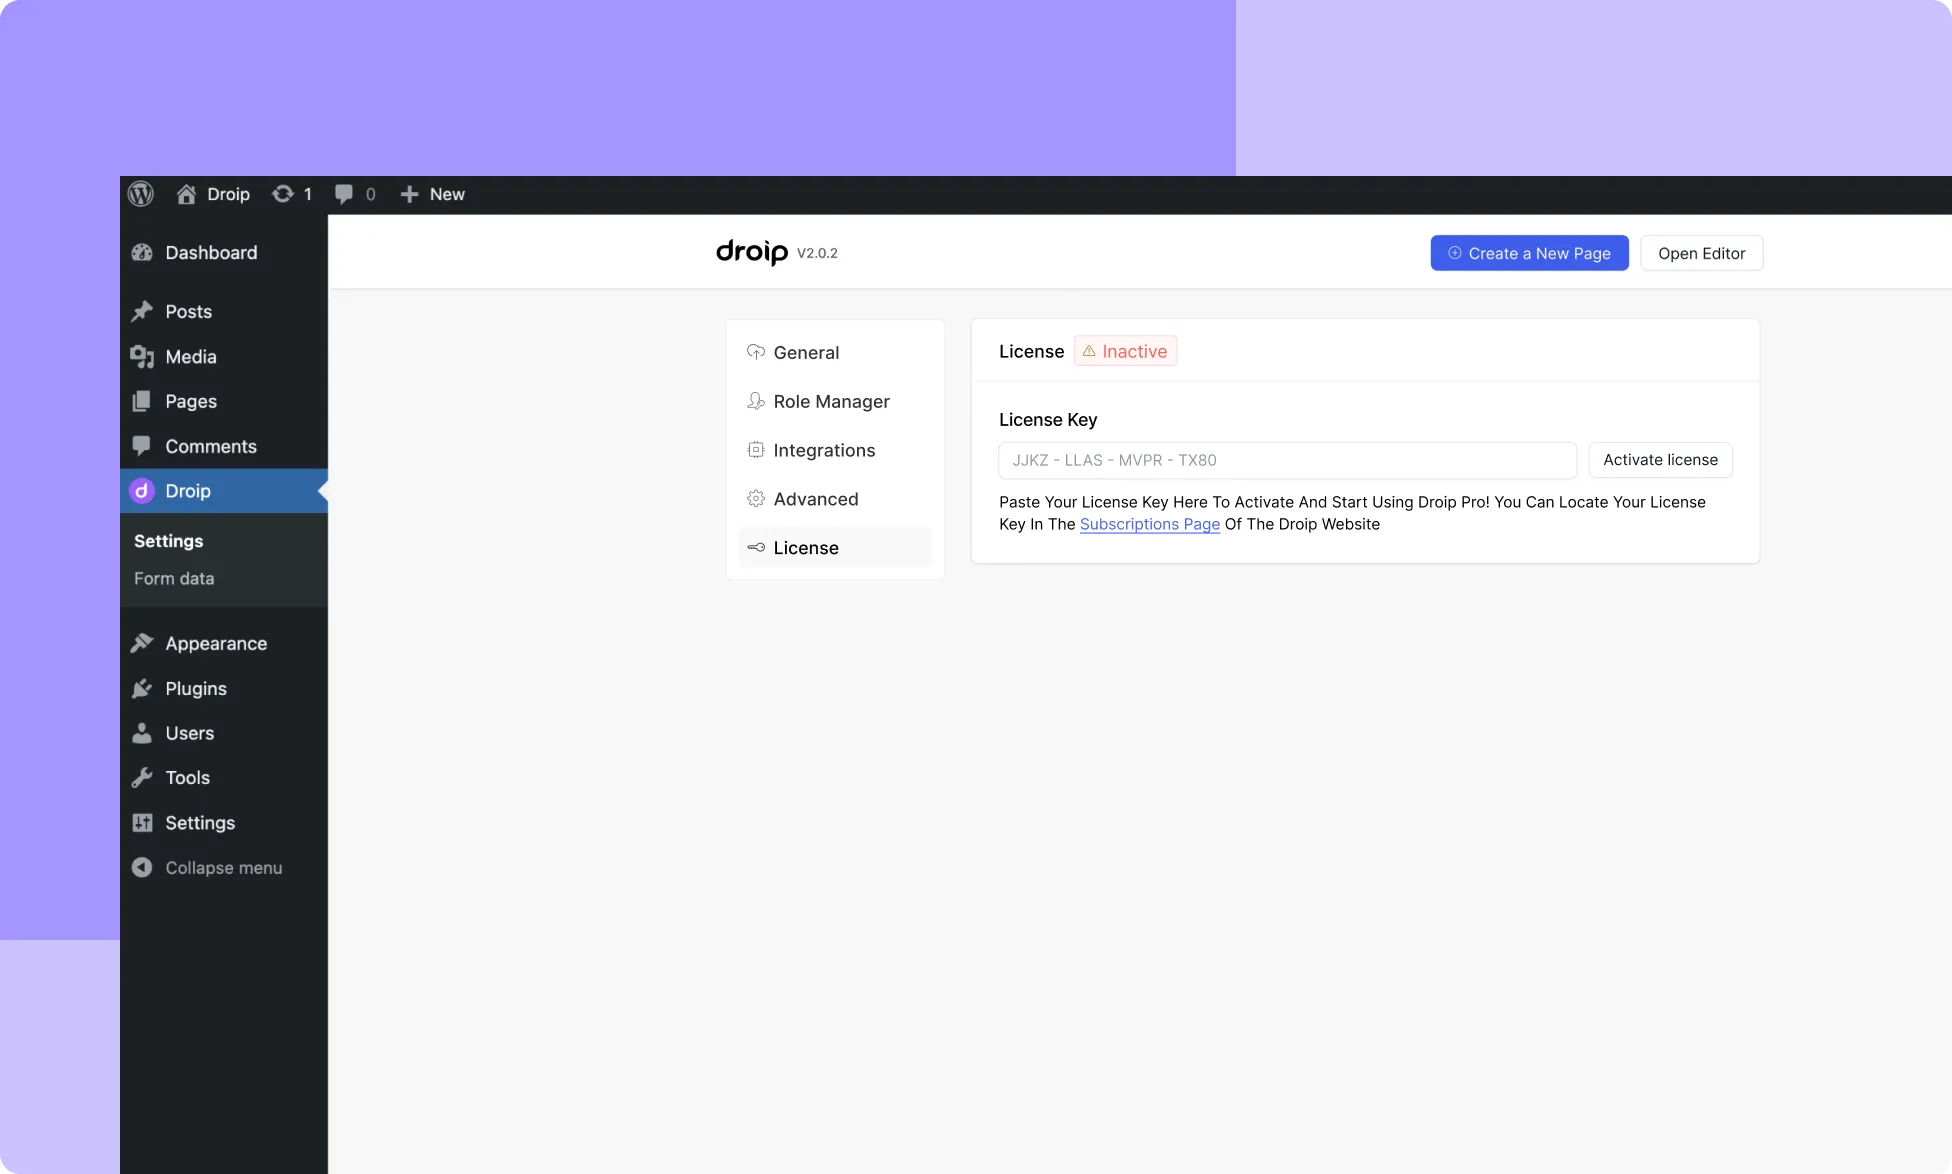
License Activation
Once you’ve installed and activated the Droip plugin, it’s time to activate your license:
First, log in to your Droip account and go to Subscriptions > Licenses.
Click on Add Website, enter your site URL, and hit Submit to generate a license key.
Finally, copy your license key and paste it into WP Backend Dashboard > Droip > Settings > License, then click Activate.
And that’s it! Now you’re all set to start designing beautiful, interactive websites with Droip.
If you run into any issues during the installation or license activation, contact us at [email protected].
How to Update Your Droip Version
To update your Droip Version, visit WordPress Dashboard > Plugins and locate Droip. If an update is available, it’ll be listed here. Click on the Update Now button to start updating.
A license key is a unique string of numbers and characters that verify authorized WordPress plugins and theme access.
To use Droip and get all the benefits of the premium plugin in your future endeavors, you need to activate the license of the Droip plugin. Please note that license activation is required to:
Future Updates, Security Patches, and Bug Fixes: Stay up-to-date with the latest features, enhancements, and security measures.
Compatibility with the Latest WordPress Update: Ensure seamless integration and optimal performance with the newest WordPress versions.
After purchasing a plan and installing the Droip Pro plugin, you’ll be prompted to add and activate your license key within the Droip WP dashboard.
📝 Note: Activating your Droip License Key is crucial for receiving automatic updates.
Access & Add Your License Key
To access your license key, follow these steps:
Go to the Droip website and sign in using the email address used for the plan purchase.
Navigate to Account > Subscriptions.
Click on Add Website and input your domain name to generate a license.
Copy the license key from the dashboard.
In the WordPress admin dashboard, go to Droip > Settings > License and activate your license by pasting the copied key.
By activating your Droip License Key, you can benefit from regular updates and guarantee optimal performance.
For any further assistance or inquiries, feel free to contact our support team at [email protected].
WordPress: 5.0 or higher.
PHP: 7.4 or higher.
PHP Extension: GD | GD Library, Zip library for custom font upload.
Database – MariaDB – 10.1 or later / MySQL – 5.7 or later
Browser – Chrome, Firefox, Safari. Internet Explorer is not supported.
Server Modules – mod_rewrite, cURL, fsockopen.
PHP Configuration:allow_url_fopen = On (required for demo import and remote file access)
Our website uses cookies to improve your browsing experience on our website. By continuing to use this website, you
agree to
their use. For details, please check our Privacy Policy.
Get started for free!
Start 90 days free trial!
Get Droip
Experience the power of Droip. Create stunning, responsive sites with pure creative freedom.