You can also use Collections to create dynamic user lists (e.g., authors) and custom single user template pages for individual users, without needing to manually update each page.
This guide will walk you through the steps to create a dynamic list of WordPress users and a single template page for individual users using Collections.
Create a Dynamic User List
Step 1: Add a New Page for the User List
Go to Pages and click Add New to create a new page where your user list will appear.
Title the page something like “Authors” or “Team Members” depending on your use case.
Step 2: Insert the Collection List Element
In the Droip editor, search for the Collection element.
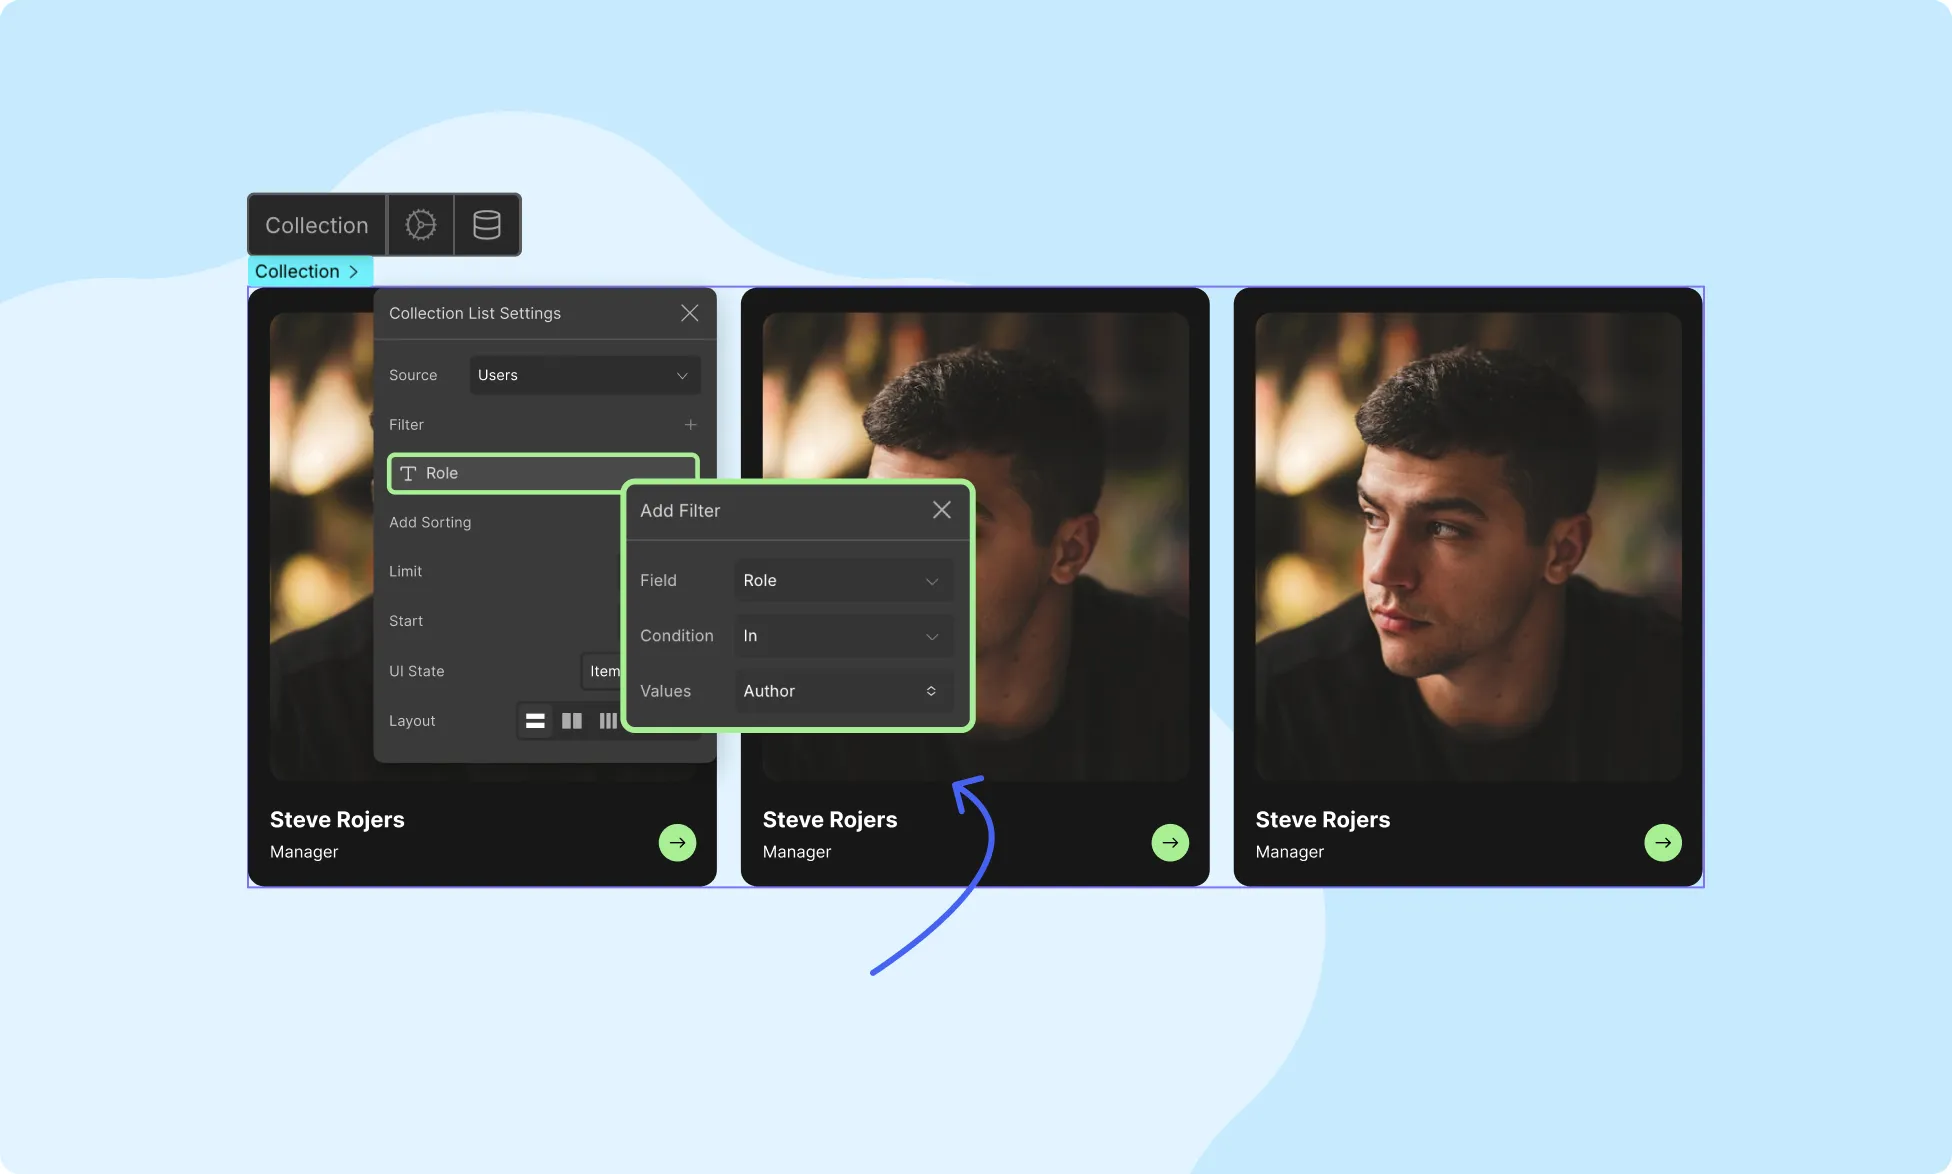
In the Collection List settings, set the Collection Type to Users.
Step 3: Customize the List
The list will dynamically pull all users from the collection.
You can filter the list based on role and display fields such as the user’s name, profile picture, etc.
Step 4: Save and Publish
Once you’re satisfied with the layout, save the page and click Publish. Now you have a dynamic user list page.
Create a Dynamic Single User Template
To display individual user information dynamically, you need to create a Single User Template that pulls data from your user collection.
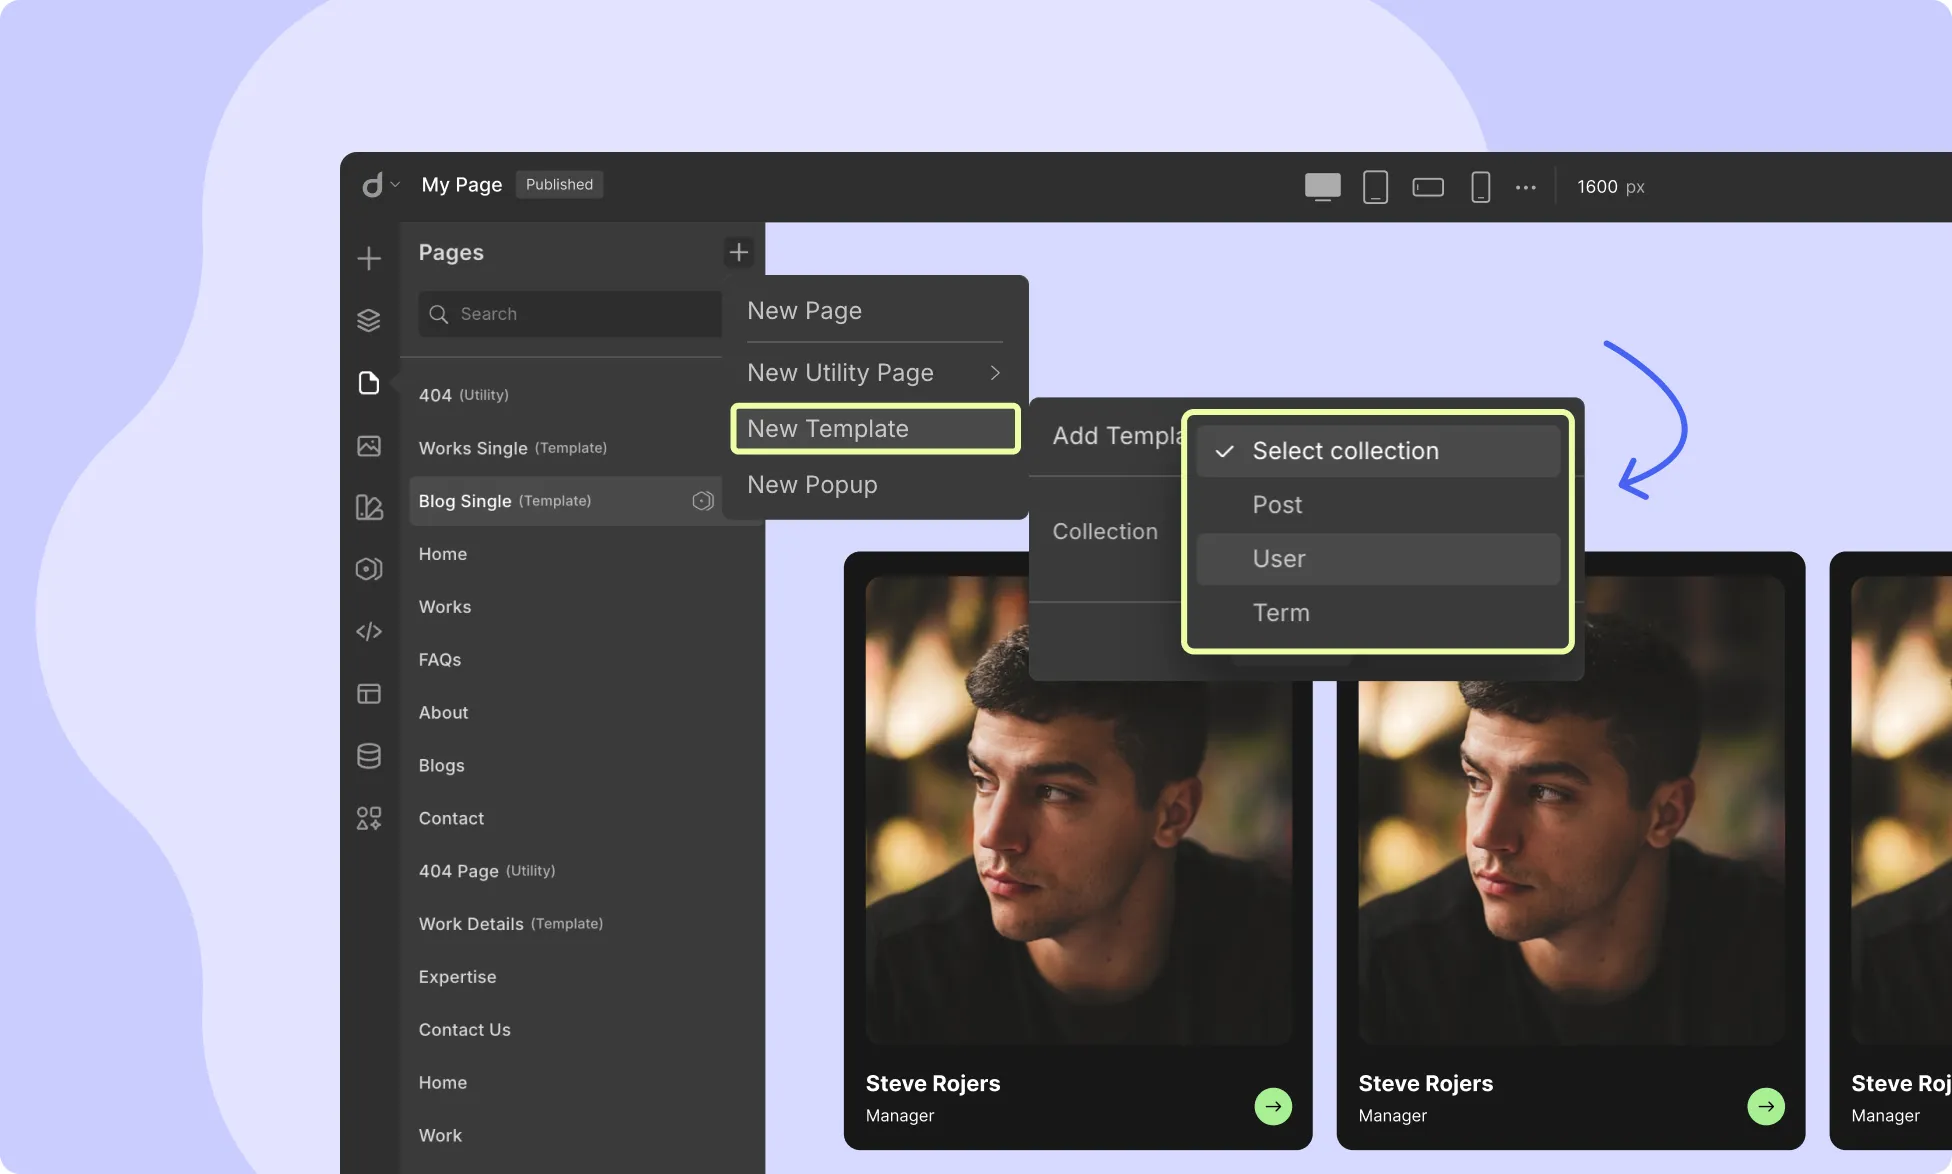
Step 1: Create a New Template for Single Users
Go to Pages and click the + icon and select New Template
Set the Collection type to User, and click on Add Template to create a new template page.
Step 2: Display Individual User Posts Dynamically
Use Droip’s visual editor to design your template.
In the Droip editor, search for the Collection element.
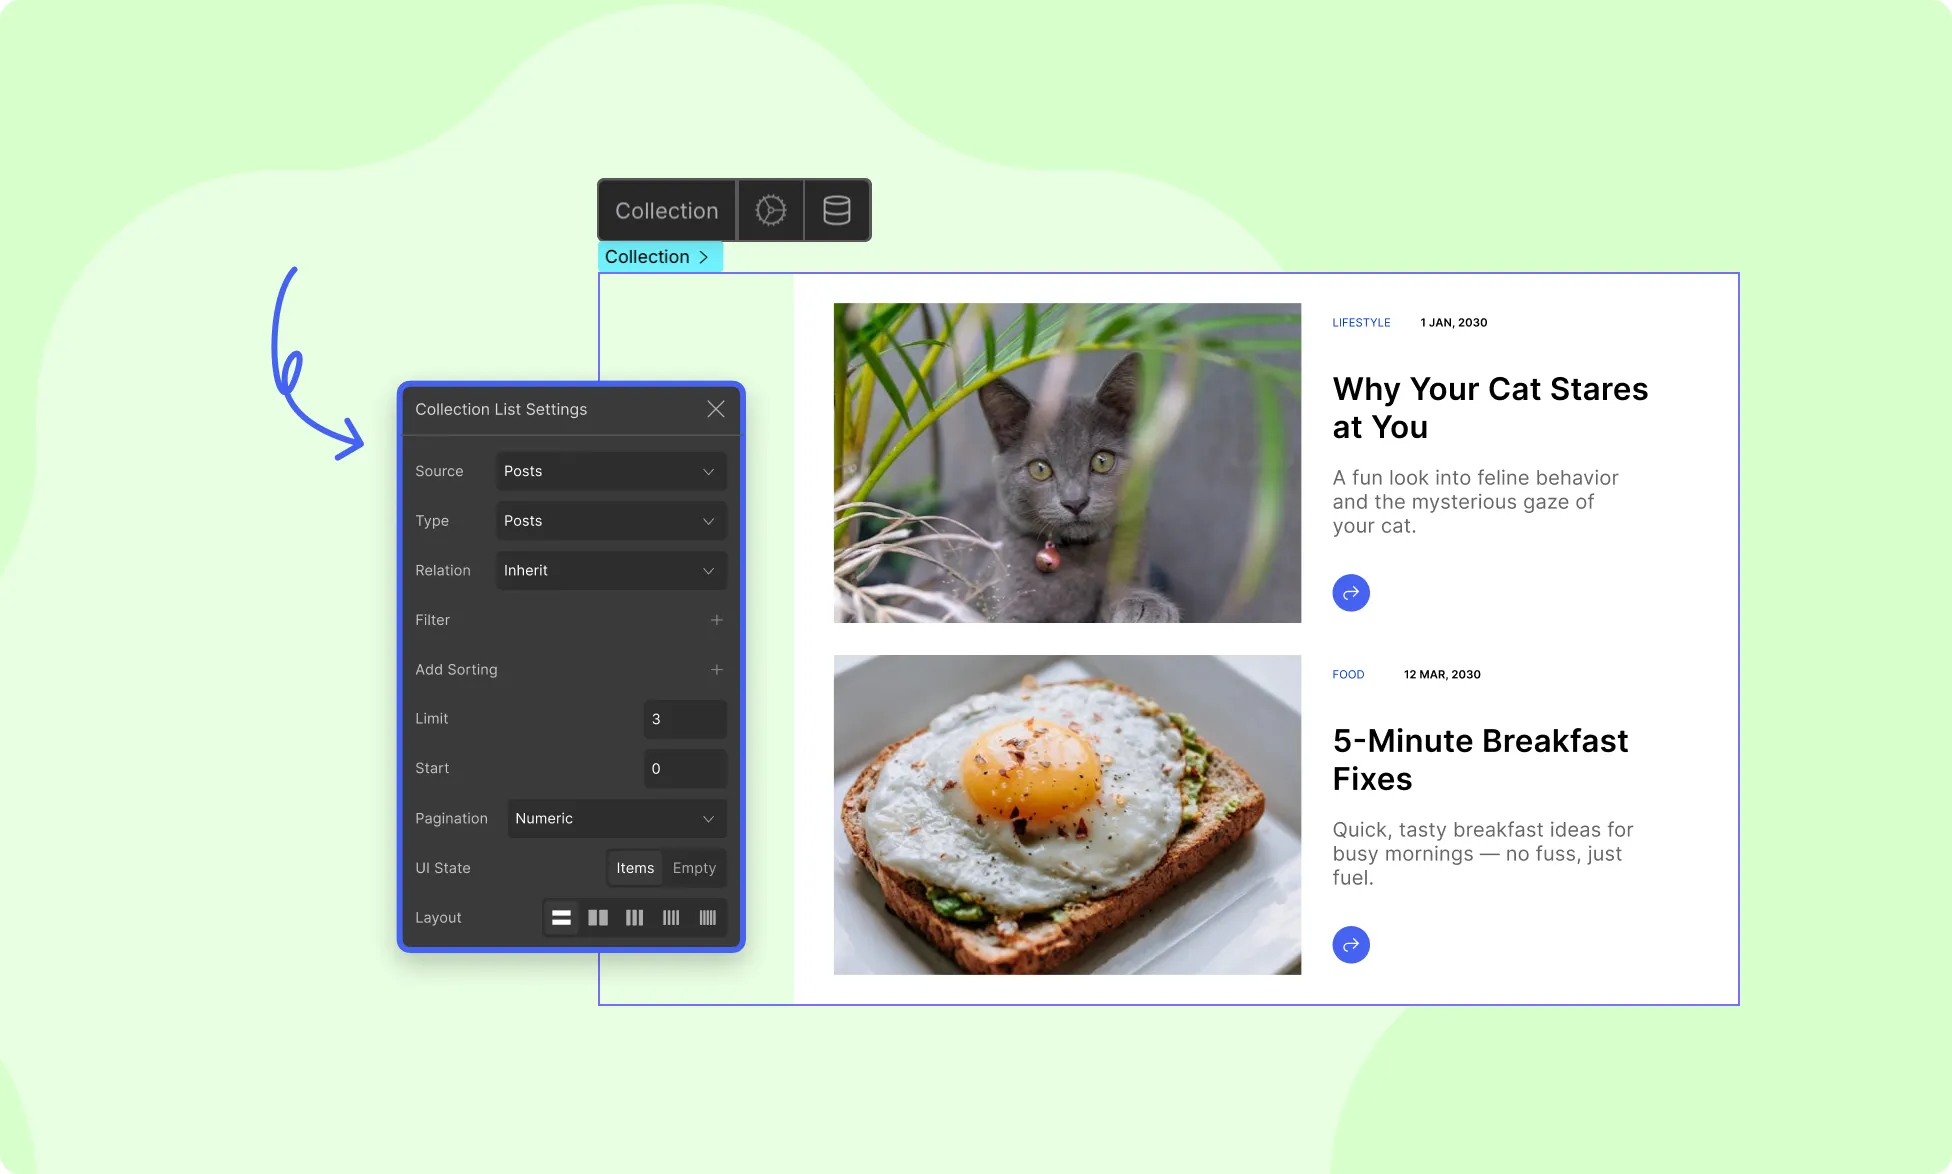
Set Collection Type to Posts and Relation to Inherit.
This will dynamically pull all the posts under that user.
In Droip, you can create a dynamic filtering functionality for WordPress posts using the Collection element.
This feature allows users to filter WordPress posts based on categories, tags, and any custom taxonomy you have on your WordPress Site
Step 1: Create a Collection for WordPress Posts
Add a Collection Element: Begin by adding a Collection Element to your Droip page. Connect this Collection Element to your WordPress posts. This is where your WordPress post data will be displayed dynamically.
Set Collection Type: In the Collection settings, set the Collection Type to Post. For the Post field, select Posts. This will ensure that your Collection is pulling data from your WordPress posts.
Configure the Collection Settings: Name your collection appropriately in the Layers, i.e Post Collection.
Design the Collection List: Use Droip’s element and styling tools to customize the appearance of the posts as per your design needs. You can use dynamic elements like post title, featured image, excerpt, and metadata (date, author, etc.).
Step 2: Create a Collection for Filter Functionality
Next, we will create another Collection that will act as the filter for our posts.
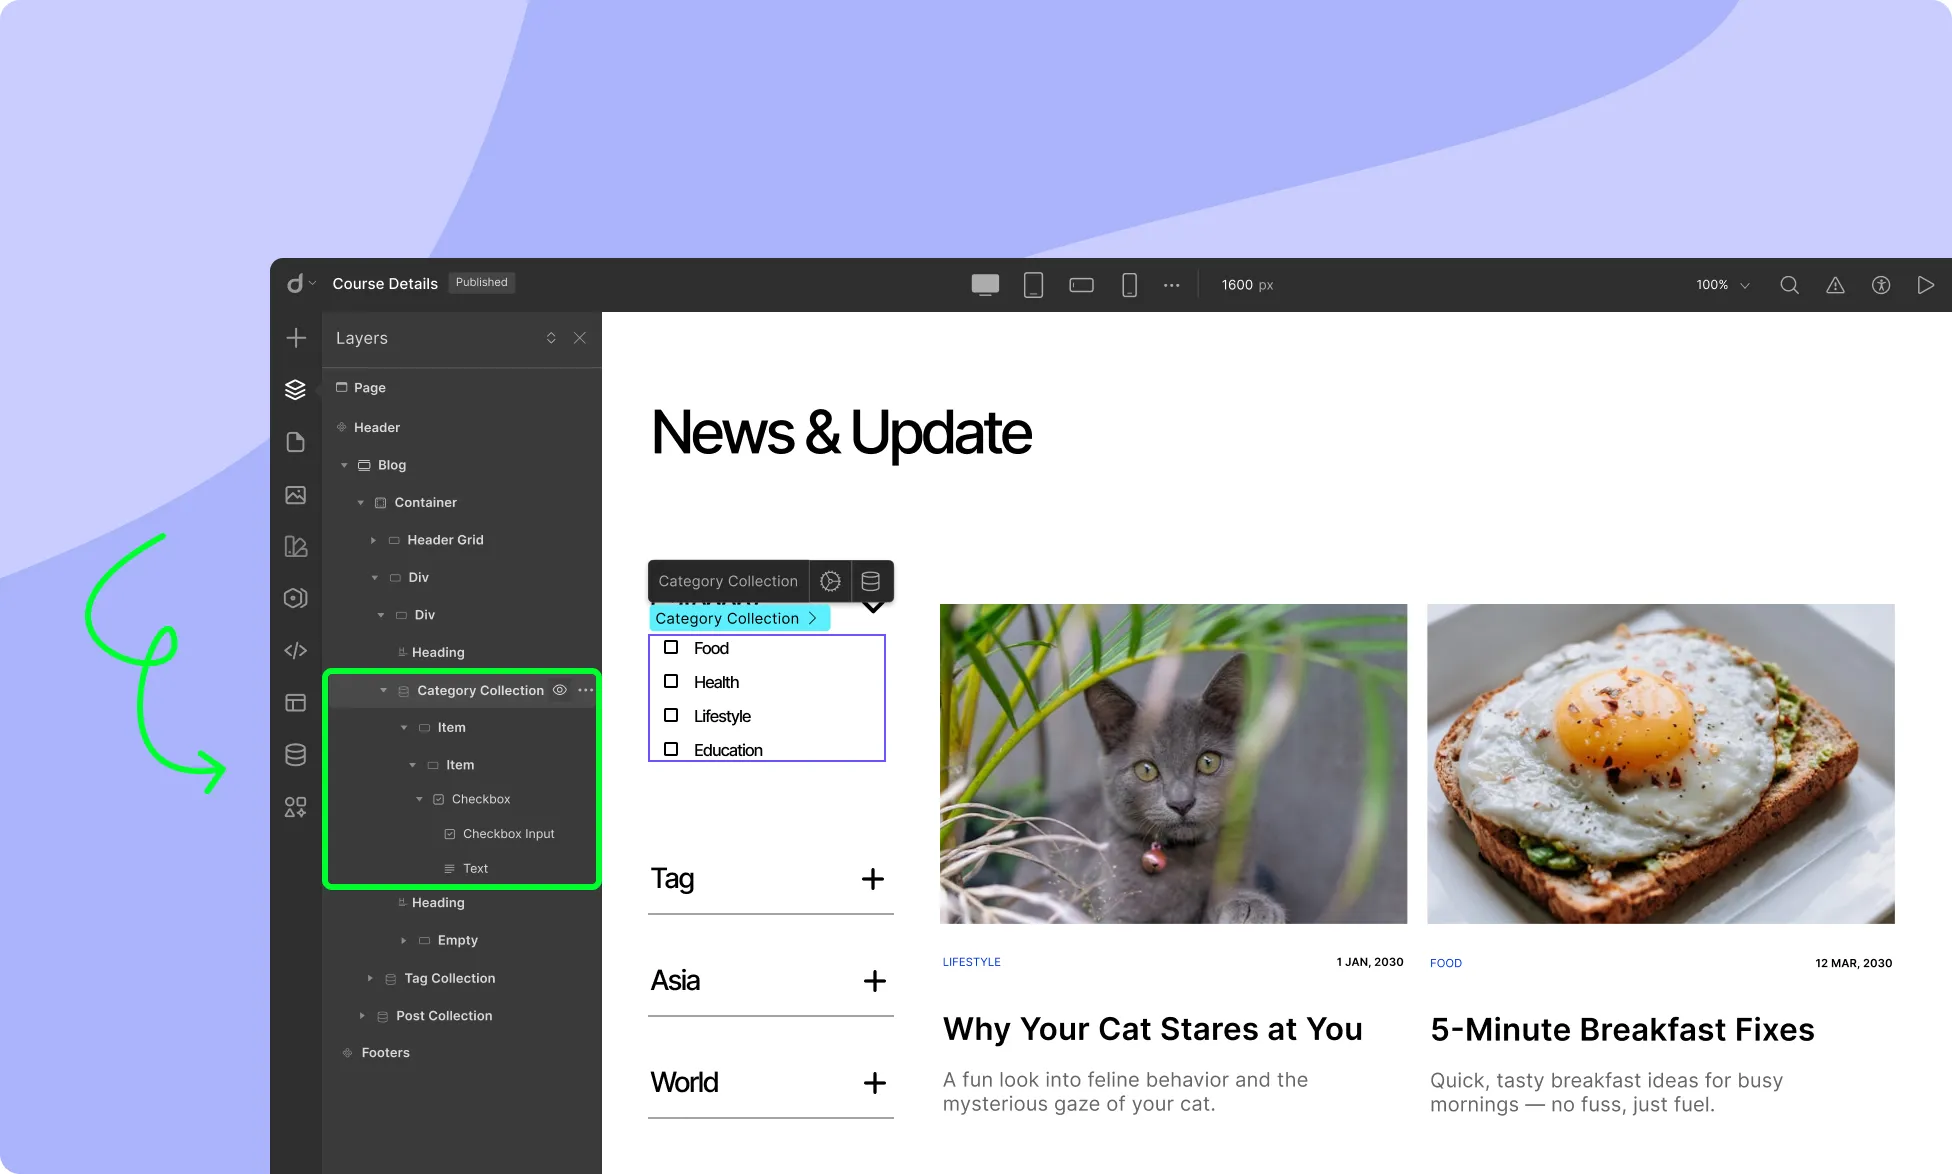
Add a New Collection Element: This collection will be responsible for creating the filter functionality. The key to this Collection Element is that it should only contain the checkbox element as collection items.
Add Checkbox: Insert the Checkbox Element into this Collection to dynamically display the categories, tags, or custom taxonomies as checkboxes that your posts fall under.
Step 3: Configure Collection Settings for the Filter
Now, configure the Collection settings for the filter functionality to connect it with your post collection.
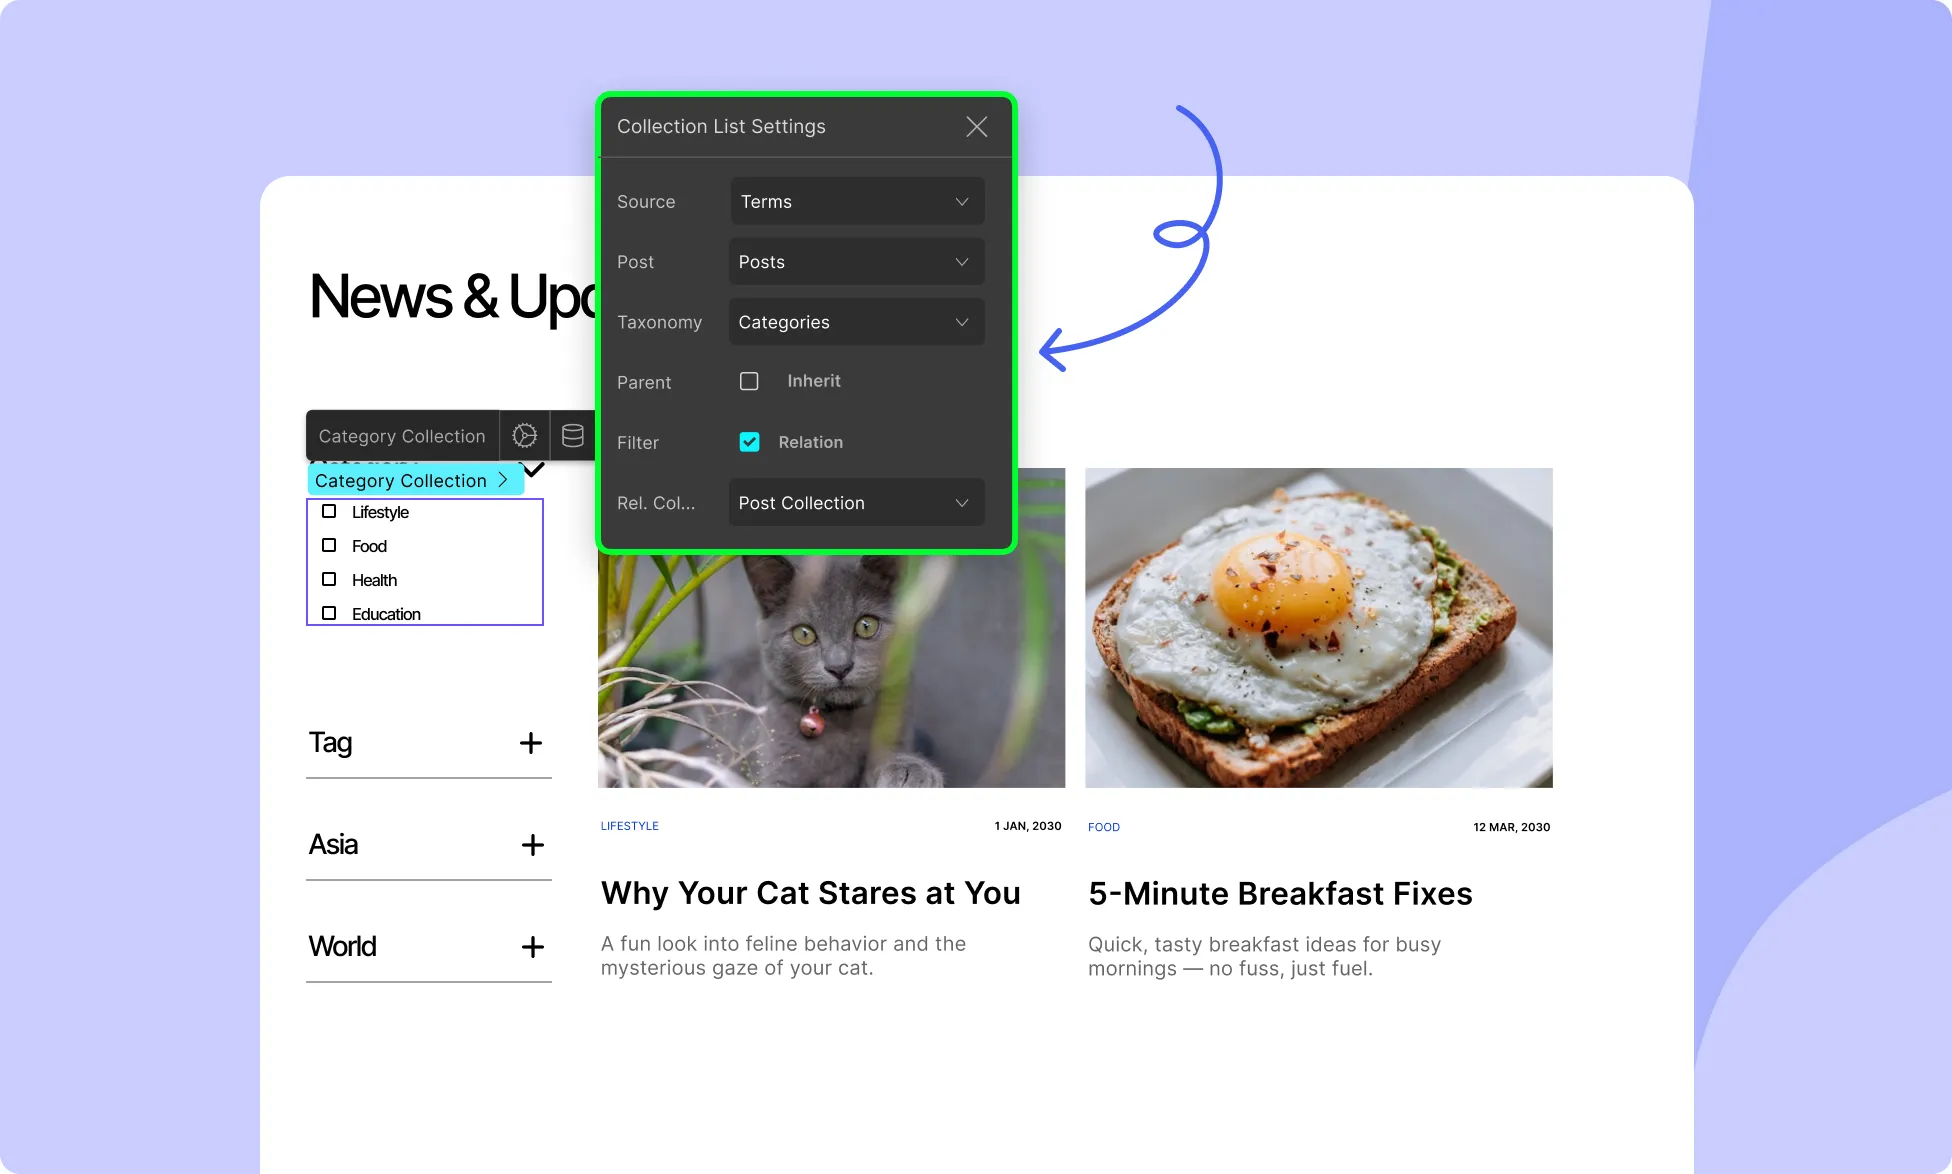
Set Collection Type: In the Collection settings, set the Collection Type to Terms. For the Post field, select Posts.
Select the Appropriate Taxonomy: In the Taxonomy field, select the relevant taxonomy you want to filter by. This could be Categories, Tags, or any custom taxonomy you have on your WordPress site.
Set Relation as Filter: Under the Relation option, tick the checkbox to enable Filter. This will link the checkbox collection with the filtering functionality.
Link the Filter Collection with the Post Collection: In the Collection field, select the Collection you want to apply the filter functionality on. This step connects the checkboxes to your list of posts, allowing them to filter the posts based on the selected criteria (categories, tags, etc.).
Step 4: Preview the Filter Functionality
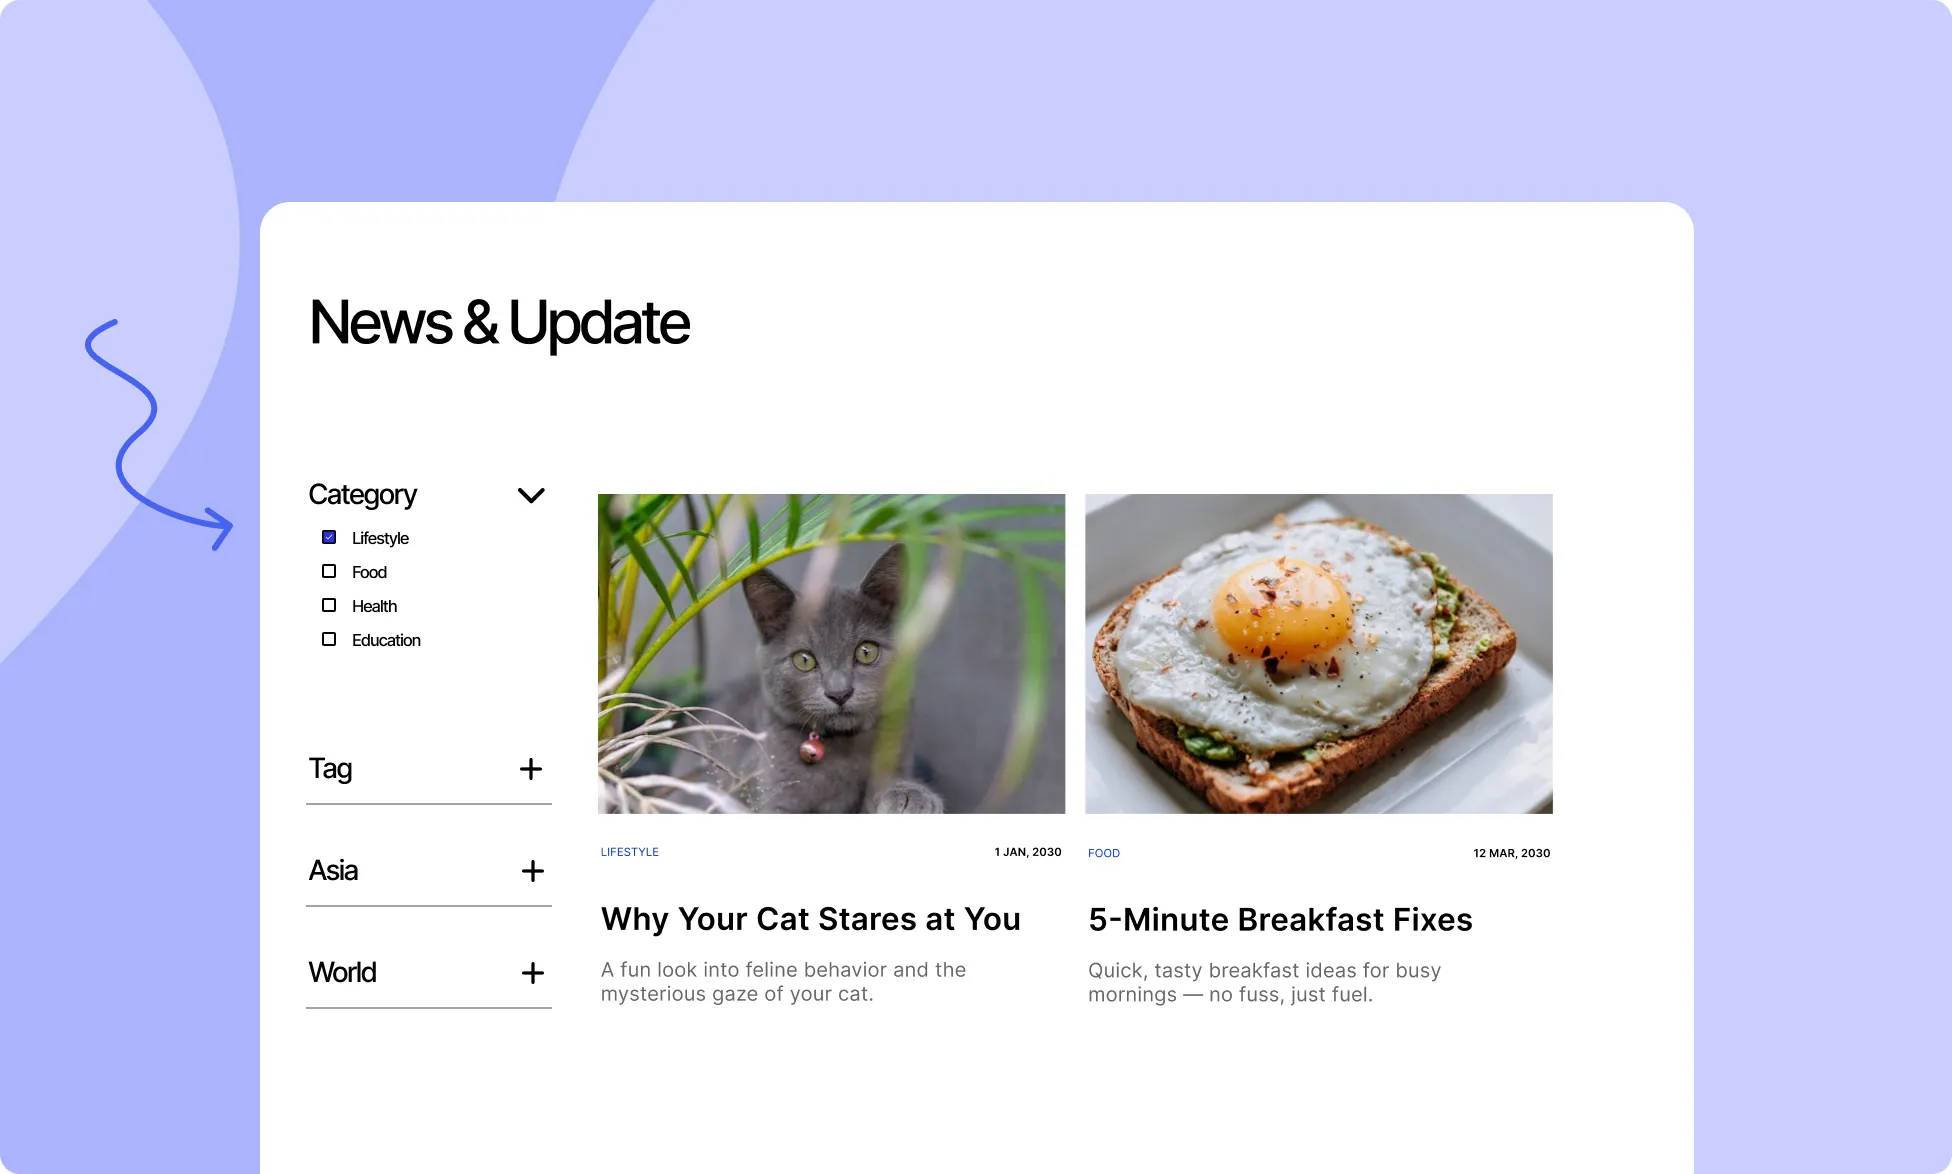
Once the settings are configured, preview your page to see the filter in action.
Users should now be able to check and uncheck the checkboxes, and the WordPress posts will dynamically update based on the selected filters.
With Droip’s Collection Element, creating a filter functionality for WordPress posts is a simple yet powerful feature. By using dynamic data, and advanced collection settings, you can offer a seamless and interactive user experience, allowing visitors to filter posts by categories, tags, or other taxonomies.
Elements by default may show some placeholder content when dropped onto the canvas which you can manually change. This type of content is what we call Static.
However, you can configure certain elements to display Dynamic content too! Outside of a Collection, this can be handy if you want to display the current post’s title, excerpt, image, related comments, taxonomies, etc.
Below is a list of the elements that can display Dynamic Content and instructions on how to go about it.
Elements That Can Display Dynamic Content
Heading
Paragraph
Button
Link Block
Image
Form Element – Label
Configure Elements to Display Dynamic Content
Displaying dynamic content using these elements is simple. Just follow the instructions below:
Start by selecting the element you want to use to display dynamic content.
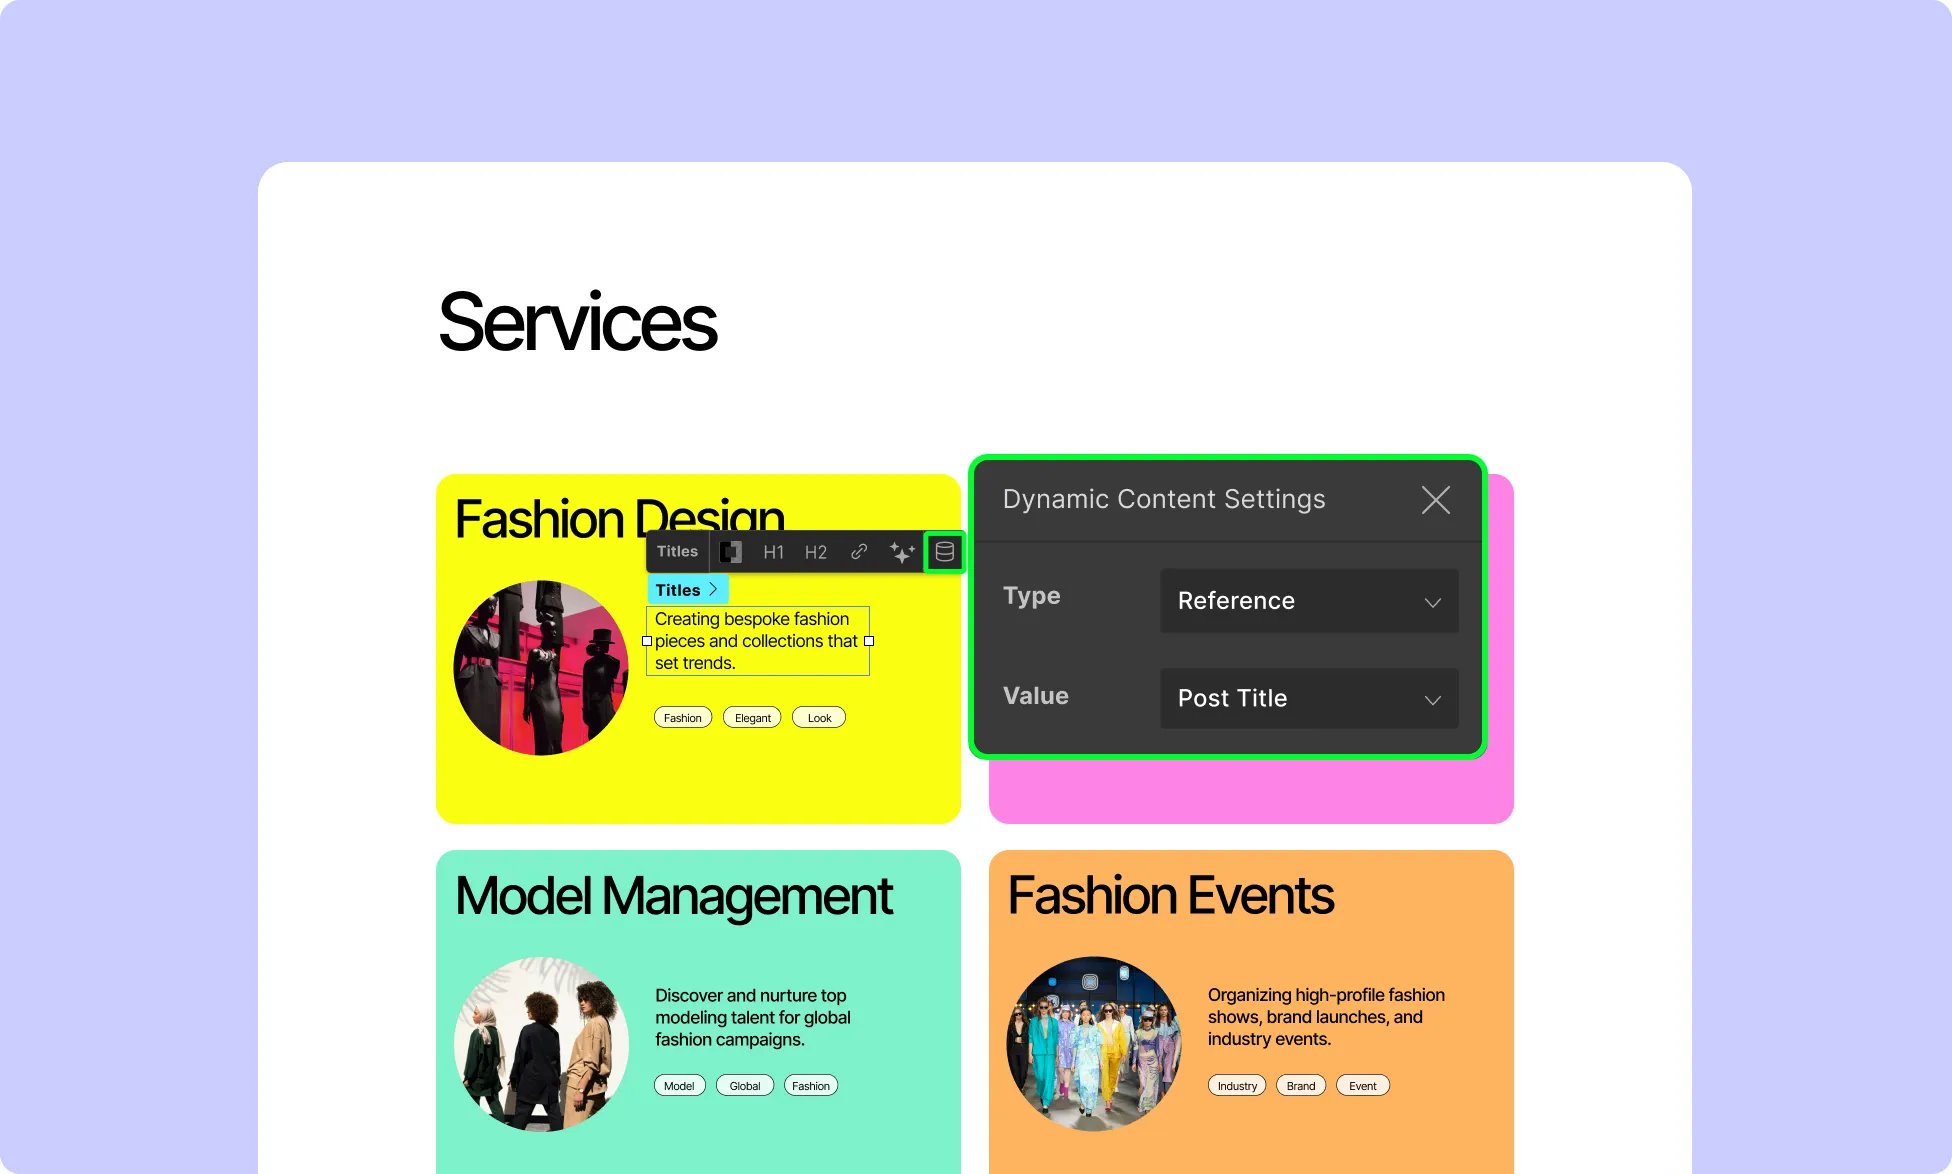
Then, from the inline editor click on the Data Collection icon. This will open Dynamic Content Settings.
From here, define the following:
Type: Select which type of Collection you want to show from here. Options are Post, Comment, or Terms.
Value: Select which value from the Collection you just chose that you want to fetch.
And that’s it! Now you can easily use these elements anywhere on your page with or without a Collection element and showcase dynamic data with just a few clicks.
For instance, to display the Page Title, you can just set the Type as Post and choose the Value as Title!
📝 Note: Again, keep in mind that these elements when used outside of a Collection, have the scope of dynamic content limited to the current page and everything related to it since you cannot define any specific Collection Item here.
Collections are a powerful way to fetch dynamic data to showcase on your website. Popular website pages that you can create using this element are Blog Archive Pages, Author List Pages, Documentation Archive Pages, and more!
Using Droip’s Collection element, you can easily narrow down the exact scope of the data you want to fetch through various criteria like Collection Type, Post Type, and Taxonomy! Depending on the structure of your website, the options listed within these types differ as they are also fetched dynamically.
How to Add a Collection
To add a Collection to your website, follow these steps:
From the Left Sidebar, go to Insert > Elements.
Scroll down to the Advanced section.
Drag & drop the Collection element onto your canvas.
Collection Types
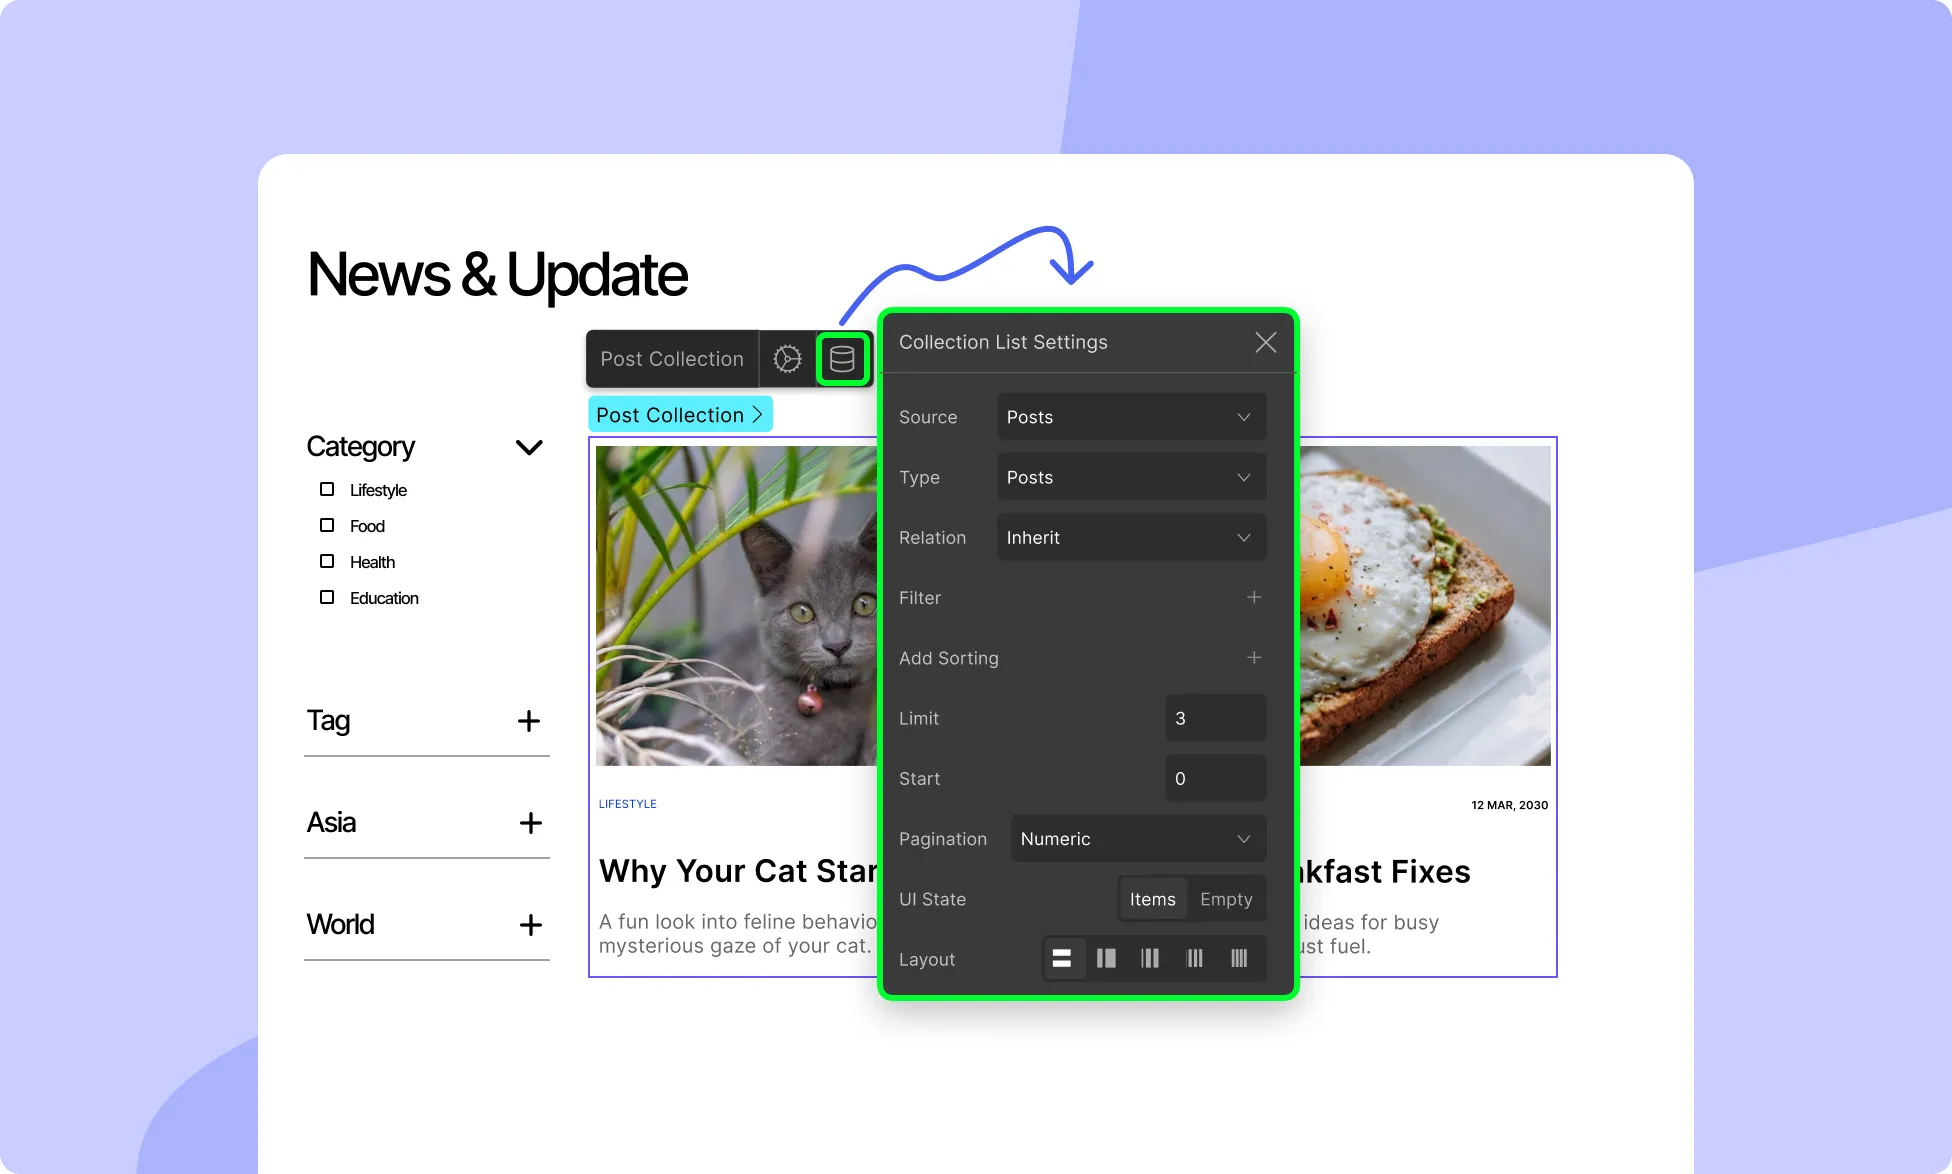
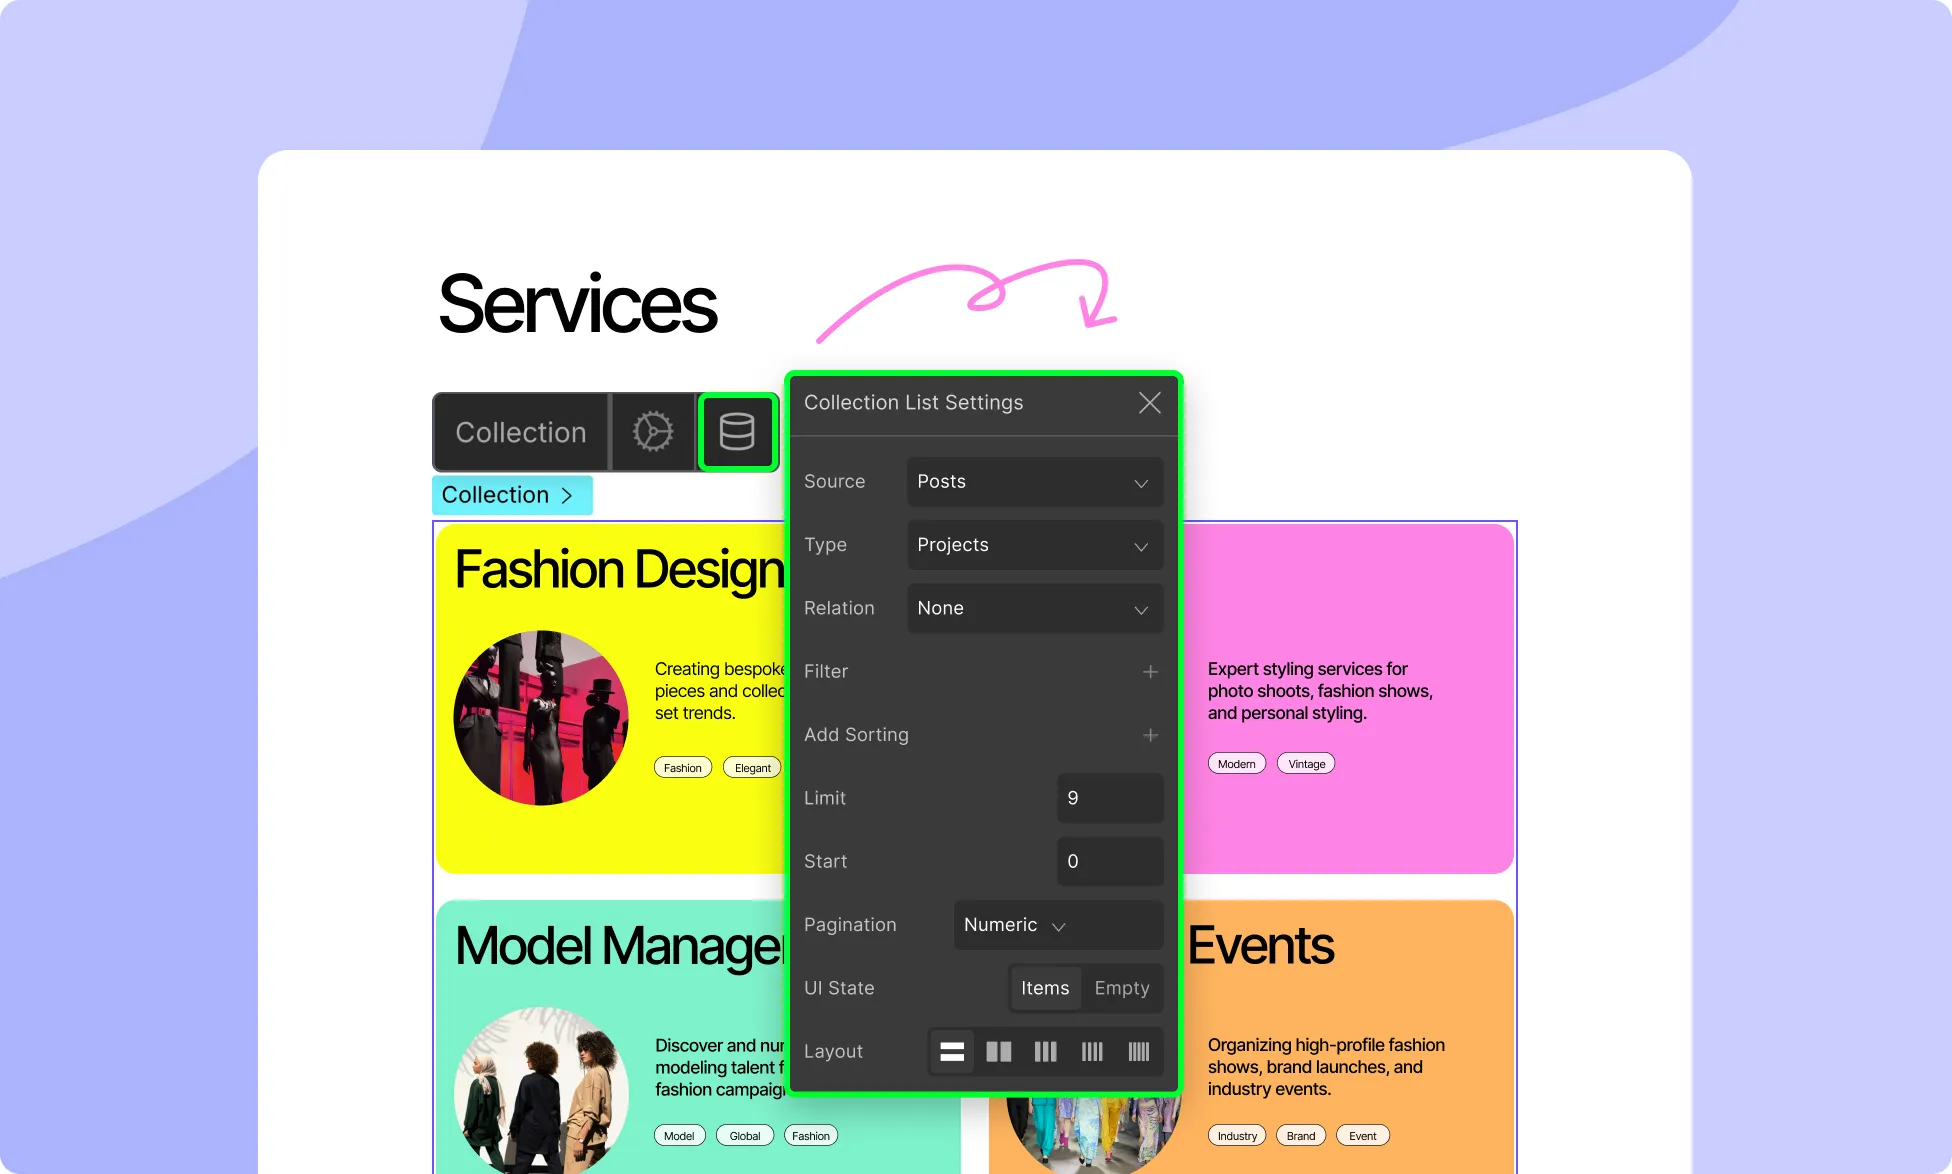
From the Collection Settings, you can define the scope of the data you want fetched and apply filtering, sorting, and other customizations. To access this, click on the Collection icon on the inline editor.
The first criterion you can set is the Collection Source. Here you’ll find the following options:
Post: Choose Post Collection if you want to fetch content from various Post Types such as Blog Posts, Pages, Custom CSS, etc.
Terms: Choose Terms Collection if you want to fetch the Categories, Tags, etc that your website content is organized by.
Users: Choose User Collection to fetch user data saved on your website.
Once you’ve selected your Collection Type, you can then configure the specific settings for that type.
Post Collection Settings
The first Collection option is Post. The Post Collection option extends beyond typical Blog Posts. In WordPress, various content types fall under the Post umbrella, including Pages, Attachments, and Custom CSS, among others.
Post Type
Once you set your Collection as Post, you can then go on to choose these specific Post Types. These options will vary based on the structure of your website.
Inheritance
Posts can be inherited. You can do so by ticking the Parent checkbox.
List Items Layout
Select the number of columns you want the Collection to consist of, ranging from 1 to 5 Columns.
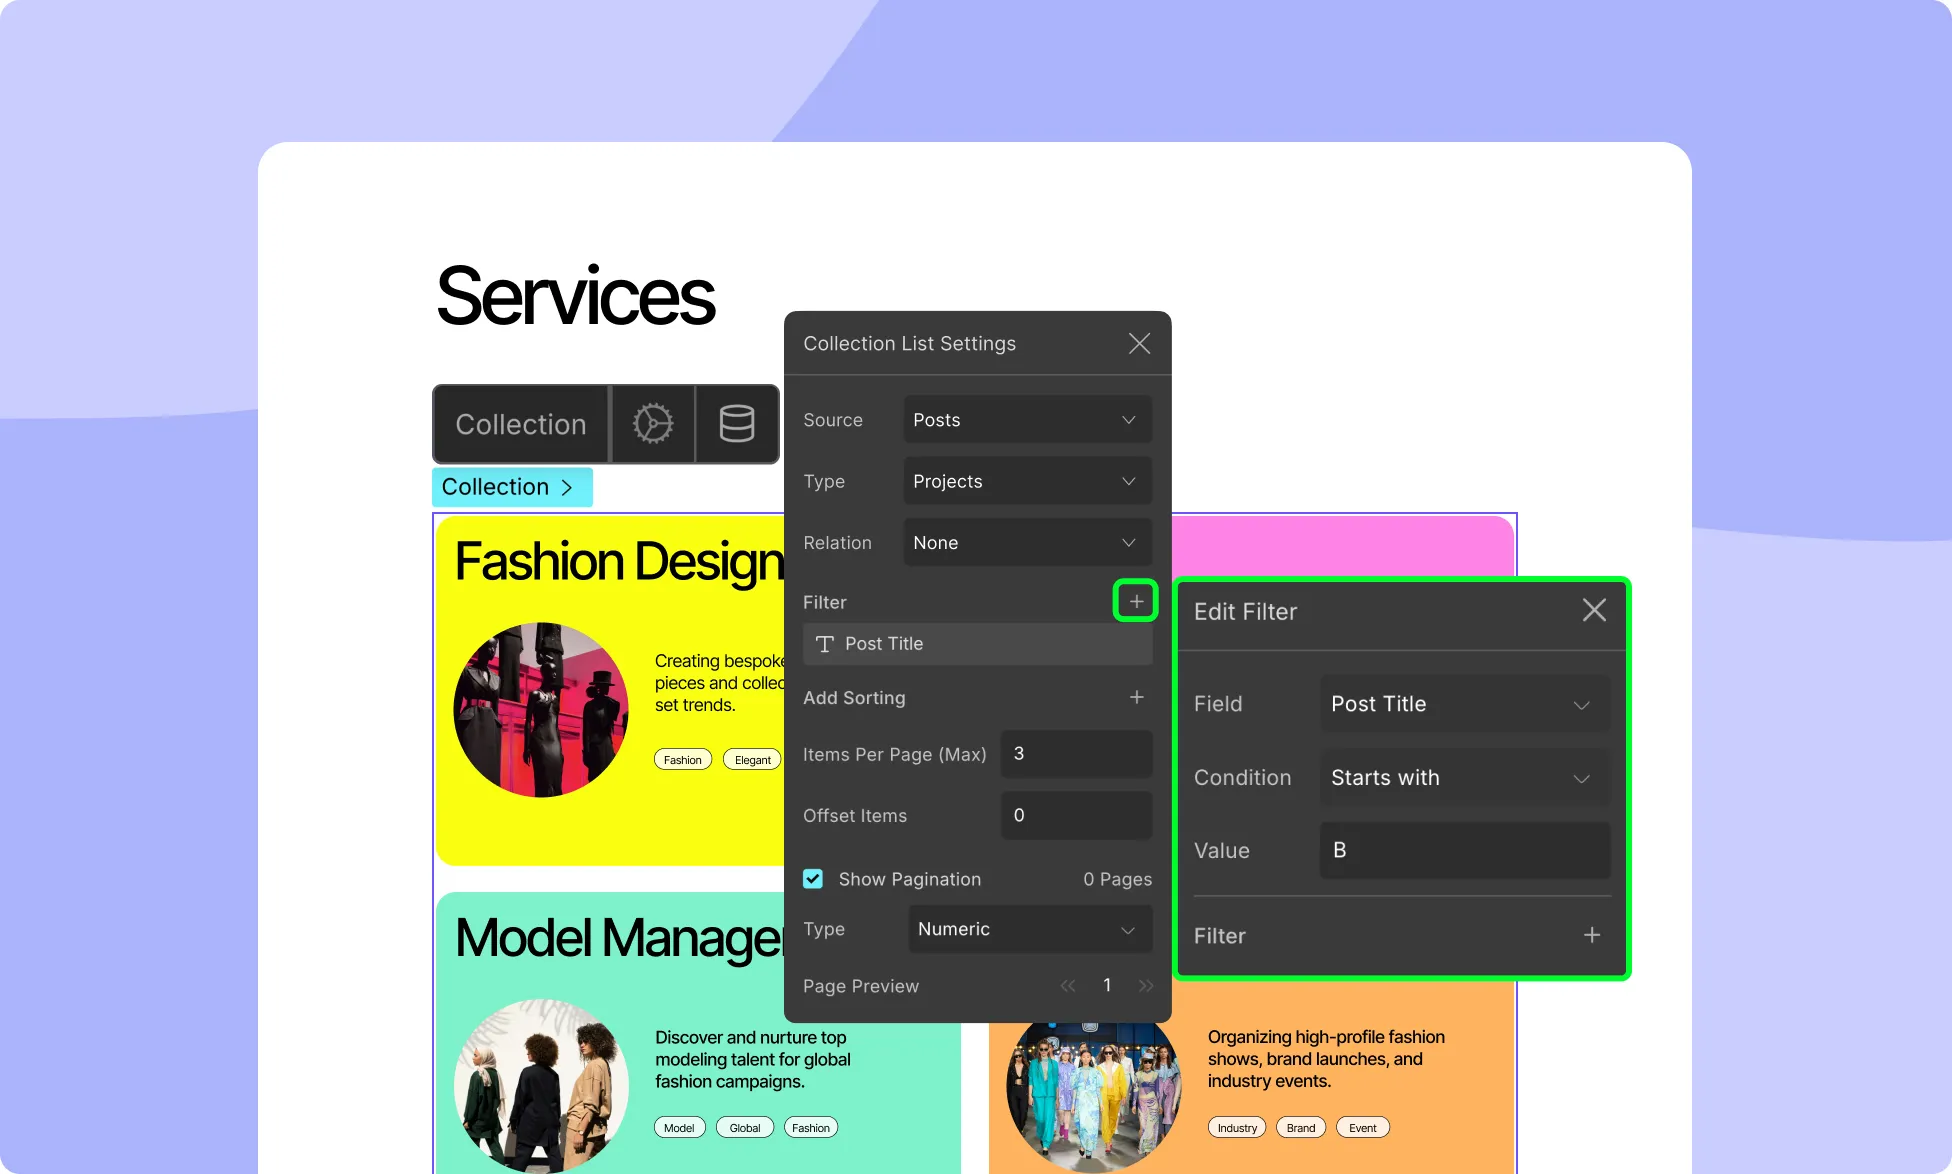
Filter
Set the filter method and criteria for the data. You can filter by:
Date: Define a specific period of time using start and end dates.
Category: Display data from a specific category or filter out data from a specific category.
Author: Show data from a specific author or exclude data from that specific author.
To add a filter, click on the + icon that’s in this section’s top right corner. A new window called Add Filter should appear from where you can select the Method and other conditions. You can add multiple filters like this.
To edit or delete a filter, use the ellipsis icon next to each filter.
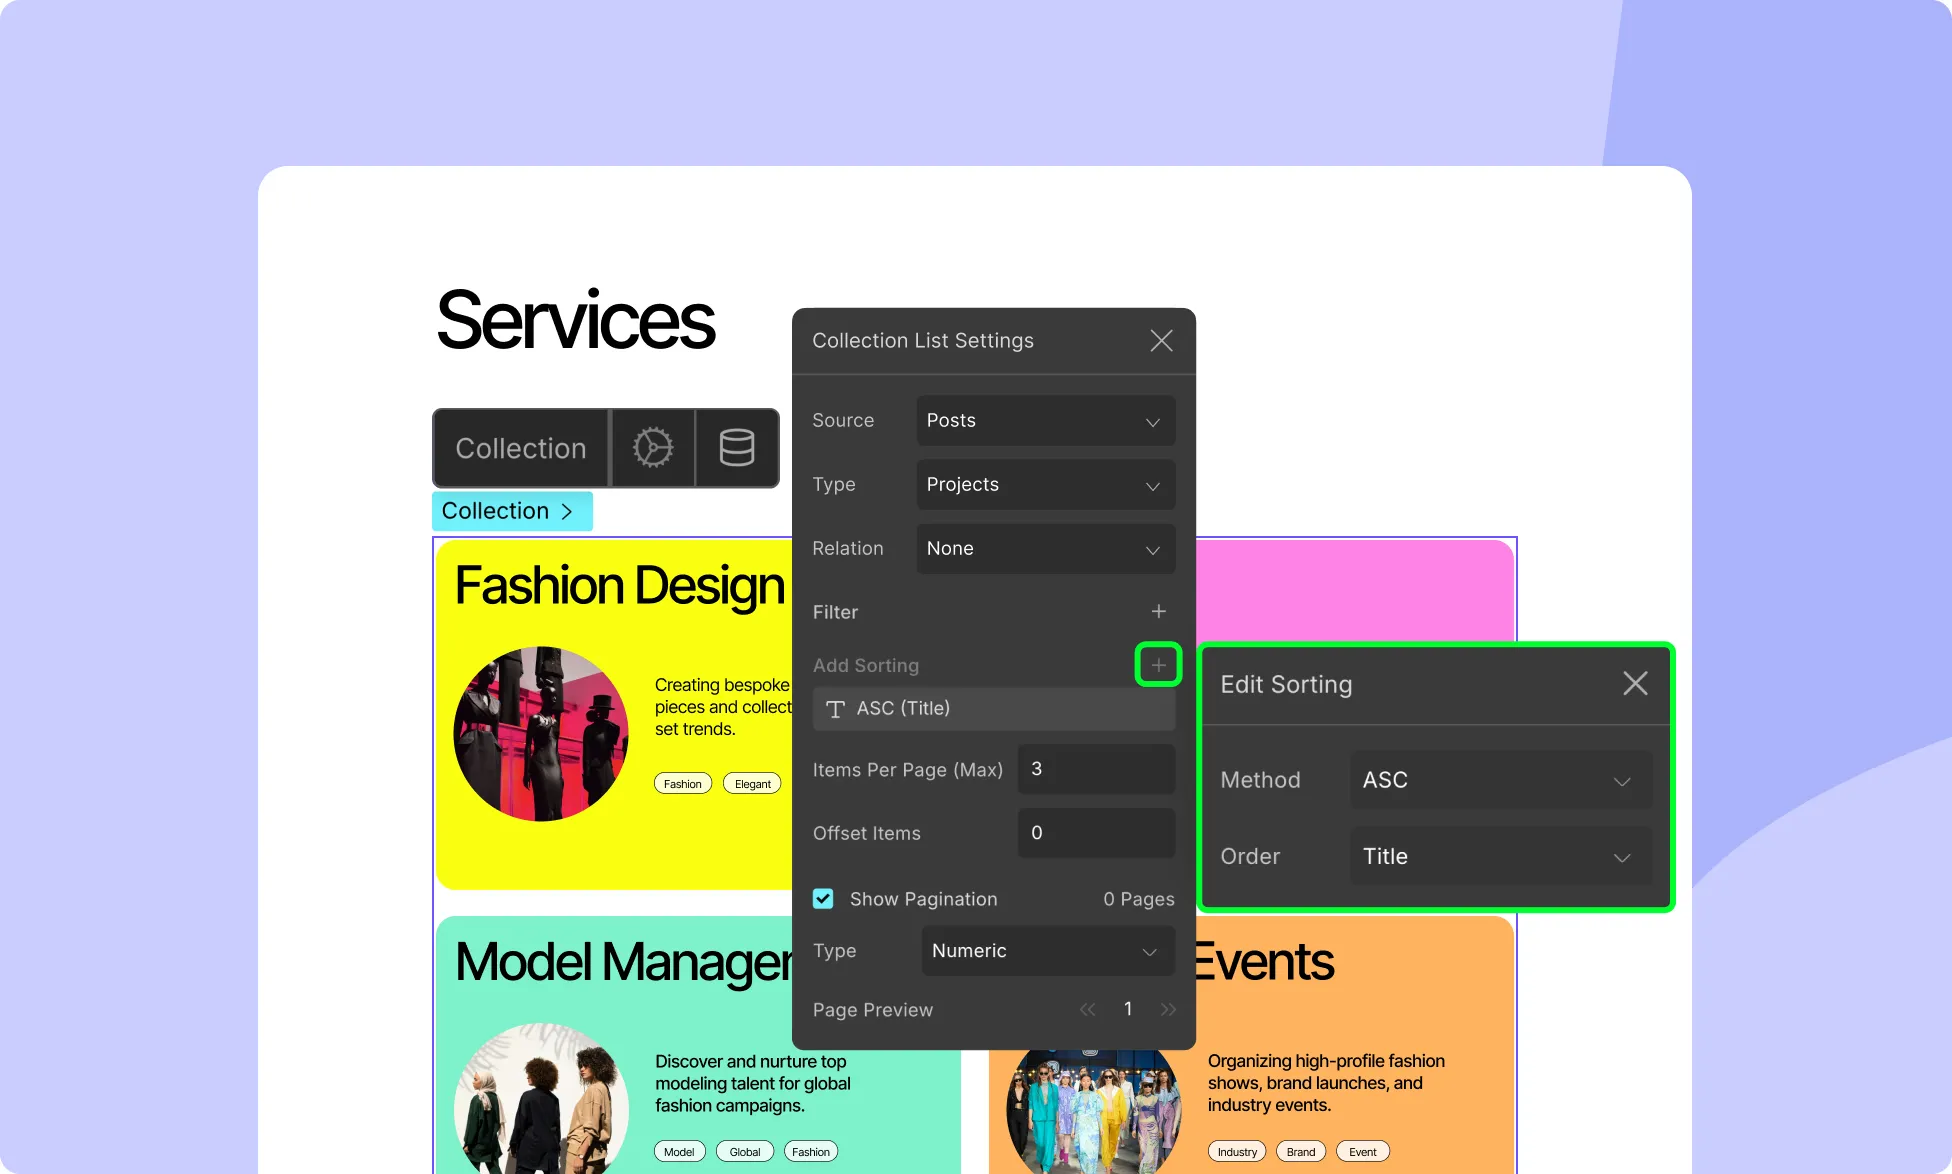
Sorting
Specify the conditions to sort the Items by setting the Method and Order. From Method, you can select either Ascending or Descending. And for Order, you can choose which Attribute to sort according to.
To sort, click on the + icon that’s in the top right corner. A new window called Add Sorting will appear from where you can set the Method and Order.
To edit a Sorting, click on the three-dot icon that is beside each of them and choose the Edit option. You can also delete the Sorting by clicking on the three-dot icon again and selecting the delete option.
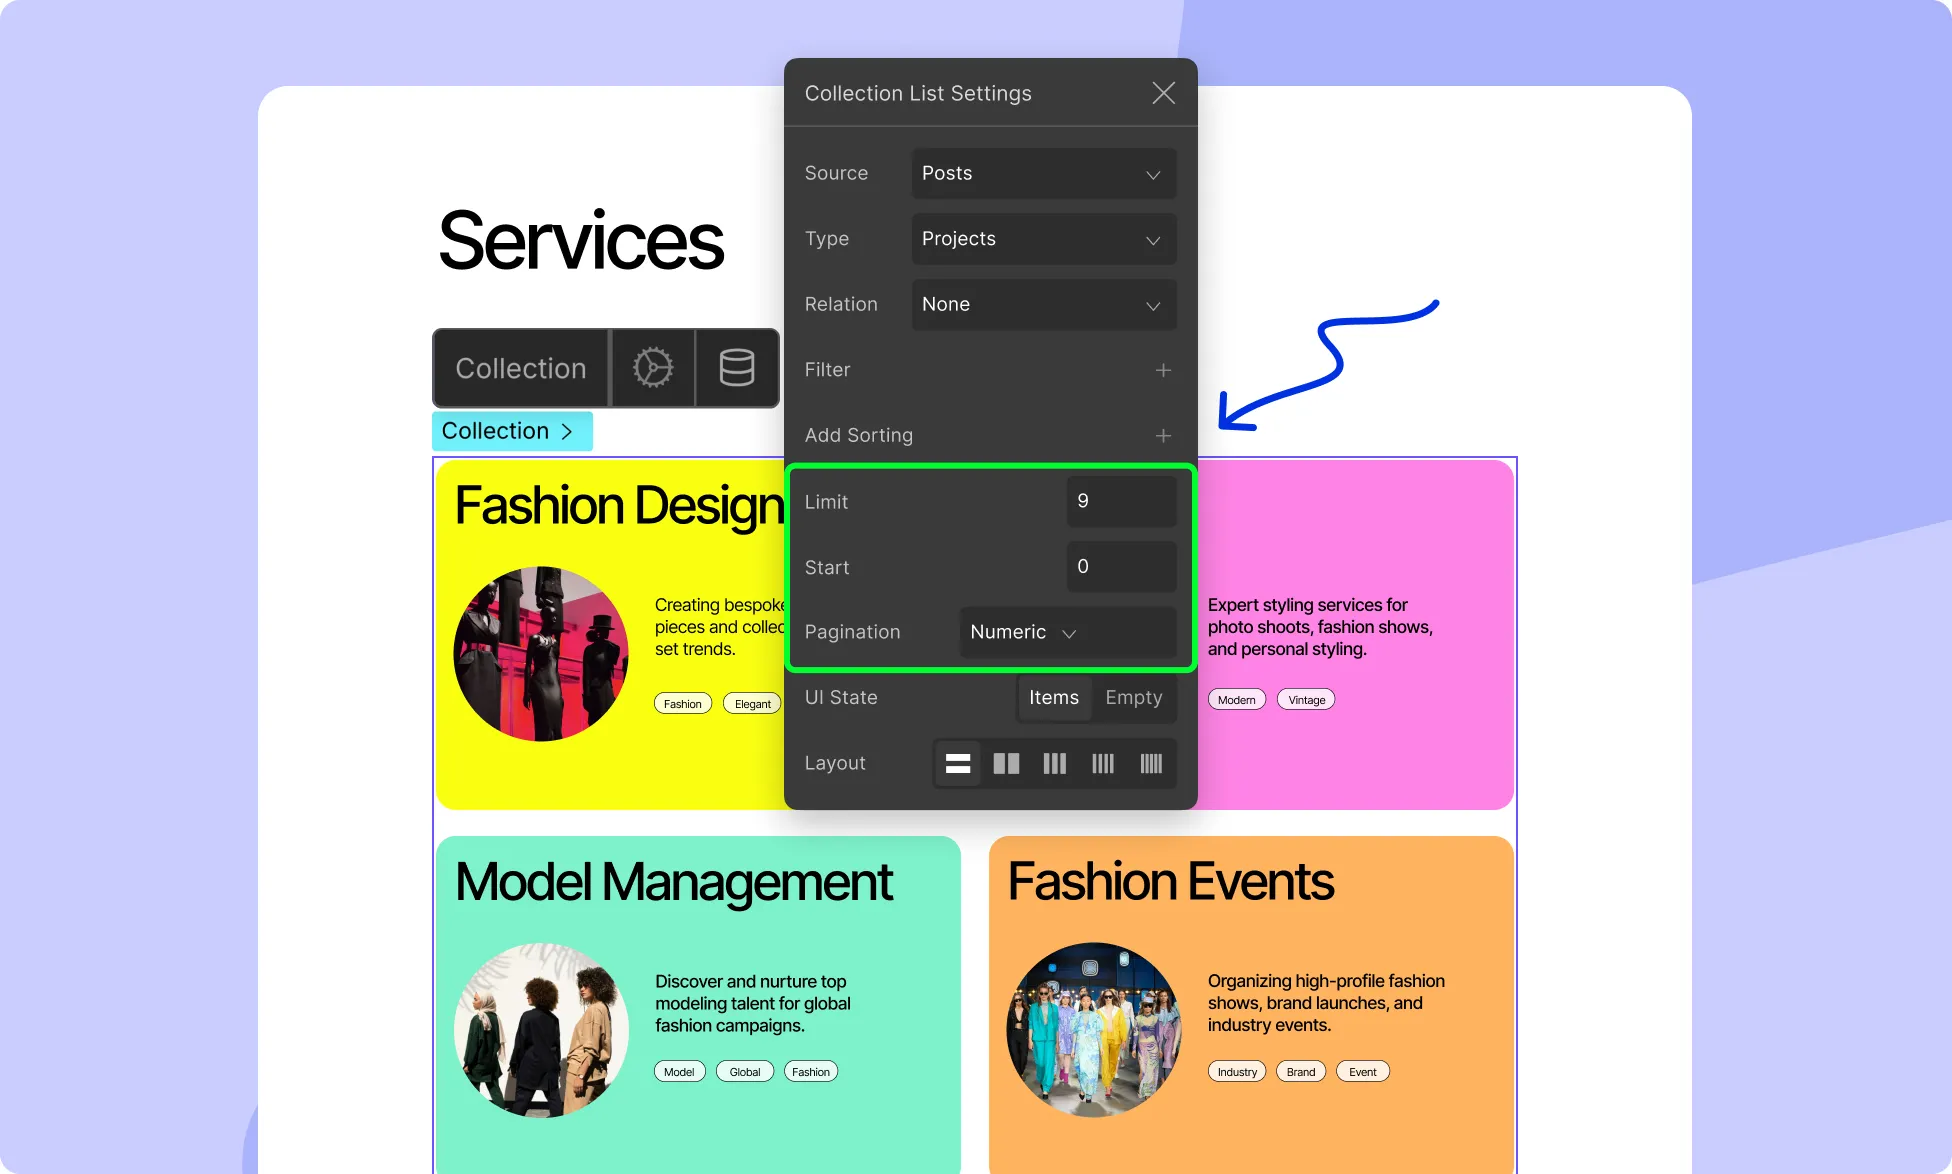
Items Pagination
Enable Items Pagination to limit the number of items displayed on each page. Once enabled, you will be able to set the following:
Items Per Page: Set the maximum number of items to display on each page.
Page Preview: Set the default page to preview.
These settings will be automatically reflected inside the previously empty Pagination Wrapper.
Comment Collection Settings
Similarly, ‘Comments’ are another type of content that you’ll often find on websites.
Comment Type
If you’ve selected Comment as your Collection, you can then go on to choose the Comment Type i.e. which set of comments you want to fetch.
Depending on your website’s structure and what’s installed on it, there can also be more than one Comment Type! Examples include Blog Post Comments, Product Reviews, etc.
Inheritance
Since comments are automatically inherited, nested comments can also be showcased easily.
Filter
Set the filter method and criteria for the Comments. You can filter by:
Date: Define a specific period of time using start and end dates.
Status: Show or filter out comments with a specific status.
Author: Display comments from a specific author or exclude ones from that specific author.
To add a filter, click on the + icon that’s in this section’s top right corner. A new window called Add Filter should appear from where you can select the Method and other conditions. You can add multiple filters like this.
To edit or delete a filter, use the ellipsis icon next to each filter.
Sort
Specify the conditions to sort the Comments by setting the Method and Order. From Method, you can select either Ascending or Descending. And for Order, you can choose which Attribute to sort according to.
To sort, click on the + icon that’s in the top right corner. A new window called Add Sorting will appear from where you can set the Method and Order.
To edit a Sorting, click on the three-dot icon that is beside each of them and choose the Edit option. You can also delete the Sorting by clicking on the three-dot icon again and selecting the delete option.
Items Pagination
Enable Items Pagination to limit the number of items displayed on each page. Once enabled, you will be able to set the following:
Items Per Page: Set the maximum number of items to display on each page.
Page Preview: Set the default page to preview.
These settings will be automatically reflected inside the previously empty Pagination Wrapper.
Term Collection Settings
Lastly, we have Terms. Terms can be anything from Categories to Tags. For this, you can select the following:
Post Type
As mentioned previously, a Post Type encompasses many forms of content in WordPress. Here, you’ll find the options for Posts, Pages, and more.
Taxonomy
In WordPress, Taxonomy is a grouping mechanism used to organize content. Examples include Categories, Tags, etc. You can also create custom Taxonomies for every Post Type.
The options in Taxonomy will differ based on the Post Type selected as each Post Type has a different set of Terms.
Inheritance
Terms can also be inherited. You can do so by ticking the Parent checkbox.
Collection List Content
After you’ve configured the Collection element settings, your Collection List will be populated by this content dynamically. This is because the elements that make up a Collection Item have been set up by default to dynamically retrieve the information from the CMS itself.
You can edit these settings by clicking on any one of these elements and opening its Dynamic Content Settings from their inline editor as shown in the image above. Here, you can choose the Type of Content in your data set you want to retrieve as well as specify its Value.
Static and Dynamic Elements in Collection
You can have both static and dynamic elements in your Collection List:
Static Elements
Static elements remain the same for all Collection Items. Simply drag and drop them from the Elements Panel into the collection, and they will be static by default.
Dynamic Elements
Certain Static Elements can be set up to fetch and show Dynamic Data. All you have to do is select it and click on the Data Collection icon to configure it.
Our website uses cookies to improve your browsing experience on our website. By continuing to use this website, you
agree to
their use. For details, please check our Privacy Policy.
Get started for free!
Start 90 days free trial!
Get Droip
Experience the power of Droip. Create stunning, responsive sites with pure creative freedom.